Writing a Web App from scratch
This page serves as a end-to-end example project for the JavaScript bindings of GreyCat with an emphasis on Web development.
For the complete documentation of the library @greycat/web, read the dedicated documentation.
Requirements
This tutorial requires:
- Node.js (>= 24)
pnpm(or any JavaScript package manager)- VitePlus+ CLI (
vp) — installation - Any recent Chromium-based browser, Firefox or Safari.
- GreyCat 7+ (see Setup)
Setup
To get started, lets ensure that GreyCat is installed globally:
curl -fsSL https://get.greycat.io/install.sh | bash -s stable
This tutorial assumes the host machine’s OS is Linux or MacOS. For the Windows installation, follow the instructions at https://get.greycat.io and adapt the different commands to a Windows environment.
Scaffolding the project
We provide an official template to get you started quickly with Web projects. Scaffold the project using VitePlus+:
vp create github:datathings/greycat-web-template
cd your-app-name
vp run setup
vp install
vp run setupfetches the latest GreyCat core and@greycat/webversions, updatingproject.gclandpackage.jsonautomatically.
The scaffolded project uses the greycat() VitePlus+ plugin (configured in vite.config.ts) which handles multi-page app setup, relative URLs, and proxying API requests to the GreyCat backend.
.
├── src/              # GreyCat server files (.gcl)
├── app/
│   ├── index.html    # Main HTML entry point
│   └── index.tsx     # Main page script
├── public/
├── project.gcl       # GreyCat's project entrypoint (eg. main())
├── vite.config.ts
└── package.json
Backend development
In this section we are going to write the server part of the project composed of:
- modeling the domain
- writing CSV importers
Defining the project’s domain
The goal of this project is to visualize sensors data coming from a GreyCat server into a Web application.
Lets pretend that the sensors data is coming from an external 3rd-party server under the form of CSV files, but for the sake of this tutorial
those files are going to be already available as static files.
Although periodically fetching external files and importing them into GreyCat is interesting and totally doable, it is out of scope for this tutorial.
The focus being on displaying data with@greycat/webrather than importing data.
To envision more what the data looks like, let’s show an excerpt:
SensorID,Latitude,Longitude,Type,Value,Timestamp
1,48.8566,2.3522,Temperature,23.5,2023-11-14T12:00:00
2,51.5074,-0.1278,Humidity,65.2,2023-11-14T12:05:00
3,49.6116,6.1319,Pressure,1012.3,2023-11-14T12:10:00
...
2,51.5074,-0.1278,CO2 Level,435,2023-11-14T20:05:00
3,49.6116,6.1319,Temperature,23.3,2023-11-14T20:10:00
4,59.9139,10.7522,Humidity,61.0,2023-11-14T20:15:00
The complete file is available to download here: sensors.csv
Download the file and add it at the root of the project in: data/sensors.csv.
Here’s a one-liner to do it:
mkdir -p data && wget https://doc.greycat.io/tutorials/advanced_web_app/assets/sensors.csv -O data/sensors.csv
Model the data
Looking back at the data/sensors.csv file, we see that we have:
| Column Name | Description |
|---|---|
SensorID |
int |
Latitude |
float |
Longitude |
float |
Type |
a kind of sensor from the following list: Temperature, Humidity, Light Intensity |
Value |
the actual value provided by the sensor as a float |
Timestamp |
a normalized UTC datetime that we are going to map as a time |
This translates almost 1:1 to GreyCat’s type system, so lets create a file in order to write our types:
# create a dedicated directory
mkdir -p src/model

# create a file for the types
touch src/model/sensors.gcl
Then in src/model/sensors.gcl paste the following:
type Sensor {
    /// Maps to `SensorID`
    id: int;
    /// Maps to `Latitude` and `Longitude`
    location: geo;
    /// Maps `Type=Temperature`, `Value`, `Timestamp`
    temperature: nodeTime<float>;
    /// Maps `Type=Humidity`, `Value`, `Timestamp`
    humidity: nodeTime<float>;
    /// Maps `Type=Light Intensity`, `Value`, `Timestamp`
    light: nodeTime<float>;
}
We create a Sensor type that contains timeseries for every possible types: temperature, humidity and light.
Now that we have our model setup, we can write an importer.
Import the data
In order to import the data, we need to import it somewhere, that somewhere will be a nodeIndex named sensors_by_id that will keep track of all the project sensors.
Go back to the src/model/sensors.gcl file and apply the following changes:
/// Index of `Sensor` by id
var sensors_by_id: nodeIndex<int, Sensor>;
/// Store the position so we can only import new data incase it gets incremntally updated
private var sensors_prev_pos: node<int?>;

type Sensor {
    /// Maps to `SensorID`
    id: int;
    /// Maps to `Latitude` and `Longitude`
    location: geo;
    /// Maps `Type=Temperature`, `Value`, `Timestamp`
    temperature: nodeTime<float>;
    /// Maps `Type=Humidity`, `Value`, `Timestamp`
    humidity: nodeTime<float>;
    /// Maps `Type=Light Intensity`, `Value`, `Timestamp`
    light: nodeTime<float>;
}

@volatile
enum SensorDataType {
    Temperature,
    Humidity,
    Pressure,
    "CO2 Level",
    Motion,
    "Light Intensity",
}

@volatile
type SensorRecord {
    id: int;
    /// Consumes two columns in a CSV
    coords: geo;
    /// Will try to match the name of the enum fields or fallback to `null` if none match.
    data_type: SensorDataType?;
    value: float;
    /// GreyCat's `time` type can be created from ISO8601 format
    date: time;

    /// Reads the given `path` using a `CsvReader<SensorRecord>` and
    /// populates the index `sensors_by_id`
    static fn import_from_file(path: String) {
        var reader = CsvReader<SensorRecord> {
            path: "data/sensors.csv",
            pos: *sensors_prev_pos,
            format: CsvFormat { header_lines: 1 },
        };

        while (reader.can_read()) {
            var line = reader.read();

            var sensor = sensors_by_id.get(line.id) ?? sensors_by_id.set(
                line.id,
                Sensor {
                    id: line.id,
                    location: line.coords,
                    temperature: nodeTime<float> {},
                    humidity: nodeTime<float> {},
                    light: nodeTime<float> {},
                }
            );

            // fill appropriate time series based on data type column
            if (line.data_type == SensorDataType::Temperature) {
                sensor.temperature.setAt(line.date, line.value);
            } else if (line.data_type == SensorDataType::Humidity) {
                sensor.humidity.setAt(line.date, line.value);
            } else if (line.data_type == SensorDataType::"Light Intensity") {
                sensor.light.setAt(line.date, line.value);
            } else {
                // ignore the rest
            }
        }

        // store the current position of the reader for future imports
        sensors_prev_pos.set(reader.pos);
    }
}
In order to ensure a certain level of type safety, we defined a SensorRecord that complies with our sensors.csv file records.
Then comes the actual iteration of the lines in the CSV file by leveraging CsvReader in the function SensorRecord::import_from_file.
You can refer to Features > CSV to get more insight into how CSV importers work in GreyCat.
Finally, we retrieve a Sensor instance from our sensors_by_id index, or we create a new one if none. And based on the ‘data_type’ column, we fill the proper timeserie with the float and time.
There we have it, our sensors.csv is ready to be imported in our GreyCat graph.
We now update the project.gcl file main function in order to call the importer:
@library("std", "7.4.150-dev");
@library("explorer", "7.4.14-dev");

@include("src");
@include("test");

fn main() {
    SensorRecord::import_from_file("data/sensors.csv");
}
And that’s it. We now have the data/sensors.csv file being read everytime we start GreyCat and the sensors_by_id index updated accordingly.
Create an API
In order to create an API in GreyCat, we only need to create functions that we @expose. Lets do this.
The only API we need for our project is a way to get the list of available sensors.
This is done quite easily by returning an Array<Sensor>.
Let’s create a new module: src/api.gcl:
// in src/api.gcl

@expose
fn sensors(): Array<Sensor> {
    var result = Array<Sensor> {};
    for (_, sensor in sensors_by_id) {
      result.add(sensor);
    }
    return result;
}
That’s it, we iterate over our index of sensors and accumlate the values in an array.
We can now move on to the frontend part.
Frontend development
From GCL to Javascript, the power of type Reflexivity
GreyCat comes with its own TypeScript declaration file (d.ts) code generator to allow type-safe access of types, enums and @exposed functions from TypeScript And/Or JavaScript.
For us to be able to use the Sensor type in the front and the @exposed function sensors(), we will need to generate the TypeScript declarations. Run:
greycat codegen ts
This auto-generates a project.d.ts file based on your project modules. This file must never be edited manually.
Start GreyCat in serve mode
Let’s start our GreyCat server in serve mode, so that it can answer queries:
greycat serve --user=1
--user=1means that every requests are impersonated to be therootuser, effectively bypassing authentication as this is out of the scope of this tutorial.
In another terminal now we will start our Web development server. This server will do 2 things:
- hot-reload the Web page when a changes happen in a TypeScript file
- proxy the API requests to our actual GreyCat server
vp dev
We can now open our favorite browser, and go to: http://localhost:5173
You should be greeted with an “The index page” message:
Display the sensors as-is
When quick prototyping Web applications, you often want to see what’s inside the response you get from the server. For this we’ve created two different Web component:
gui-valuewhich is going to print any given value as a stringgui-objectwhich is a more involved printer, that actually knows how to display complex data structures
To get started with our sensors list, we are going to display them using <gui-object />. In app/index/index.tsx, replace with the following:
With JSX:
import "@greycat/web";
import "@greycat/web/greycat.css";

await gc.sdk.init();

const sensors = await gc.api.sensors();

document.body.appendChild(
  <gui-layout>
    <div slot="header">Sensors</div>
    <gui-nav slot="navigation" />
    <div slot="main">
      <gui-object value={sensors} />
    </div>
  </gui-layout>,
);
Without JSX (vanilla DOM):
import "@greycat/web";
import "@greycat/web/greycat.css";

await gc.sdk.init();

const sensors = await gc.api.sensors();

const header = document.createElement("div");
header.slot = "header";
header.textContent = "Sensors";

const nav = document.createElement("gui-nav");
nav.slot = "navigation";

const main = document.createElement("div");
main.slot = "main";
const obj = document.createElement("gui-object");
obj.value = sensors;
main.appendChild(obj);

const layout = document.createElement("gui-layout");
layout.append(header, nav, main);
document.body.appendChild(layout);
JSX is a convenience layer, not a requirement. Both styles produce the same result and can be mixed freely in
.tsxfiles.
Once the change is made, save the file, and the browser should reload with the content of the sensors:
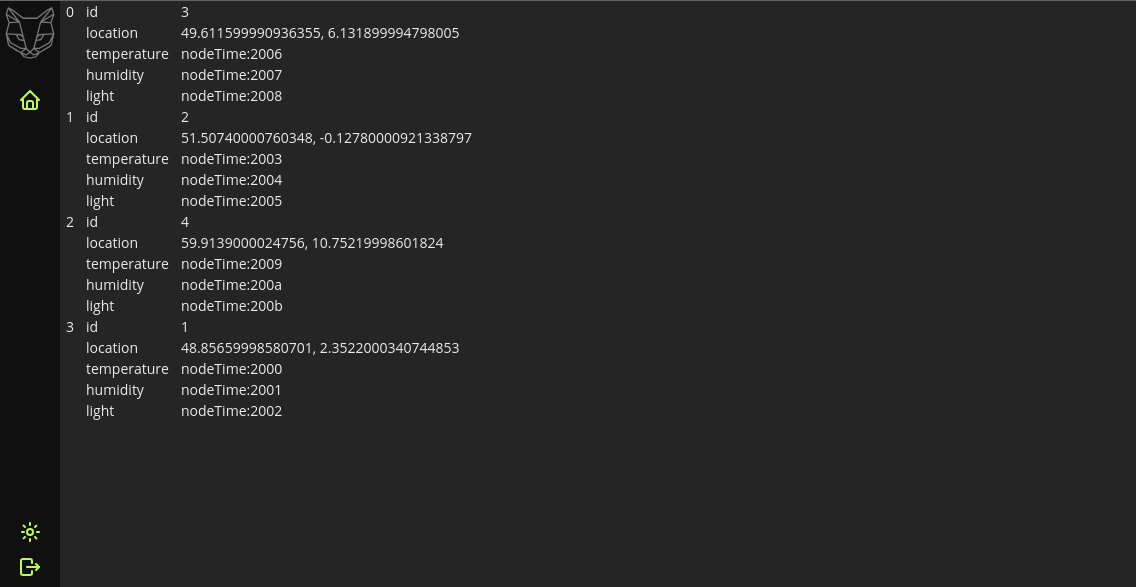
This is handy, but not ideal in our case. We can see our 4 sensors, but we actually would like to see the different captors data in, say, a table.
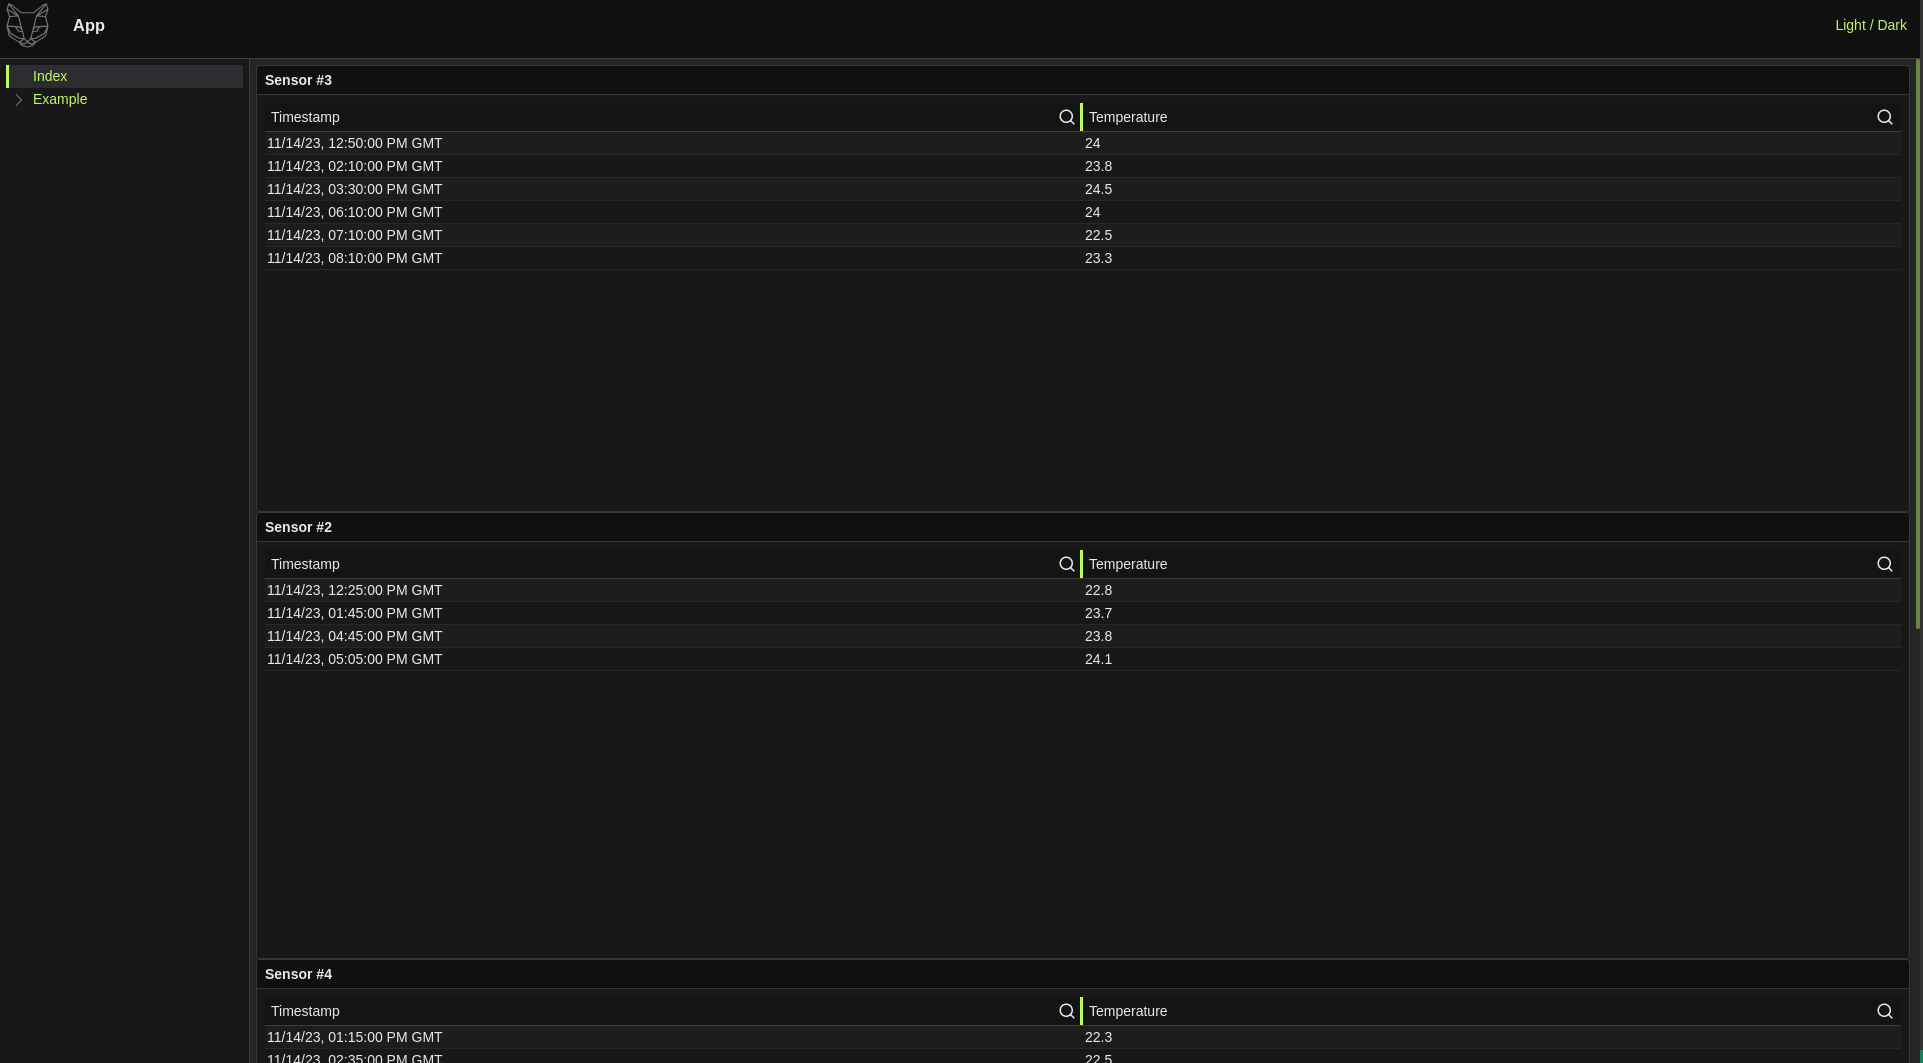
Display the timeseries in a table
As said before, <gui-object /> is good for prototyping, or displaying scalar values or POJOs, but when it comes to timeseries, often times, you want them to be displayed in a table containing 2 columns, one for the time and one for the value.
This is why every node type in GreyCat (nodeTime, nodeList, nodeIndex and nodeGeo) can be sampled to return a Table.
And because the Table type is in the std library, we also made a Web Component that knows how to display it.
Therefore, we are going to remove <gui-object /> , and make a dedicated Web Component for displaying sensors.
Instead of displaying the sensors variable using a <gui-object /> we are going to iterate over the sensors, and for each entry, create a Web Component called <app-sensor /> to which we give a reference to the sensor.
This means that we need to add another file app/common/app-sensor.tsx with the following content:
import { GuiElement, registerCustomElement } from "@greycat/web";

export class AppSensor extends GuiElement {
  private _sensor!: gc.Sensor;
  private _header: HTMLElement = document.createElement("span");
  private _content: HTMLElement = document.createElement("div");

  constructor() {
    super();

    this.shadowRoot.replaceChildren(
      <sl-card style={{ width: "100%" }}>
        <div slot="header">{this._header}</div>
        {this._content}
      </sl-card>,
    );
  }

  set value(sensor: gc.Sensor) {
    this._sensor = sensor;
    this.update();
  }

  async update(): Promise<void> {
    this._header.textContent = `Sensor #${this._sensor.id}`;

    try {
      const data = await gc.nodeTime.sample(
        [this._sensor.temperature],
        null,
        null,
        100,
        gc.SamplingMode.dense,
        null,
        null,
      );
      data.headers = ["Timestamp", "Temperature"];
      this._content.replaceChildren(<gui-table value={data} />);
    } catch (err) {
      this._content.replaceChildren(document.createTextNode("something went wrong"));
      console.error(err);
    }
  }
}

declare global {
  interface HTMLElementTagNameMap {
    "app-sensor": AppSensor;
  }

  namespace GreyCat {
    namespace JSX {
      interface IntrinsicElements {
        "app-sensor": GreyCat.Element<AppSensor>;
      }
    }
  }
}

registerCustomElement("app-sensor", AppSensor);
With our custom web component we just need to map it to our desired type and automatically passing an object of that type will return our custom web component
import "@greycat/web";
import "@greycat/web/greycat.css";
import { GuiFactory } from "@greycat/web";
import "~/common/app-sensor";

await gc.sdk.init();

// Add to our internal global component factory
GuiFactory.global.set(gc.sensors.Sensor._type, "app-sensor");

const sensors = await gc.api.sensors();

document.body.appendChild(
  <gui-layout>
    <div slot="header">Sensors</div>
    <gui-nav slot="navigation" />
    <div slot="main">
      {sensors.map((v) => (
        <gui-object value={v} />
      ))}
    </div>
  </gui-layout>,
);
This example demonstrates the usage of the factory, but one could have directly call
<app-sensor value={sensor} />and it have also worked the sameThe main advantage of the factory is the fact that any GreyCat component will be aware of “how” to display a specific instance of a type
Create a sensor
We now want to be able to create and register our own sensors manually from the Web application.
We would first need a new @exposed function in our server for this. Lets modify api.gcl and add the following:
// in src/api.gcl
// ...

@expose
fn createSensor(id: int, lat: float, lng: float) {
  var sensor = Sensor {
    id: id,
    location: geo{lat, lng},
    temperature: nodeTime<float>{},
    humidity: nodeTime<float>{},
    light: nodeTime<float>{},
  };
  sensors_by_id.set(id, sensor);
}
Save the file, restart GreyCat server by hitting Ctrl+c and then run greycat serve --user=1 again.
Also, because we’ve modified our public-facing API, we need to regenerate our TypeScript bindings by running greycat codegen ts.
Then, we go back to our frontend, and modify app/index/index.tsx to add a form for sensor creation.
By leveraging @greycat/web’s dynamic input, we can do this with little to no-code:
import "@greycat/web";
import "@greycat/web/greycat.css";
import "~/common/app-sensor";

await gc.sdk.init();

const object = document.createElement("gui-object");

const form = document.createElement("gui-input-fn");
form.value = new gc.api.createSensor$args(5, 6.5, 5.5);

async function fetchSensors() {
  object.value = await gc.api.sensors();
}

async function addSensor() {
  try {
    await gc.api.createSensor.apply(null, form.args);
    await fetchSensors();
  } catch (err) {
    // TODO: a real application should take errors into consideration
    console.error(err);
  }
}

document.body.appendChild(
  <gui-layout>
    <div slot="header">Sensors</div>
    <gui-nav slot="navigation" />
    <div slot="main">
      {form}
      <sl-button onclick={addSensor}>Add</sl-button>
      {object}
    </div>
  </gui-layout>,
);

fetchSensors(); // fetch data at initialization