In this page
External SSO
Introduction
The Enterprise licensed GreyCat facilitates Single Sign-On (SSO) by integrating an OpenID Connect client. This solution ensures GreyCat’s compatibility with any SSO provider implementing the OpenID Connect protocol. This feature streamlines the integration of GreyCat services into clients’ existing ecosystems. They can seamlessly utilize their unique SSO service to manage employee access to GreyCat services. Below is a diagram that illustrates the complete authentication flow of GreyCat when using an external SSO provider:
Open ID connect is a protocol based on Oauth2 requiring an ID_Token as the proof of authentication. Note that for some SSO providers, returning ID_Token is optional. Ensure this option is activated in your configuration when using such a provider, such as Azure Entra. Additionally, GreyCat utilizes the implicit flow among all possible flows of Open ID Connect protocol. Ensure the SSO provider is configured to support this flow.
After authentication, GreyCat maintains a GreyCat session-ID based server-side session to keep connections alive since the SSO’s JWT ID Token is not typically meant to be used to maintain sessions (although it could be). GreyCat’s session expires regularly and the frontend of GreyCat will thus communicate with the SSO provider to verify if a user is still connected. If so, the provider will reply with the latest ID_Token and the GreyCat session will be renewed on the server-side.
The GreyCat session’s default lifetime is short (one day - 86400 seconds) in order to refresh a user’s latest personal information through the updated latest ID_Token’s claims, for example, the user’s role. Be aware that if the user’s information is updated on the SSO provider’s server, this modification won’t be synchronized to GreyCat until the user’s GreyCat session expires, unless the user disconnects and reconnects from GreyCat manually.
Important feature
Role mapping
GreyCat relies on a Role Based Access Control (RBAC) to enforce fine-grain security controls. Each role is often granted a collection of permissions. You can customize the role definitions and the permissions granted to the on GreyCat through the file that locates at *[GreyCat_Project_Root]/gcdata/security/user_policy.json*. Meanwhile, GreyCat provides some standard default roles for out-of-the-box usage.
Each user can only be linked to a single role, and you can easily map these GreyCat user roles to the roles previously defined or to be defined in the future on your SSO provider’s side. This operation should be done on the configuration page of your SSO provider.
After modifying the role mapping/assignment configurations on one user’s SSO provider’s side, this user needs to disconnect and reconnect to GreyCat in order to synchronize the role mappings immediately. Here’s where you find role mapping/assignment configuration on Azure Entra:
Configurations
Where to configure?
You can pass SSO related configurations to GreyCat either by command-line arguments at launch or by environment variables.
- Pass arguments when launching from CLI: You can retrieve information related to these arguments by running ‘greycat server -h’. Here are some examples:
--oid_client_id=<str> OpenID Client ID to use for connection
--oid_config_url=<str> url to retrieve the OpenID configuration object
- Define environment variables: You can define the configurations in ‘.env’ file or define environment variables globally. Since the globally defined variables are visible to other programs as well, we use a ‘GREYCAT_’ prefix for the environment variable names to avoid conflicts with other programs. Here are a few examples:
GREYCAT_OID_CLIENT_ID=<str> OpenID Client ID to use for connection
GREYCAT_OID_CONFIG_URL=<str> url to retrieve the OpenID configuration object
What to configure?
On GreyCat’s side
The configurations might vary slightly for each SSO service provider, but you always need to define at least these minimum configurations for GreyCat to support OpenID authentication:
- Config_URL: This URL is where greycat retrieves the specific SSO server-side configurations related to Open ID for your SSO service instance. The URL varies for different providers and for different service groups (tenants/directories).
- Client_ID: Also called Application ID on some platforms, basically, it allows the platform to identify your SSO service instance.
Depending on the SSO provider, you might need to configure a OpenID public key which is used to validate the ID token’s signature. For example, this is necessary for KeyCloak but not for Azure. For Azure, this public key is dynamically updated after certain period and it is exposed to the application (in our case, GreyCat) through the Config_URL.
On SSO provider’s side
SSO provider’s Critical settings:
- Implicit flow: Open ID Connect is built on top of OAuth2, it supports thus three different flows. In the case of GreyCat, we use the implicit flow and we will require the SSO service provider to send us an ID_Token in the response. So make sure the Implicit is supported and activated on your SSO provider’s settings. (For Azure Entra, it’s always activated.)
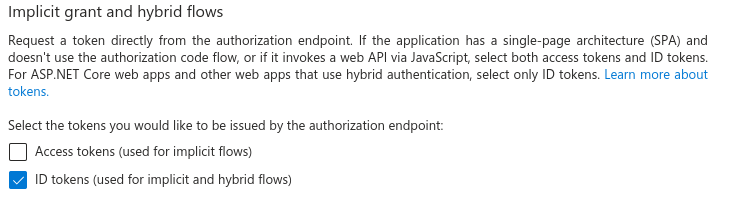
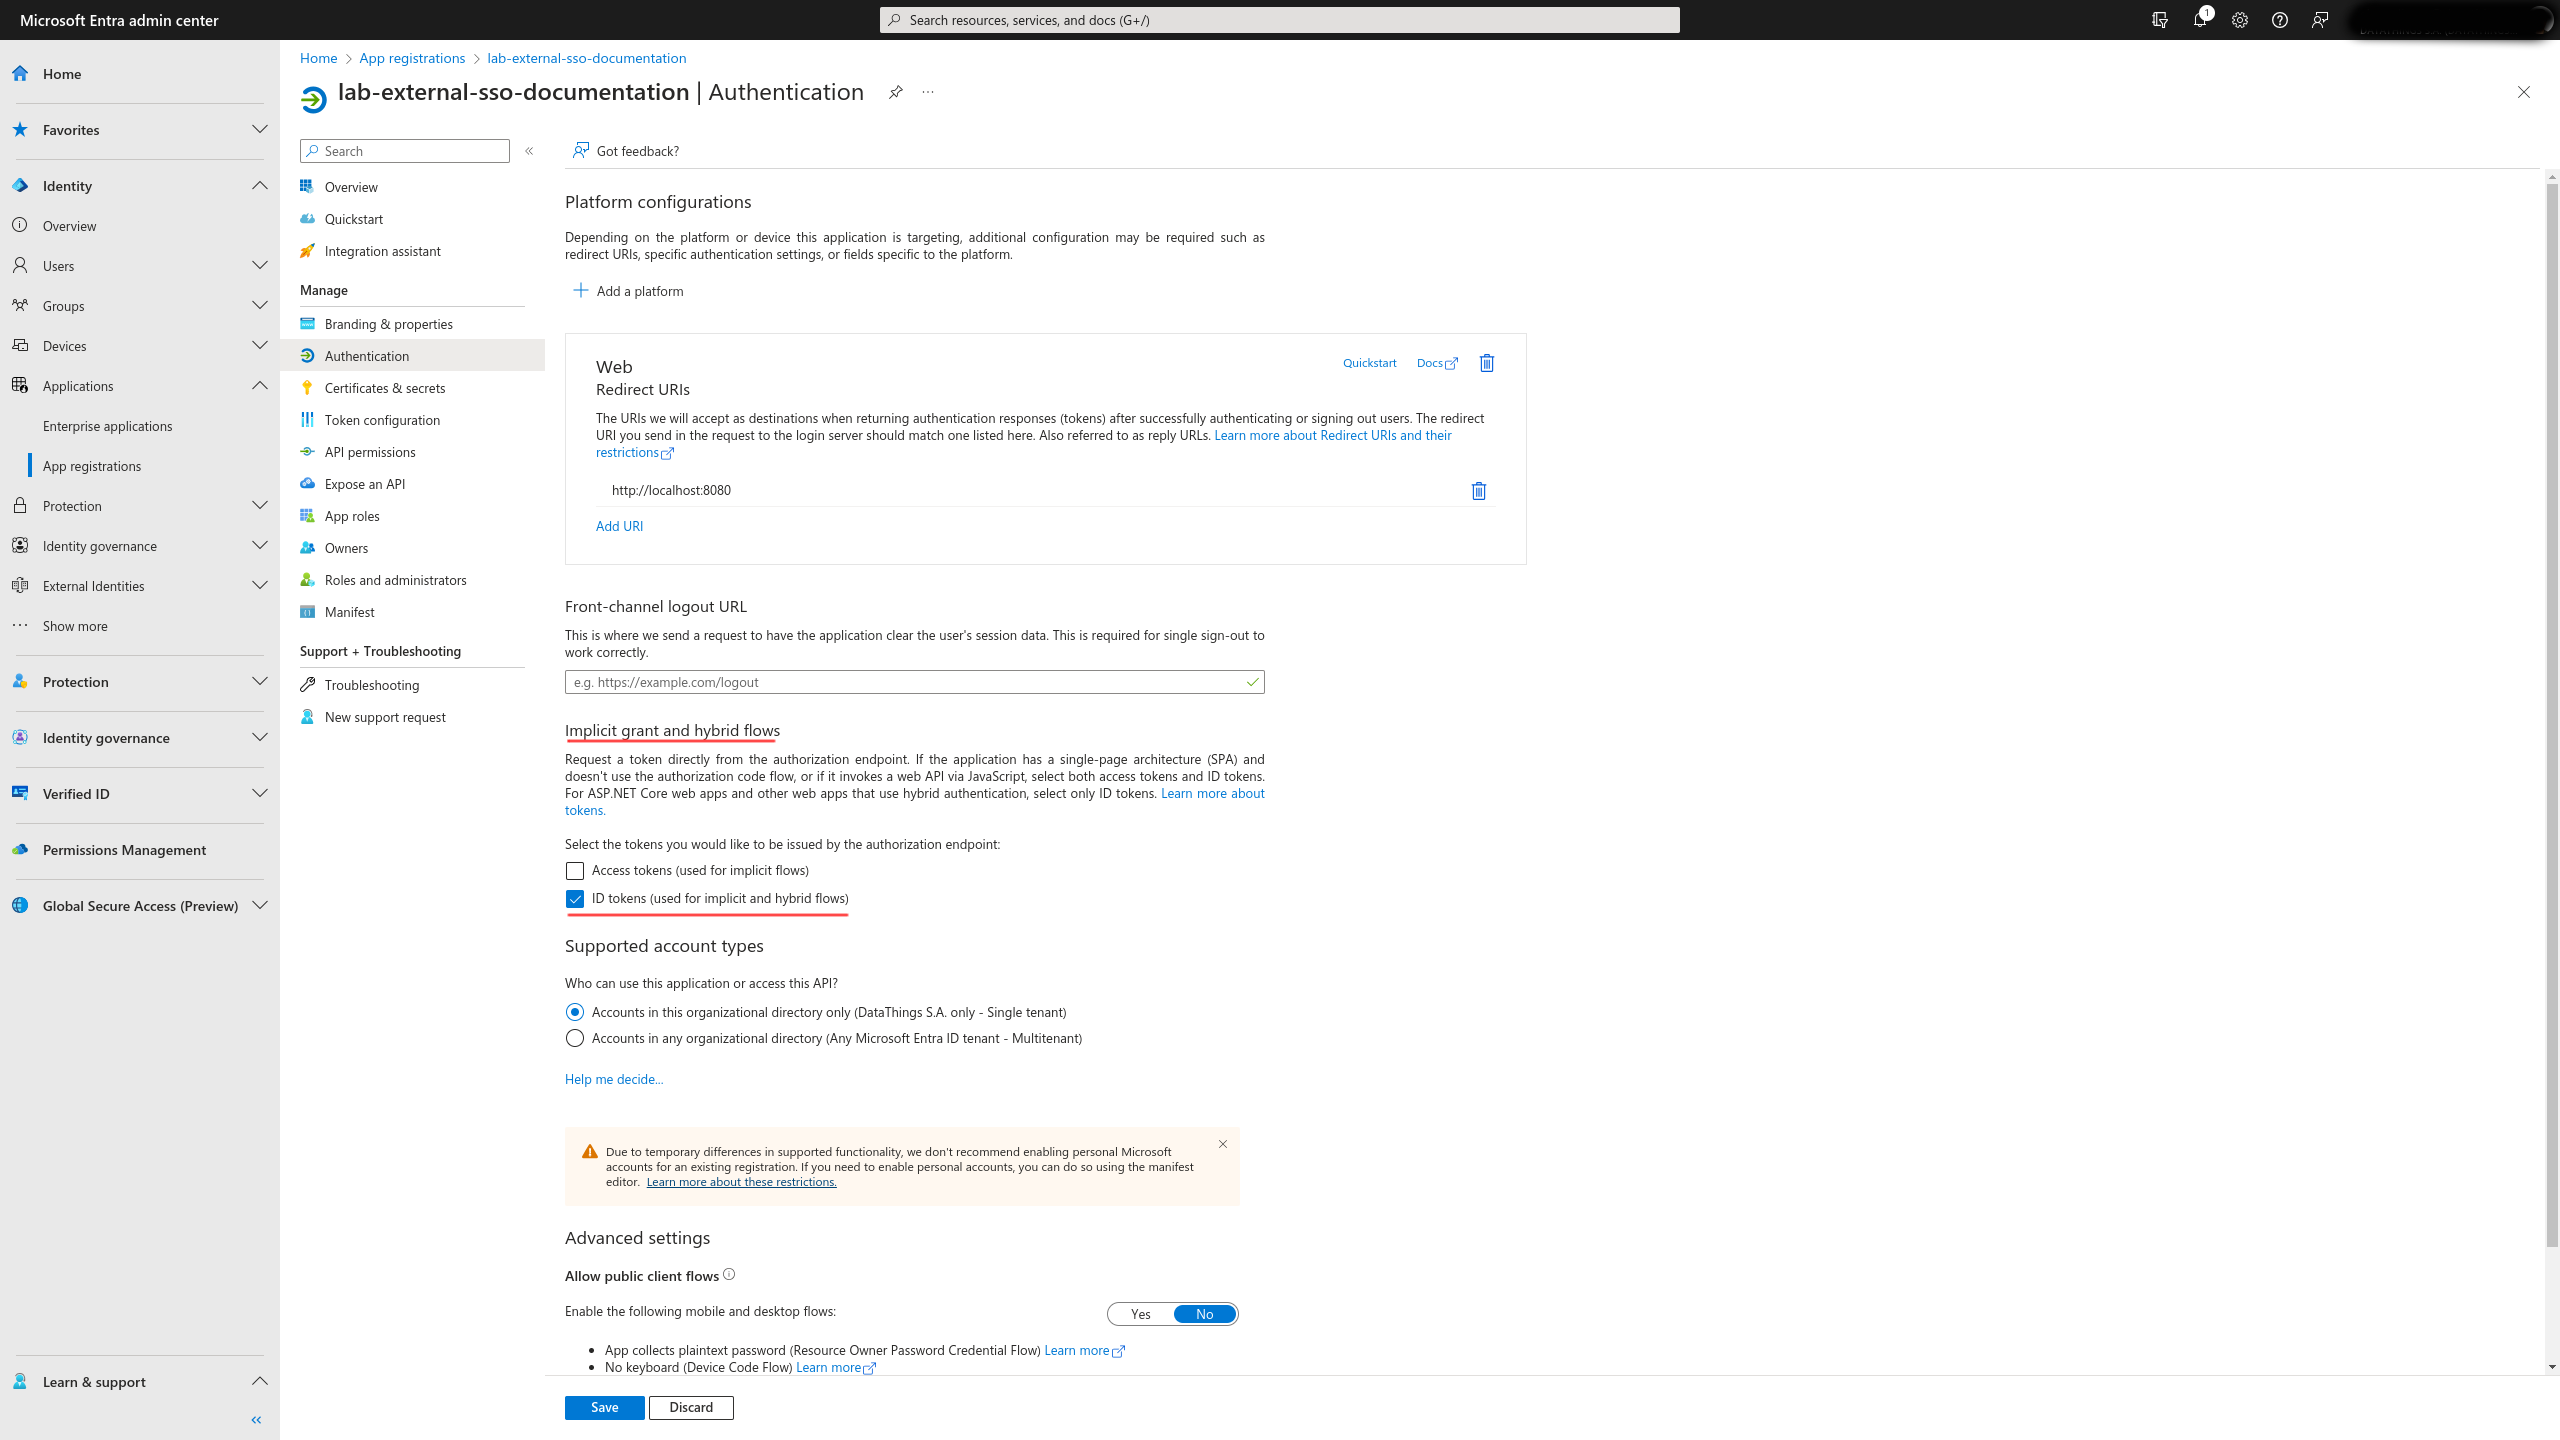
- ID token: Supposing you have Implicit flow activated on SSO provider’s settings, ID Token could still be an optional response content. For example, on Azure Entra, you have to check this option in the section
Implicit grant and hybrid flowsas demonstrated in the following image.
-
A proper Role is assigned to the user and the role is mentioned in the claims of
ID Token: If no compatible role that matches a GreyCat role is assigned to the user or if the role is not mentioned in theID Token, you will get an error code of403 Forbidden. -
ID Token’s claims containing “email” or “preferred_username”: To maintain the server side session on GreyCat, the program needs the some personal information to be included in the part of claims in ID Token. Please make sure at least “email” or “preferred_username” is always included. Here is an example for Azure:
FAQs
-
Did the authentication work? For each successful authentication, a
GreyCat Tokenwill be issued and stored in the cookies of the browser. This token is namedgreycatand you can check its existence using your browser’s debug tool.

-
Why do I still get
403 Forbidden: If the authentication passes and you still receive a403 Forbiddenstatus code, most likely, in theID Token, the role that you are assigned has no right to access any resource of the application. To fix this, you might need to adjust the role mapping setting from your SSO provider. -
Why do I fall into an
authentication loop: By default, if a user is not assigned to any role, GreyCat will assign them thepublicrole. However, with thepublicrole, the only page you are allowed to visit is the authentication page, so you will be automatically redirected to the authentication page again and again. If you are using Google’s OAuth service as an SSO solution, it’s normal that you will have this issue since the Role Based Permission Management is not supported by Google’s OAuth service. To fix this, you should check the Documentation For Permissions to learn how to define initial roles. But if you want, you can also modify the[Your GreyCat project's root directory]/gcdata/security/user_policy.jsonfile to update a user’s role manually. For example, having the role ofuserinstead ofpublicallows you to visit the APIs. -
Why do I get a
mismatch_uri_redirecterror?: This could be due to a typo or the need to append a/character to GreyCat’s host address. Remember, the redirection URL consists of the host address followed by a/. For instance, if your GreyCat application is deployed athttp://localhost:8080, ensure the redirection URL ishttp://localhost:8080/.
Using Keycloak
Launch Keycloak service
If a keycloak service is already available to you, you can skip to Create client. If it’s not the case, here we propose to launch an instance of Keycloak using Docker which is the most simple solution for demo purpose.
Install Docker
According to the official documentation, “Docker is an open platform for developing, shipping, and running applications. Docker enables you to separate your applications from your infrastructure so you can deliver software quickly”. If you’re unfamiliar with Docker’s basic concepts, refer to this link: https://docs.docker.com/get-started/overview/
If you do not have Docker installed on your machine yet, you should proceed the installation first according to your platform:
- Linux:
For Linux, you can install Docker Engine directly without using Docker Desktop. Check this link for the installation guide:
https://docs.docker.com/engine/install/ - Windows or Mac:
For these two platforms, you have to install Docker Desktop which includes Docker Engine as runtime environment. Here are the specific guides for each platform:
- Windows: https://docs.docker.com/desktop/install/windows-install/
- MacOS: https://docs.docker.com/desktop/install/mac-install/
Starting a Keycloak instance with Docker
Use the command below to start a Keycloak instance on port 5000 with default username = admin and password=admin (for testing purposes). For this step, Docker will fetch the image of Keycloak automatically if it doesn’t exist on your local machine so you do not need to download the image manually.
docker run -p 5000:8080 -e KEYCLOAK_ADMIN=admin -e KEYCLOAK_ADMIN_PASSWORD=admin quay.io/keycloak/keycloak:23.0.7 start-dev
Then you will see an output similar to this:
$ docker run -p 5000:8080 -e KEYCLOAK_ADMIN=admin -e KEYCLOAK_ADMIN_PASSWORD=admin quay.io/keycloak/keycloak:23.0.7 start-dev
Updating the configuration and installing your custom providers, if any. Please wait.
2024-03-01 13:44:25,910 INFO  [io.quarkus.deployment.QuarkusAugmentor] (main) Quarkus augmentation completed in 5220ms
...
...
...
2024-03-01 13:44:38,423 INFO  [org.keycloak.services] (main) KC-SERVICES0009: Added user 'admin' to realm 'master'
2024-03-01 13:44:38,426 WARN  [org.keycloak.quarkus.runtime.KeycloakMain] (main) Running the server in development mode. DO NOT use this configuration in production.
Configure the Keycloak service
Create realm
Assuming you launched keycloak using the previous Docker command, navigate to http://localhost:5000/admin/master/console/ and use the default user name/password combinationadmin and admin to connect to the administration console. By default, you have the master realm displayed and we will create a new Realm named “Datathings” from the dropdown button in the top left corner.
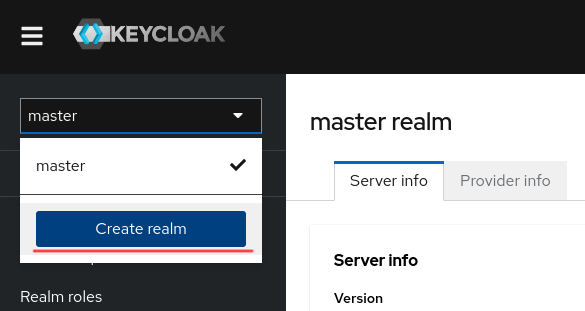
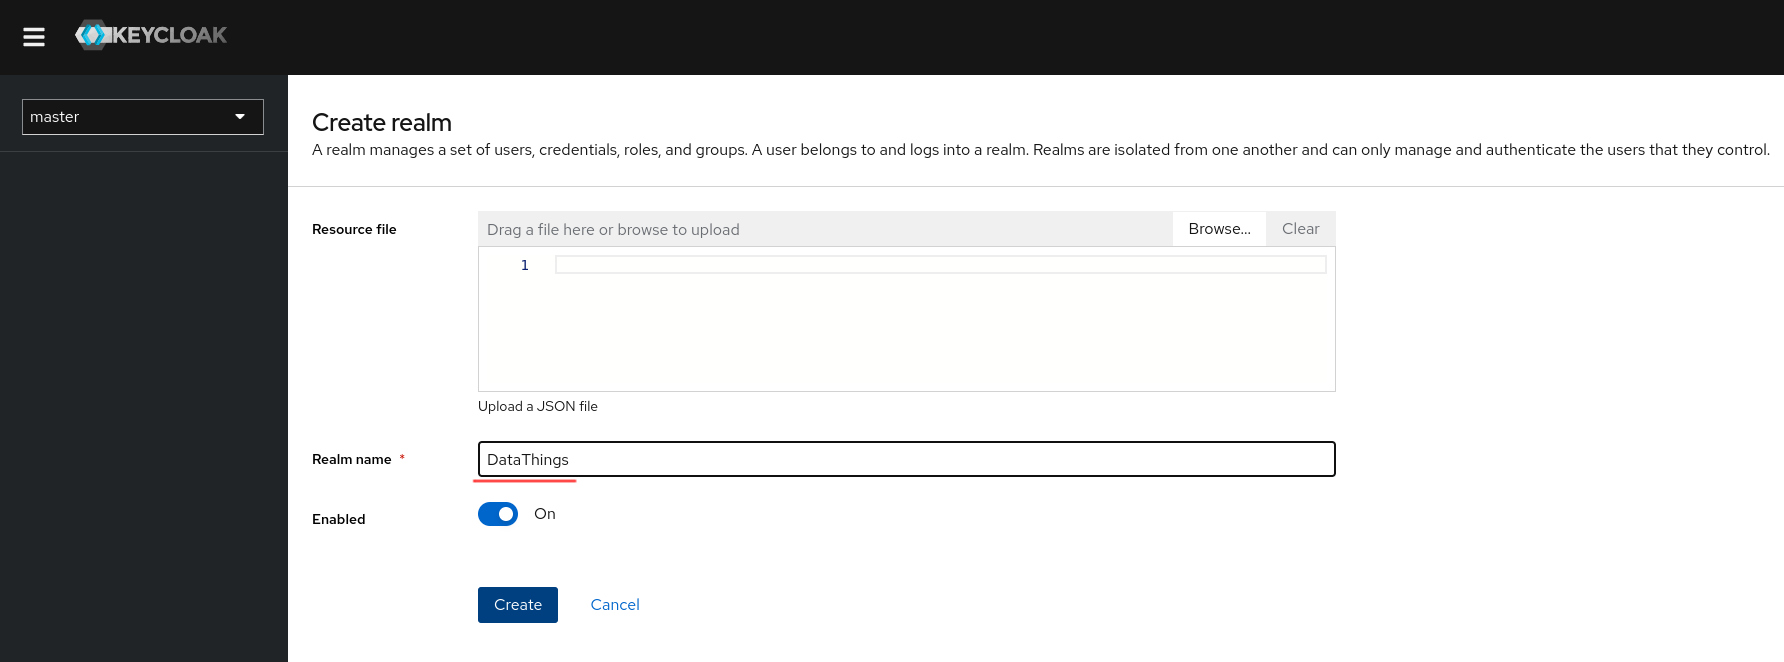
The essential configuration is straightforward. Simply provide the desired name for the realm.
Create client
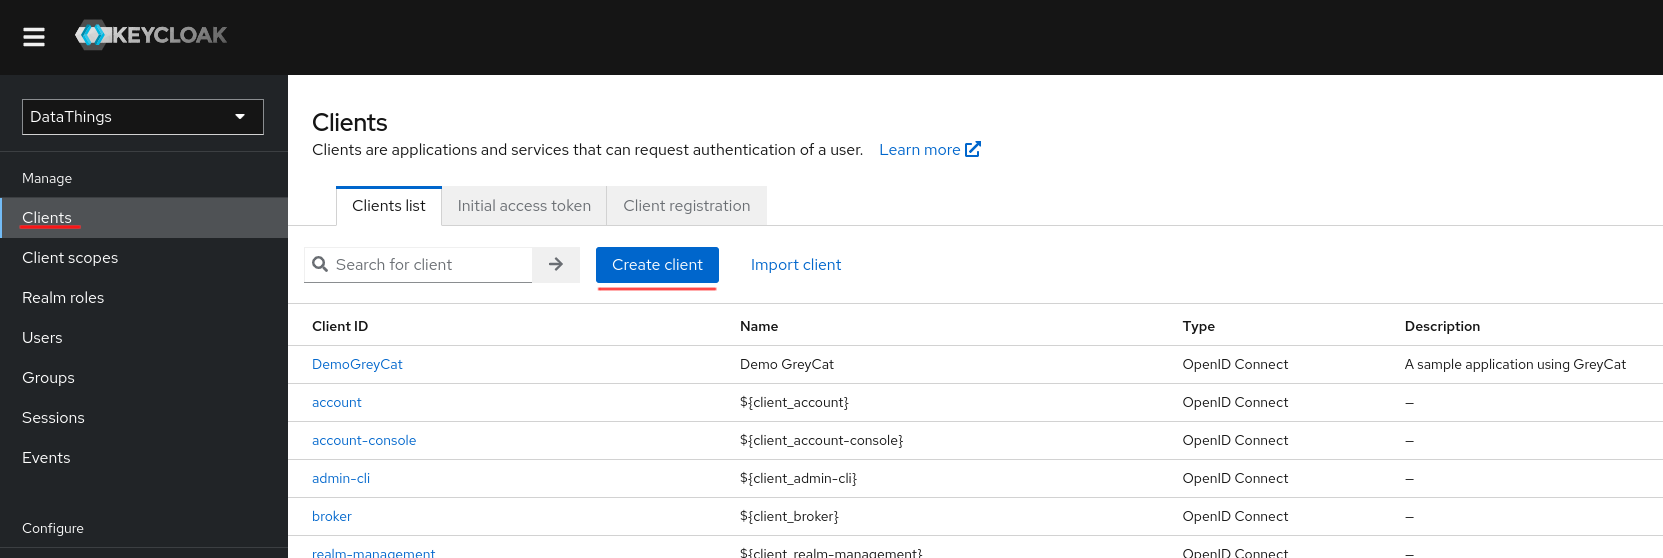
In DataThings Realm, create a Client to register our GreyCat application. Navigate to Clients on the left panel and click on Create client button.
General settings
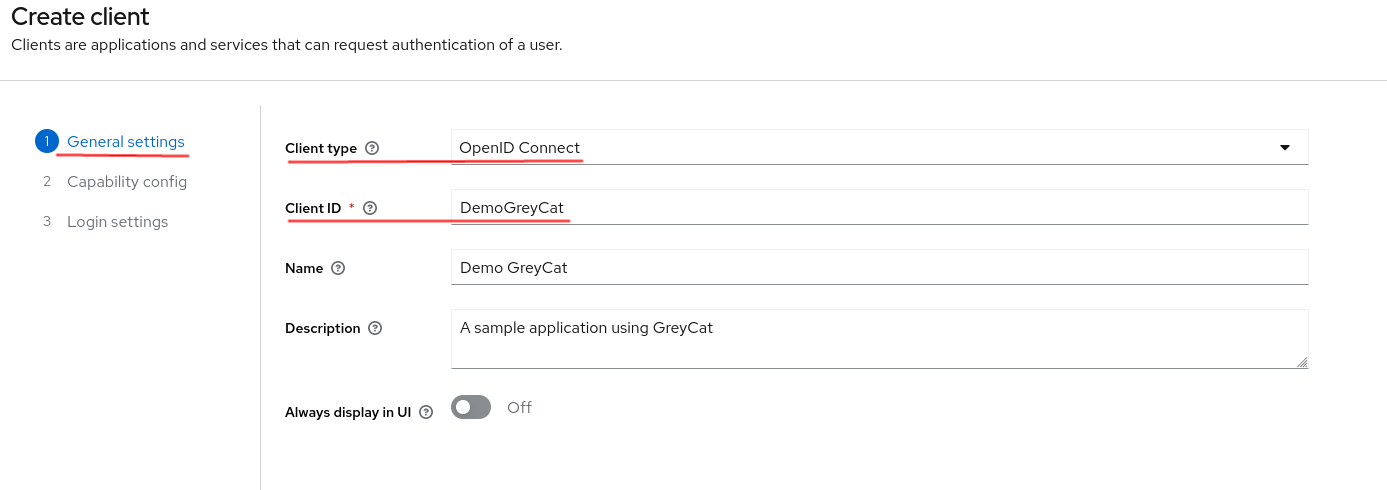
For this example, we name this client DemoGreyCat. For general settings, make sure you are using OpenID Connect as connection type.
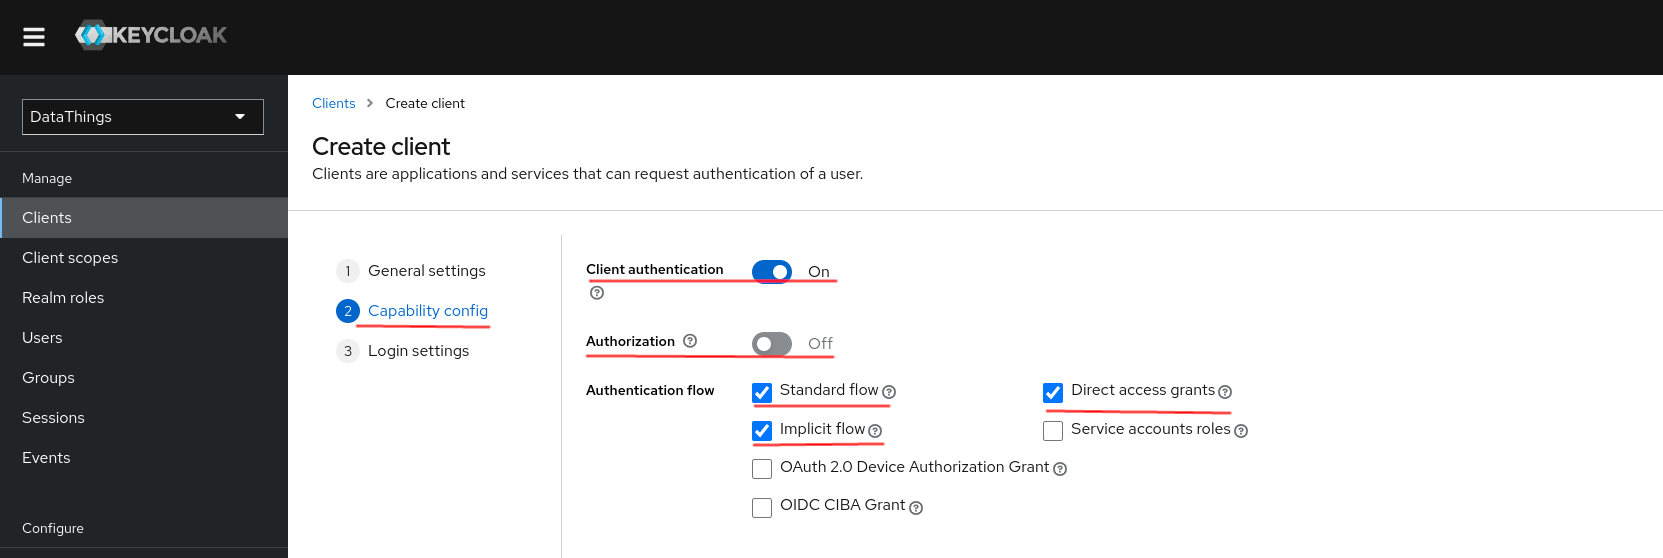
Capability configuration
Set the following configurations under Capability configuration:
- Client authentication:
On - Authorization:
Off - Authentication flow:
- Standard flow
- Implicit flow
- Direct access grants
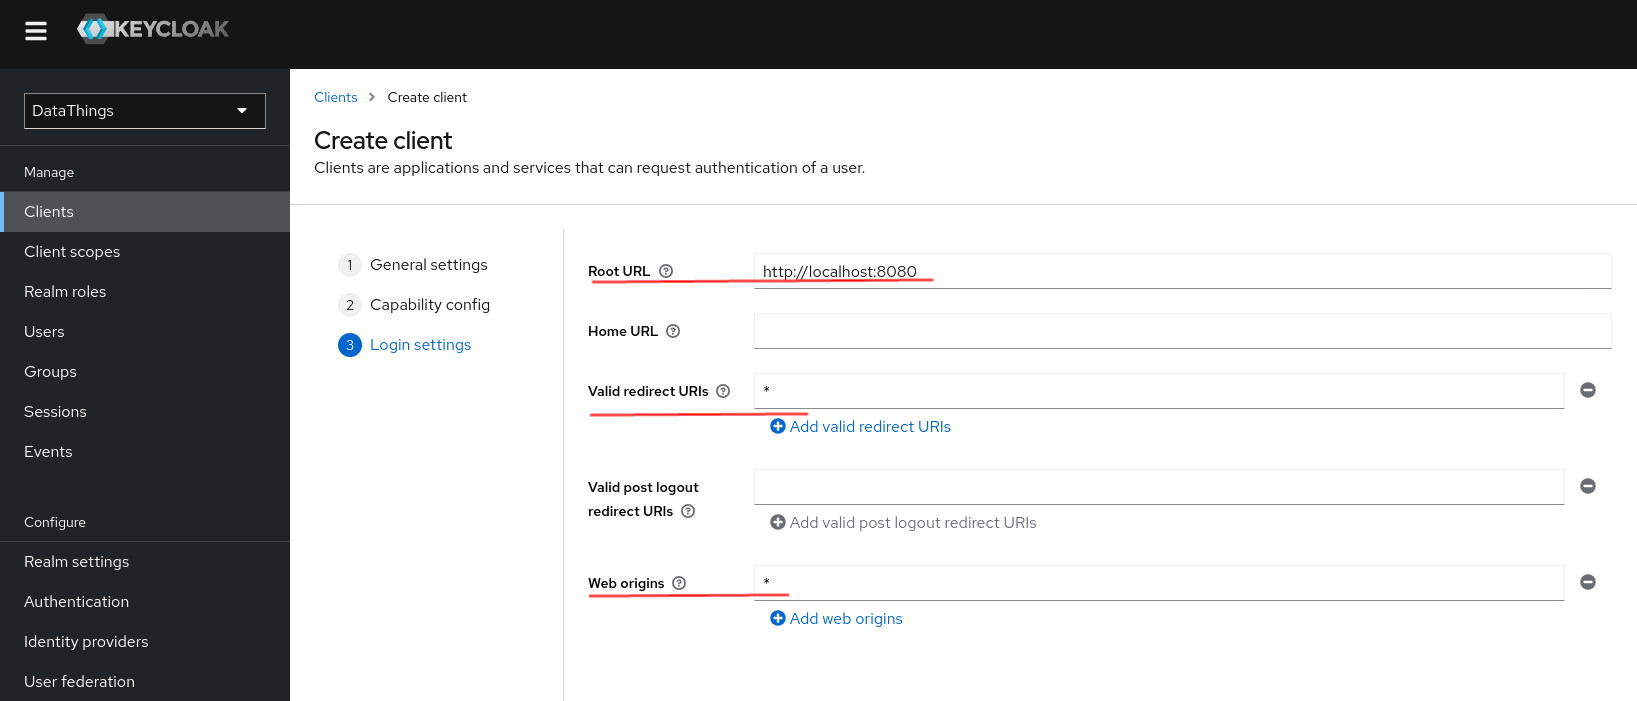
Login settings
We set, in Login settings:
- Root URL: http://localhost:8080
- Web origins:
*(DO NOT USE THIS VALUE IN A PRODUCTION ENVIRONMENT, this will by-pass CORS validation) - Valid redirect URIs:
*(DO NOT USE THIS VALUE IN A PRODUCTION ENVIRONMENT)
Client configuration (Exported JSON)
After the creation, if you want, you can export the settings by clicking the 3 vertical points button on the right end of your Client.

The exported json format fie that you have should contain this configuration:
{
  "clientId": "DemoGreyCat",
  "name": "Demo GreyCat",
  "description": "A sample application using GreyCat",
  "rootUrl": "",
  "adminUrl": "http://localhost:8080",
  "baseUrl": "",
  "surrogateAuthRequired": false,
  "enabled": true,
  "alwaysDisplayInConsole": false,
  "clientAuthenticatorType": "client-secret",
  "secret": "JwgJmCditznz65QFb26k1jnc9SGuJnIy",
  "redirectUris": ["*"],
  "webOrigins": ["*"],
  "notBefore": 0,
  "bearerOnly": false,
  "consentRequired": false,
  "implicitFlowEnabled": true,
  "directAccessGrantsEnabled": true,
  "serviceAccountsEnabled": false,
  "publicClient": false,
  "frontchannelLogout": true,
  "protocol": "openid-connect",
  "attributes": {
    "oidc.ciba.grant.enabled": "false",
    "client.secret.creation.time": "1710246459",
    "backchannel.logout.session.required": "true",
    "post.logout.redirect.uris": "*",
    "oauth2.device.authorization.grant.enabled": "false",
    "display.on.consent.screen": "false",
    "backchannel.logout.revoke.offline.tokens": "false"
  },
  "authenticationFlowBindingOverrides": {},
  "fullScopeAllowed": true,
  "nodeReRegistrationTimeout": -1,
  "defaultClientScopes": ["web-origins", "acr", "profile", "roles", "email", "role_for_idtoken"],
  "optionalClientScopes": ["address", "phone", "offline_access", "microprofile-jwt"],
  "access": {
    "view": true,
    "configure": true,
    "manage": true
  }
}
Role related configuration
This section is essential to grant the access to GreyCat through SSO service. If none compatible role is assigned to the user of if the role is not mentioned in the ID Token, you will get an error code of 403 Forbidden.
Role definition
Since GreyCat relies on Role-Based Access Control (RBAC) for security, you’ll need to define server-side roles within GreyCat and associate permissions with them. While this definition happens within GreyCat, you should also define and assign Keycloak roles to users. This ensures user linkage to corresponding GreyCat roles. Essentially, each Keycloak role name should match a GreyCat role name for proper mapping. For example, by default, GreyCat generates a set of roles in *[GreyCat_Project_Root]/gcdata/security/user_policy.json* including admin. To map this GreyCat role to an Keycloak role, create a Keycloak role named ‘admin’. The role definition could be accomplished in two levels. In either of the two levels, only the name of role matters:
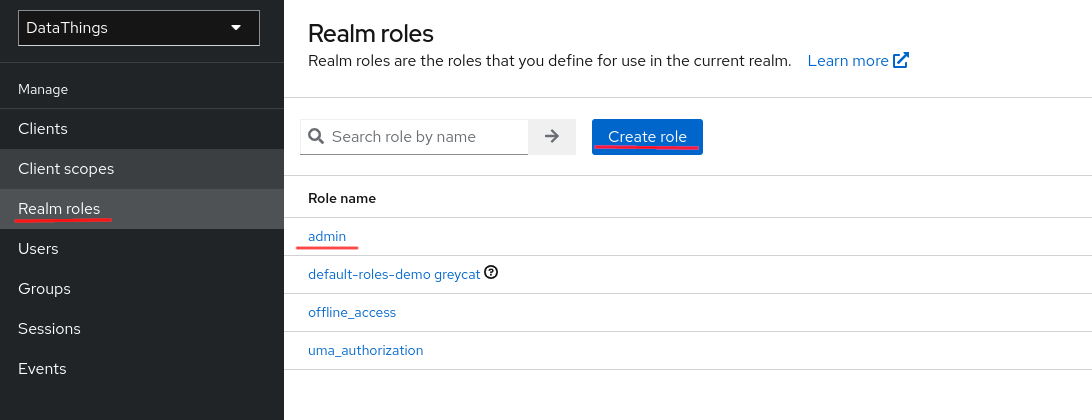
Define Realm roles
Realm roles are by default visible to all the clients within the realm. To define realm level roles, navigate to Realm roles from the left panel.
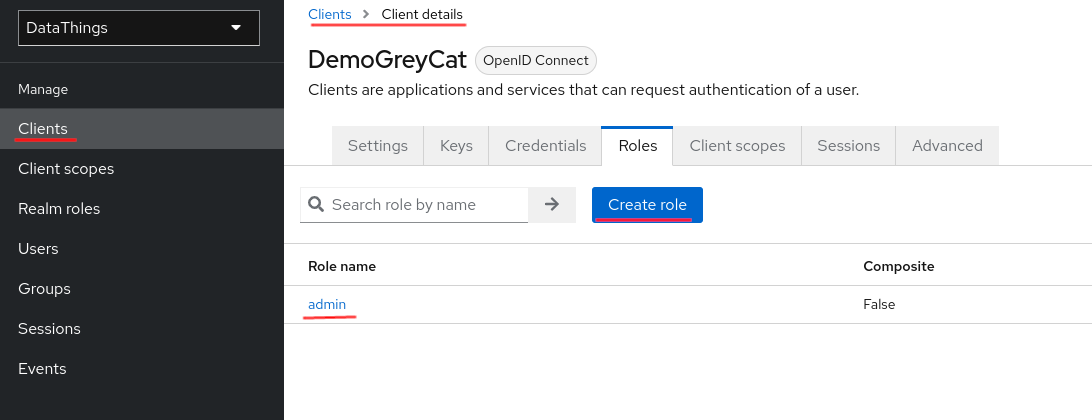
Define Client roles
Client roles are by default only visible to the current client. But you can also reference another client’s roles by specifying the client. To define client level roles, navigate to Clients from the left panel, select your client and click on roles from the top.
Role assignment
Create a user
We need to create a user on Keycloak so that we can assign a role to the user. We create users by navigating to Users from the left panel. Be careful, GreyCat uses the email value to distinguish users, make sure this email filed is filled:

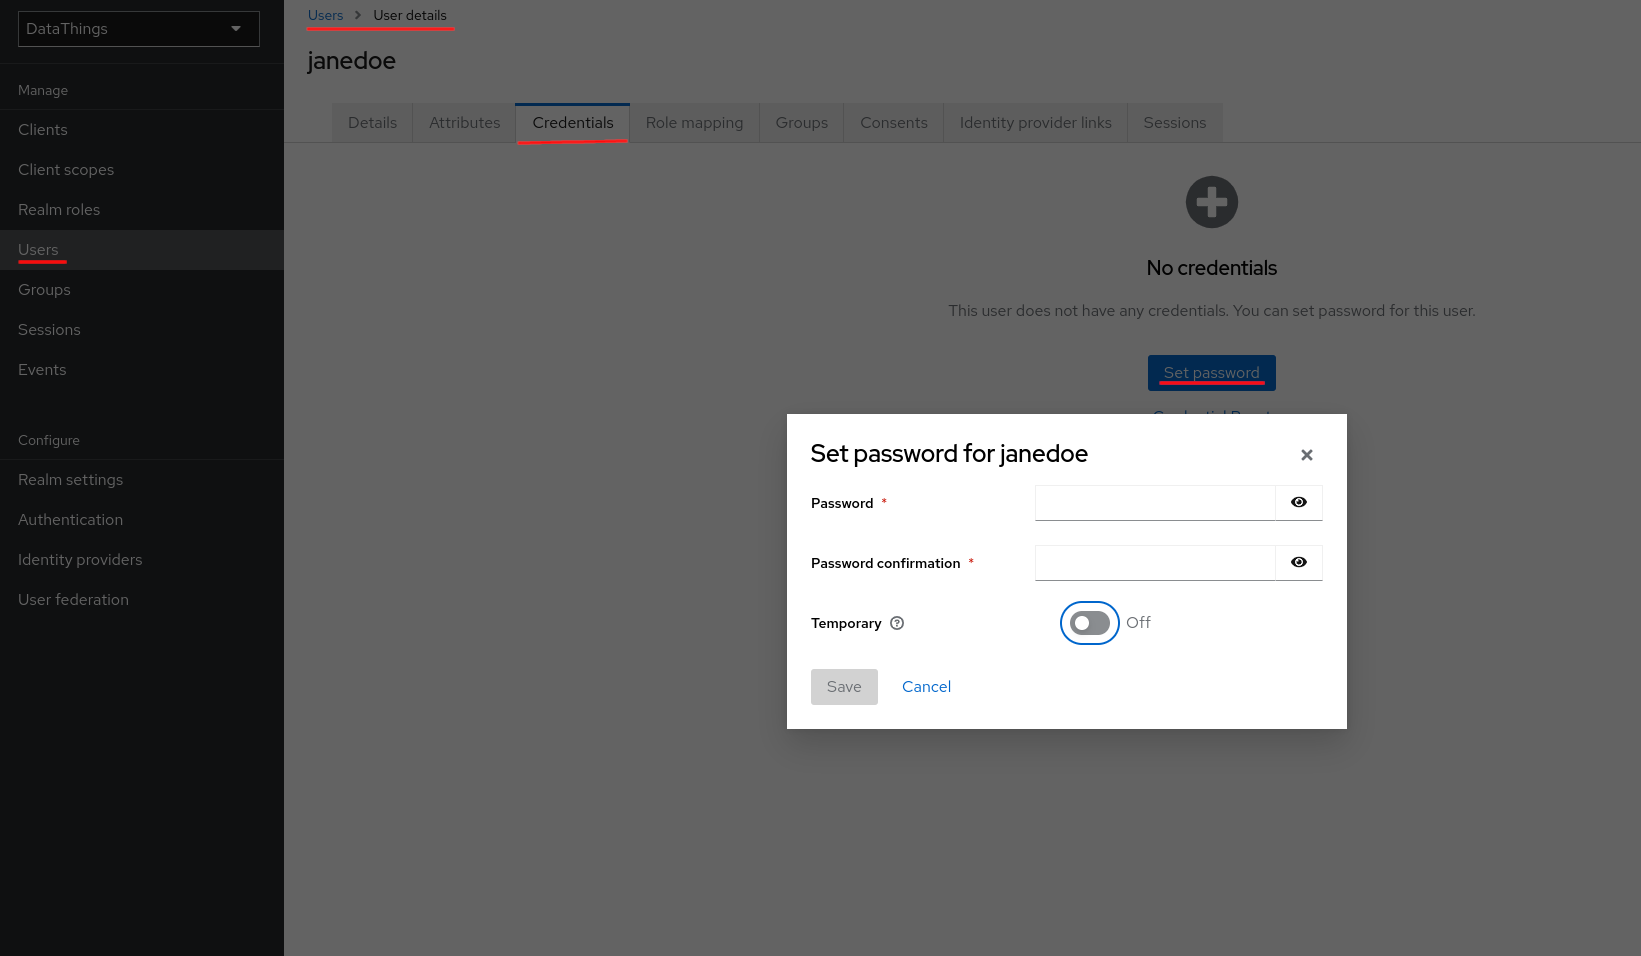
Define credentials
Once you have created a user, you need to define a credential for the user. From the top navigate bar, navigate to Credentials and define a password.
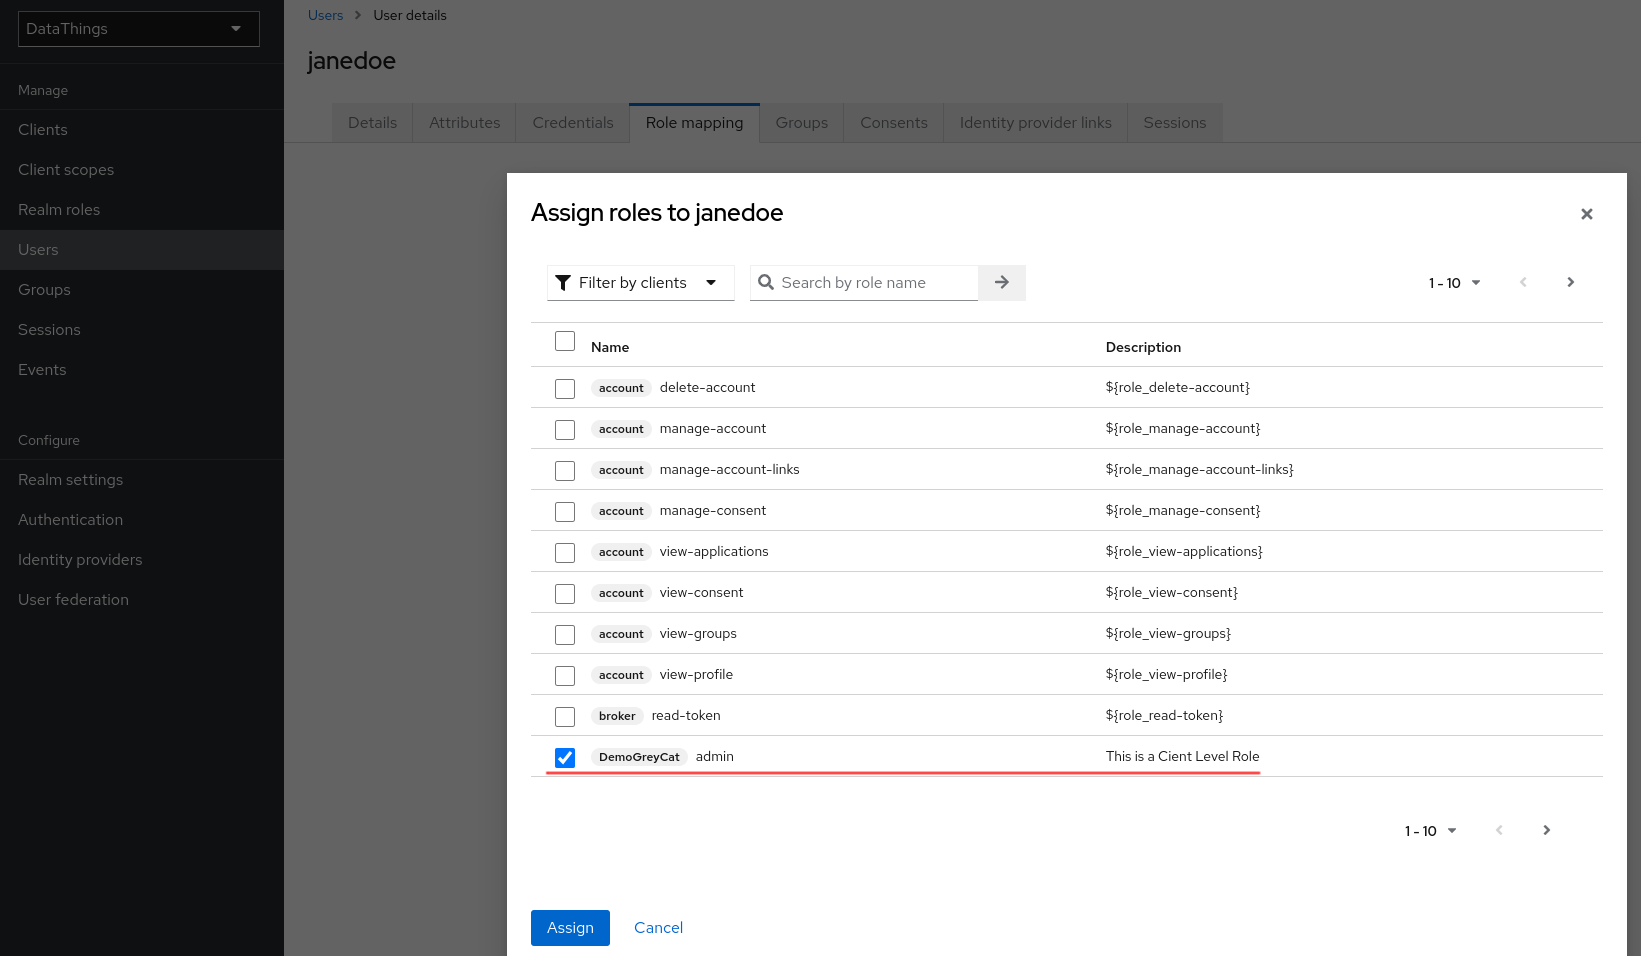
Define role mapping
Eventually, we can assign roles to this user. We navigate to Role mapping using the top navigate bar. In the popped out panel, in its top left panel, we can select if we wanna assign a Realm Role or a Client Role. Here, we will use the Client Role named admin that we previously defined.
Include roles in ID Token
For Keycloak, defining and assigning the roles are still not enough. By default, the information related to roles is not included in the ID Token. As previously mentioned, this will lead to a 403 Forbidden error.
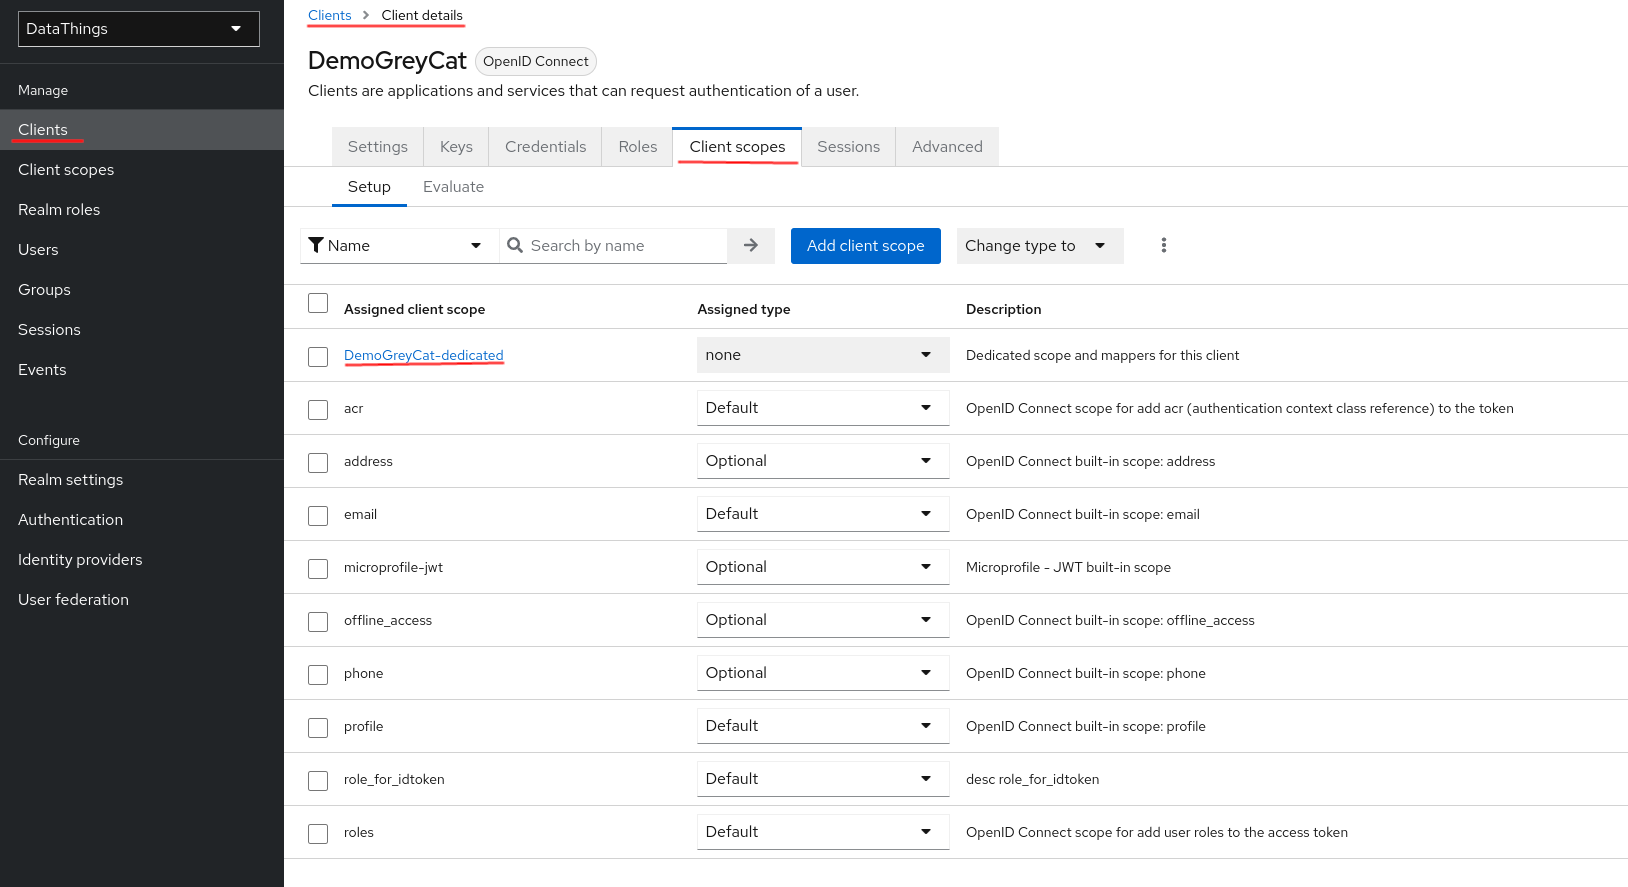
To add this information in the ID Token, you have to edit the Client scope entry specific to the client. Here are the steps you have to take:
- Navigate to
Clientusing the left side panel - Click on our client -
DemoGreyCat, to access its detailed settings - From the top menu, click
Client scopes - Click on the entry specific to your
Client. In our case,DemoGreyCat-dedicated.
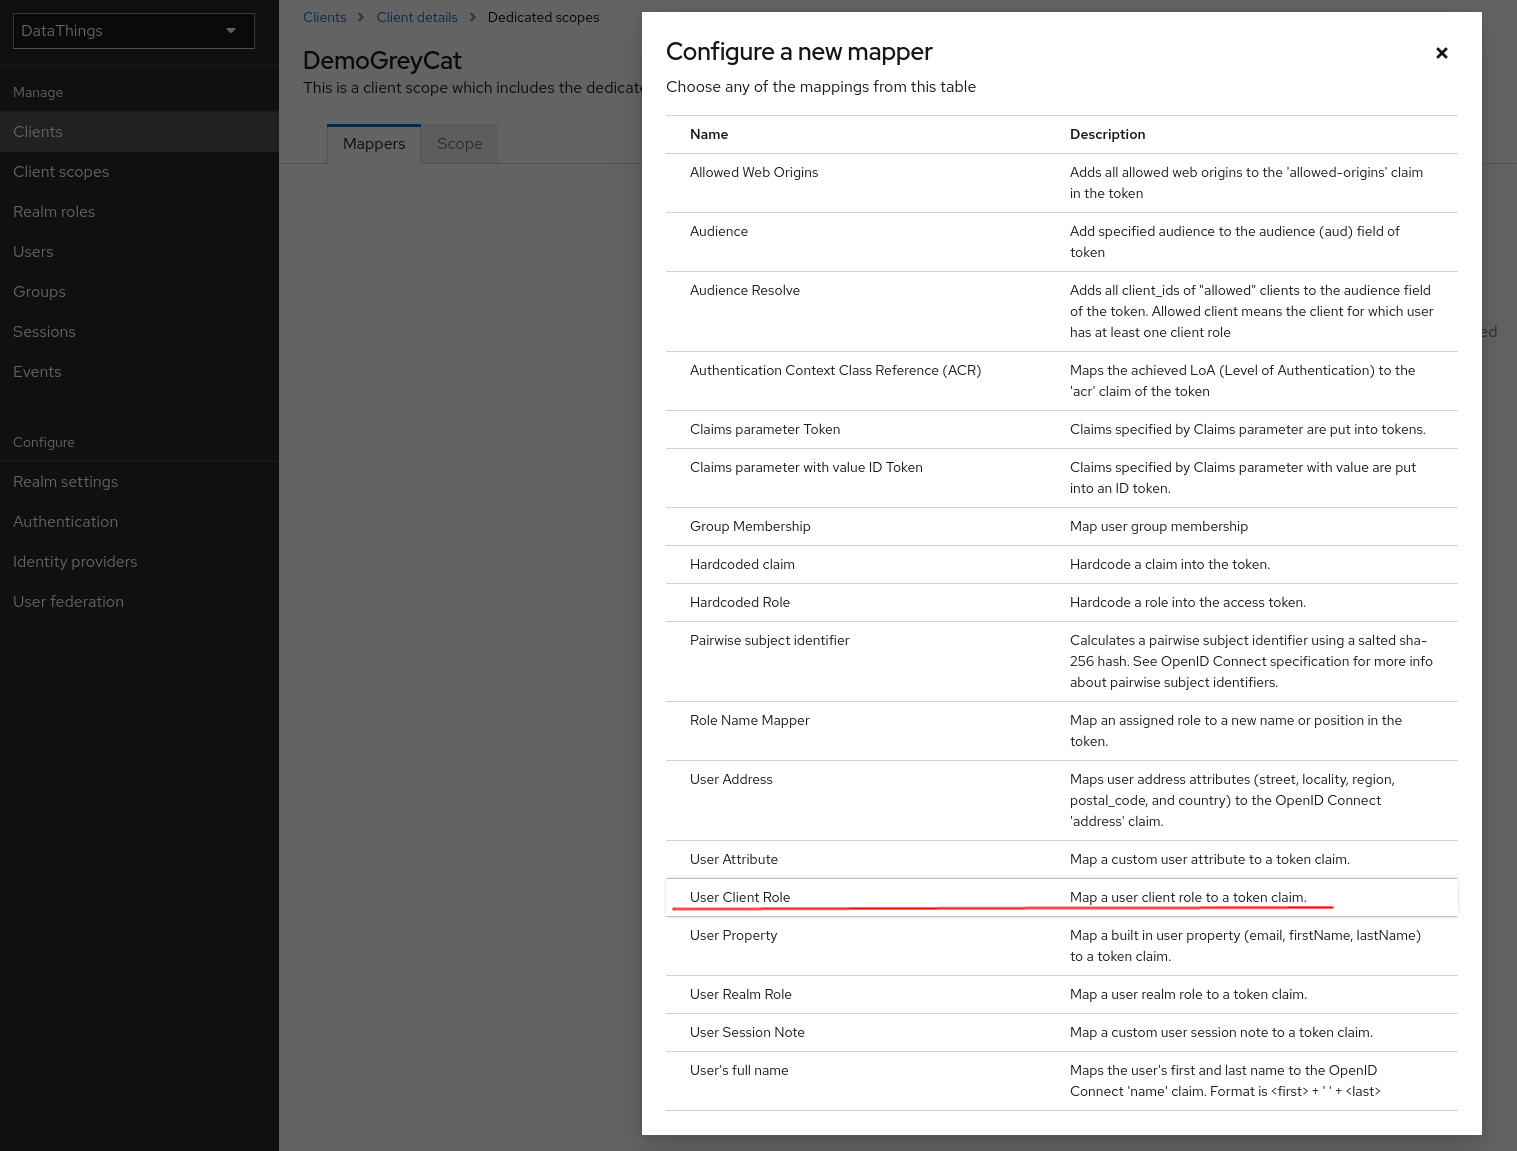
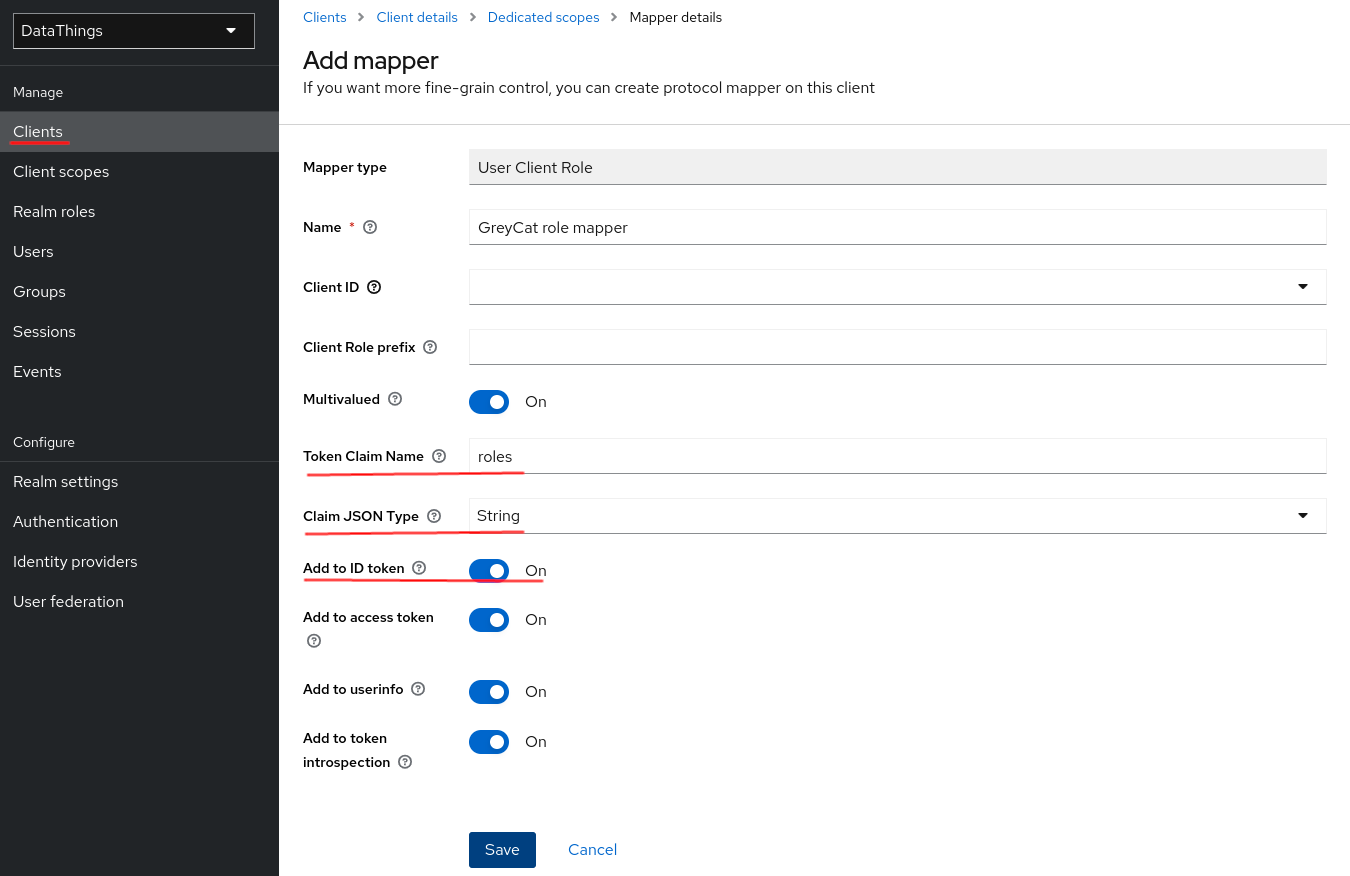
Once you are at the Client Scopes editing page, you have to configure a new mapper. We previously defined a Client role or a Realm role, we want this mapper to inject this role value to the ID Token. When creating the mapper, we can choose the information to map, we select the User client role option that represents Client role. If you only defined a Realm Role, you should select User realm role.
For the configurations related to this mapper, there are several options that are very important:
- Multi-valued: GreyCat only accepts one singe role for each user, but if you share the SSO service among several applications, you might need this option
On. In this case, GreyCat will accept the first role in the value list that matches a GreyCat role. - Token Claim Name: Its value must be
rolessince that’s what GreyCat accepts. - Claim JSON Type:
String - Add to ID Token :
On(Since this is why we are doing this configuration)
Configuration for GreyCat
The configurations on GreyCat can be proceeded either through command-line arguments or a .env file at your GreyCat application’s root.
Retrieve the values
Either way, you need three information:
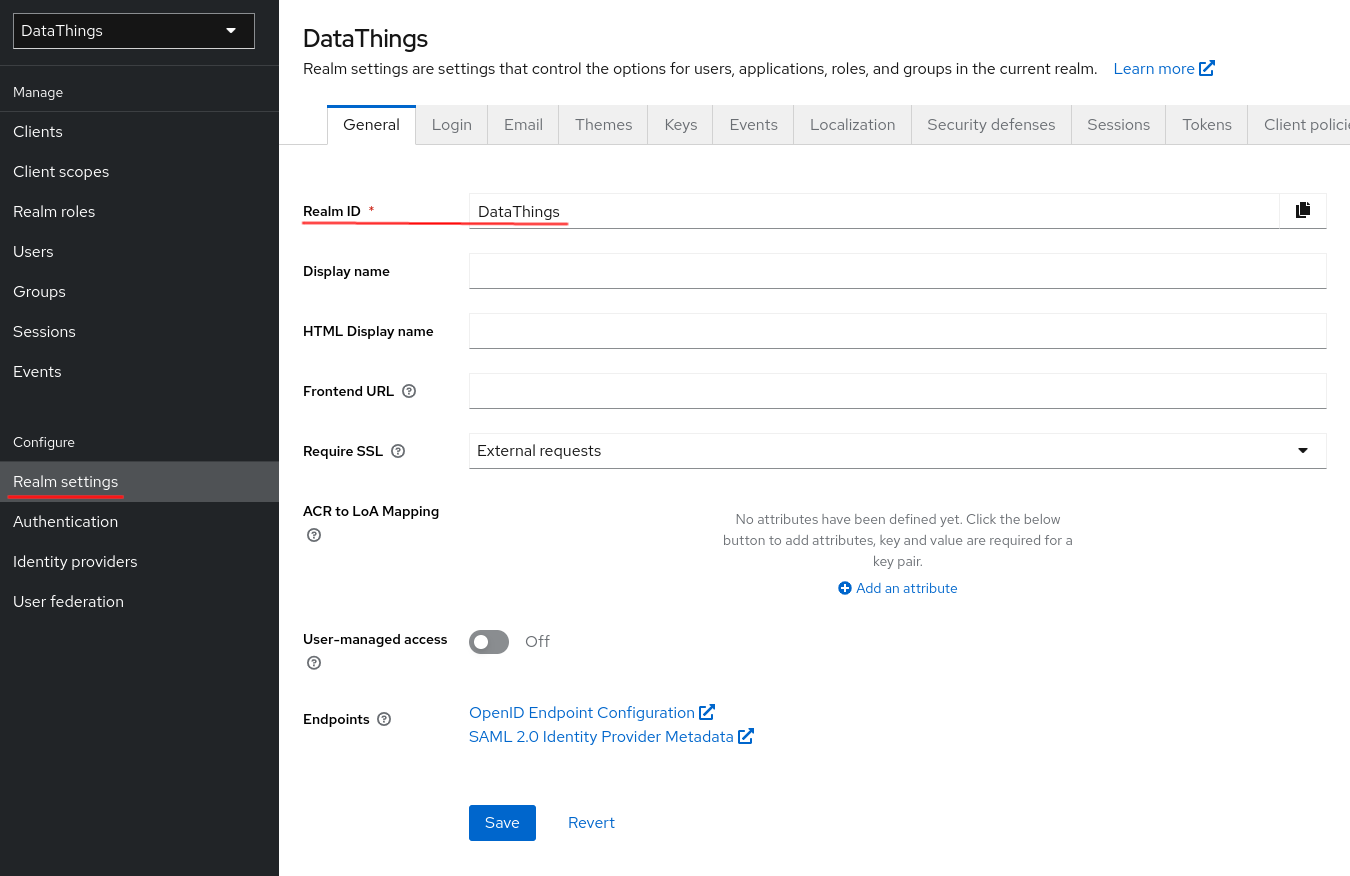
-
Realm ID: Click on
Realm settingsin the Configure session in the left panel and you should see the realm ID on the right in your work zone in the tab namedGeneral.
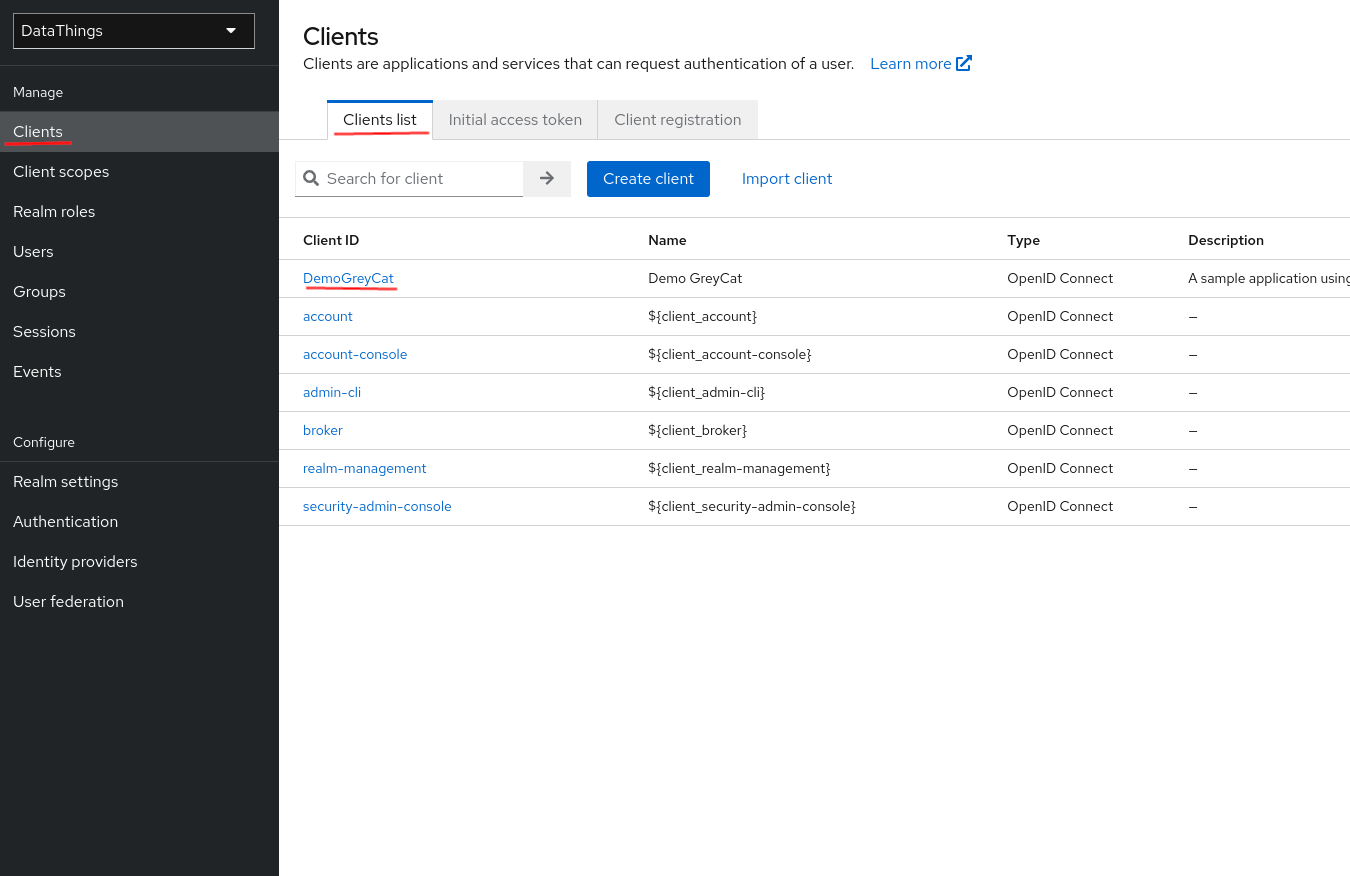
-
Client ID: Click on
Clientsin the left panel, you can see your client’s ID in the list in the work zone.
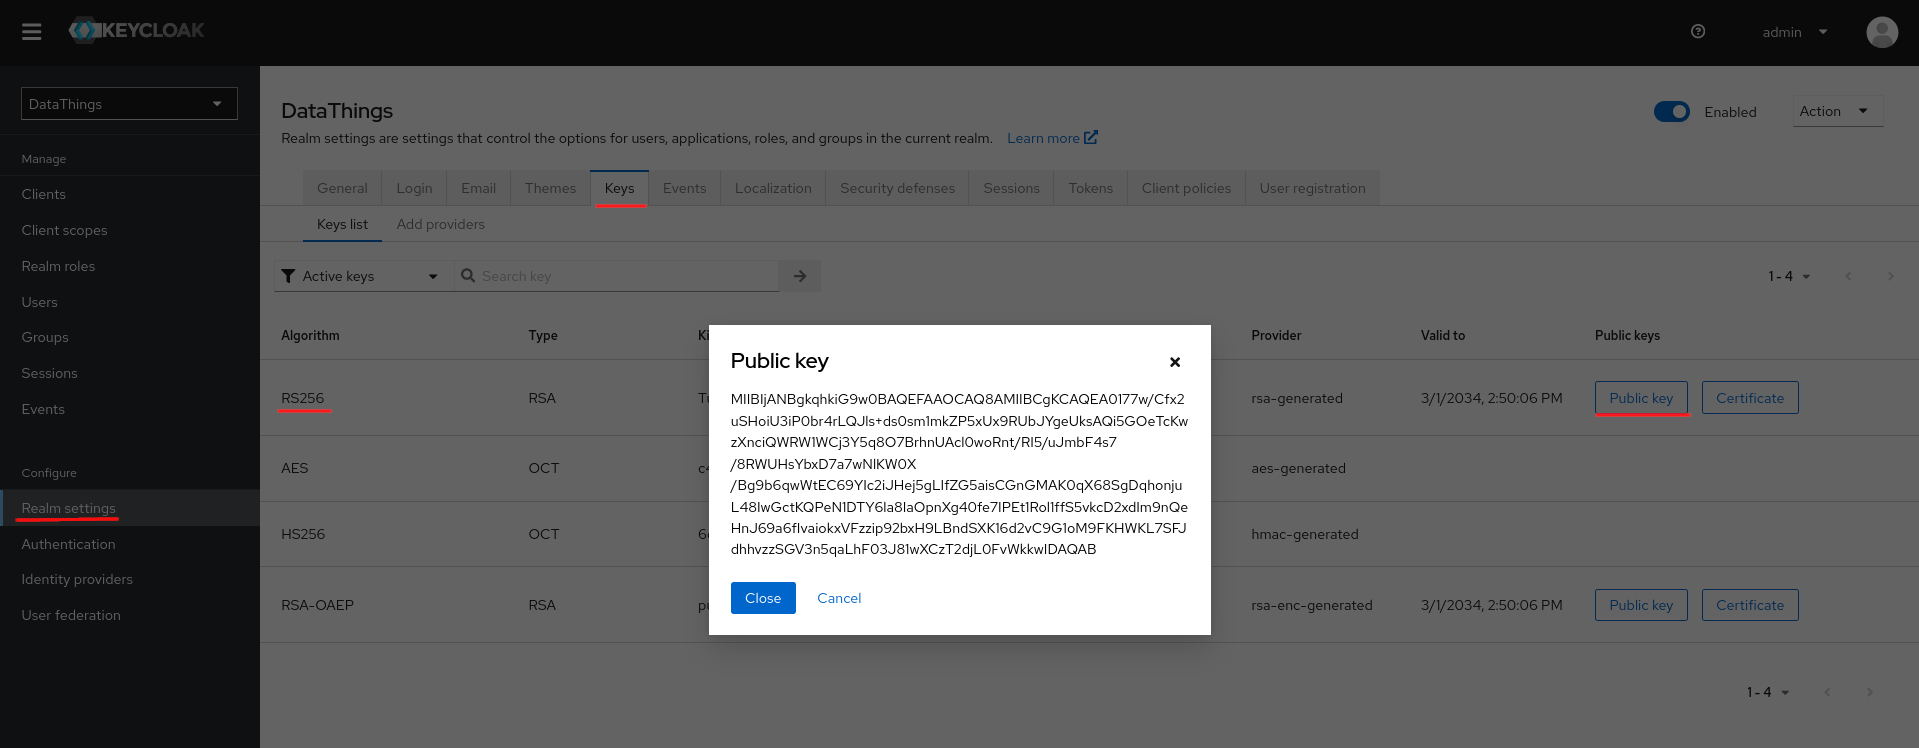
-
RS256 public key of the realm: Still in
Realm settings, from the top panel, navigate toKeystab and export the RS256 Public key.
Apply the values
To check how to pass the configurations using command line arguments, you can always run greycat serve -h.
To pass the values by environment variables using a .env file, create the file named exactly ".env" at the root directory of your GreyCat project and set the values that we found:
GREYCAT_OID_CONFIG_URL=http://{$KEYCLOAK_HOST_ADDRESS}/realms/{$REALM_ID}/.well-known/openid-configuration
GREYCAT_OID_CLIENT_ID={$CLIENT_ID}
GREYCAT_OID_PUBLIC_KEY={$THE_PUBLIC_KEY_VALUE}
Using Azure Entra
Application registration
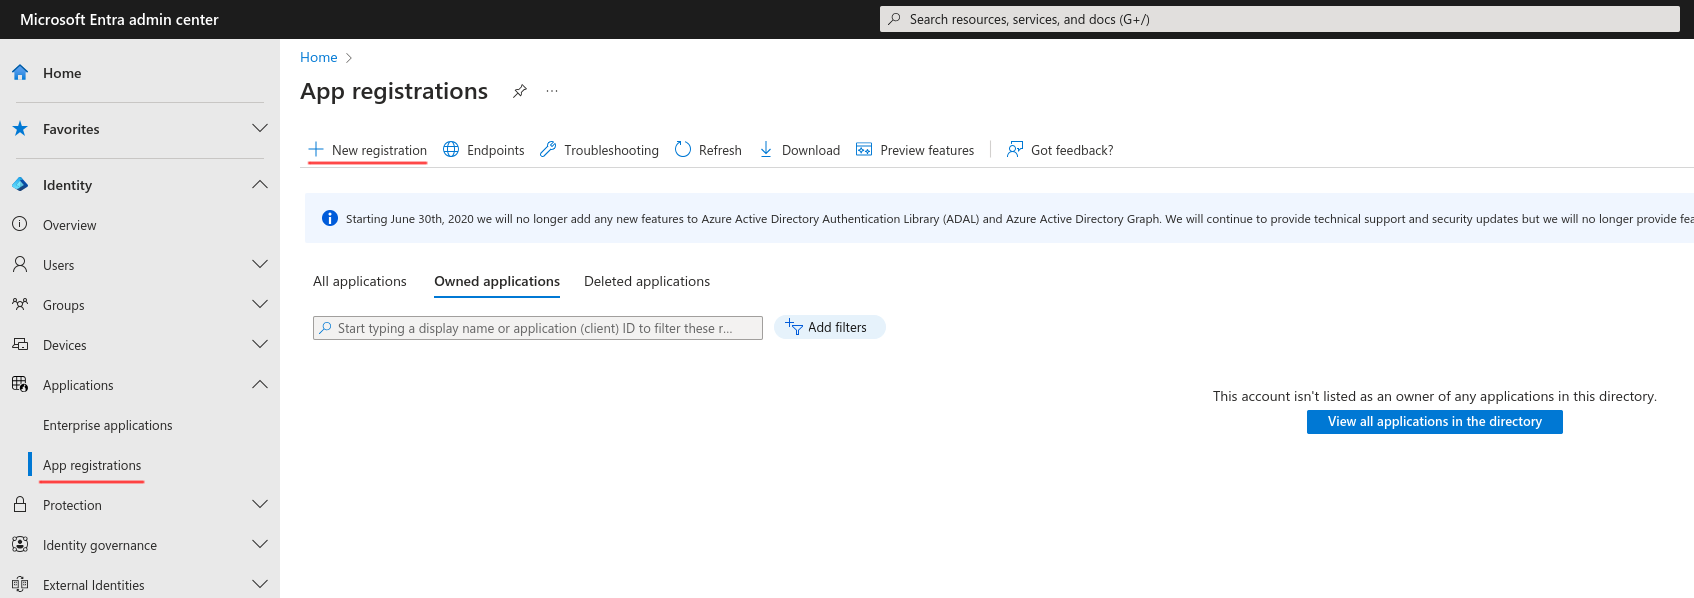
The entry for registration
Using your organization account to login to MS Azure Entra, you will see the home page of Microsoft Entra admin center. If you don’t have an existing instance of the Entra application running, you’ll need to proceed with registration. To do this, from the left side menu, go to Applications -> App registrations. On the top left corner of your work zone, click the button “New registration”.
Registration
To register an Entra application, you have to provide the following information:
- The name of your Entra application
- The type of Microsoft Account that could be used to login through your Entra application
- The redirect URI is optional for now, but you’ll eventually need to configure it to prevent GreyCat redirection denials. Declare GreyCat as a web application and indicate its home URI as the redirect URI.

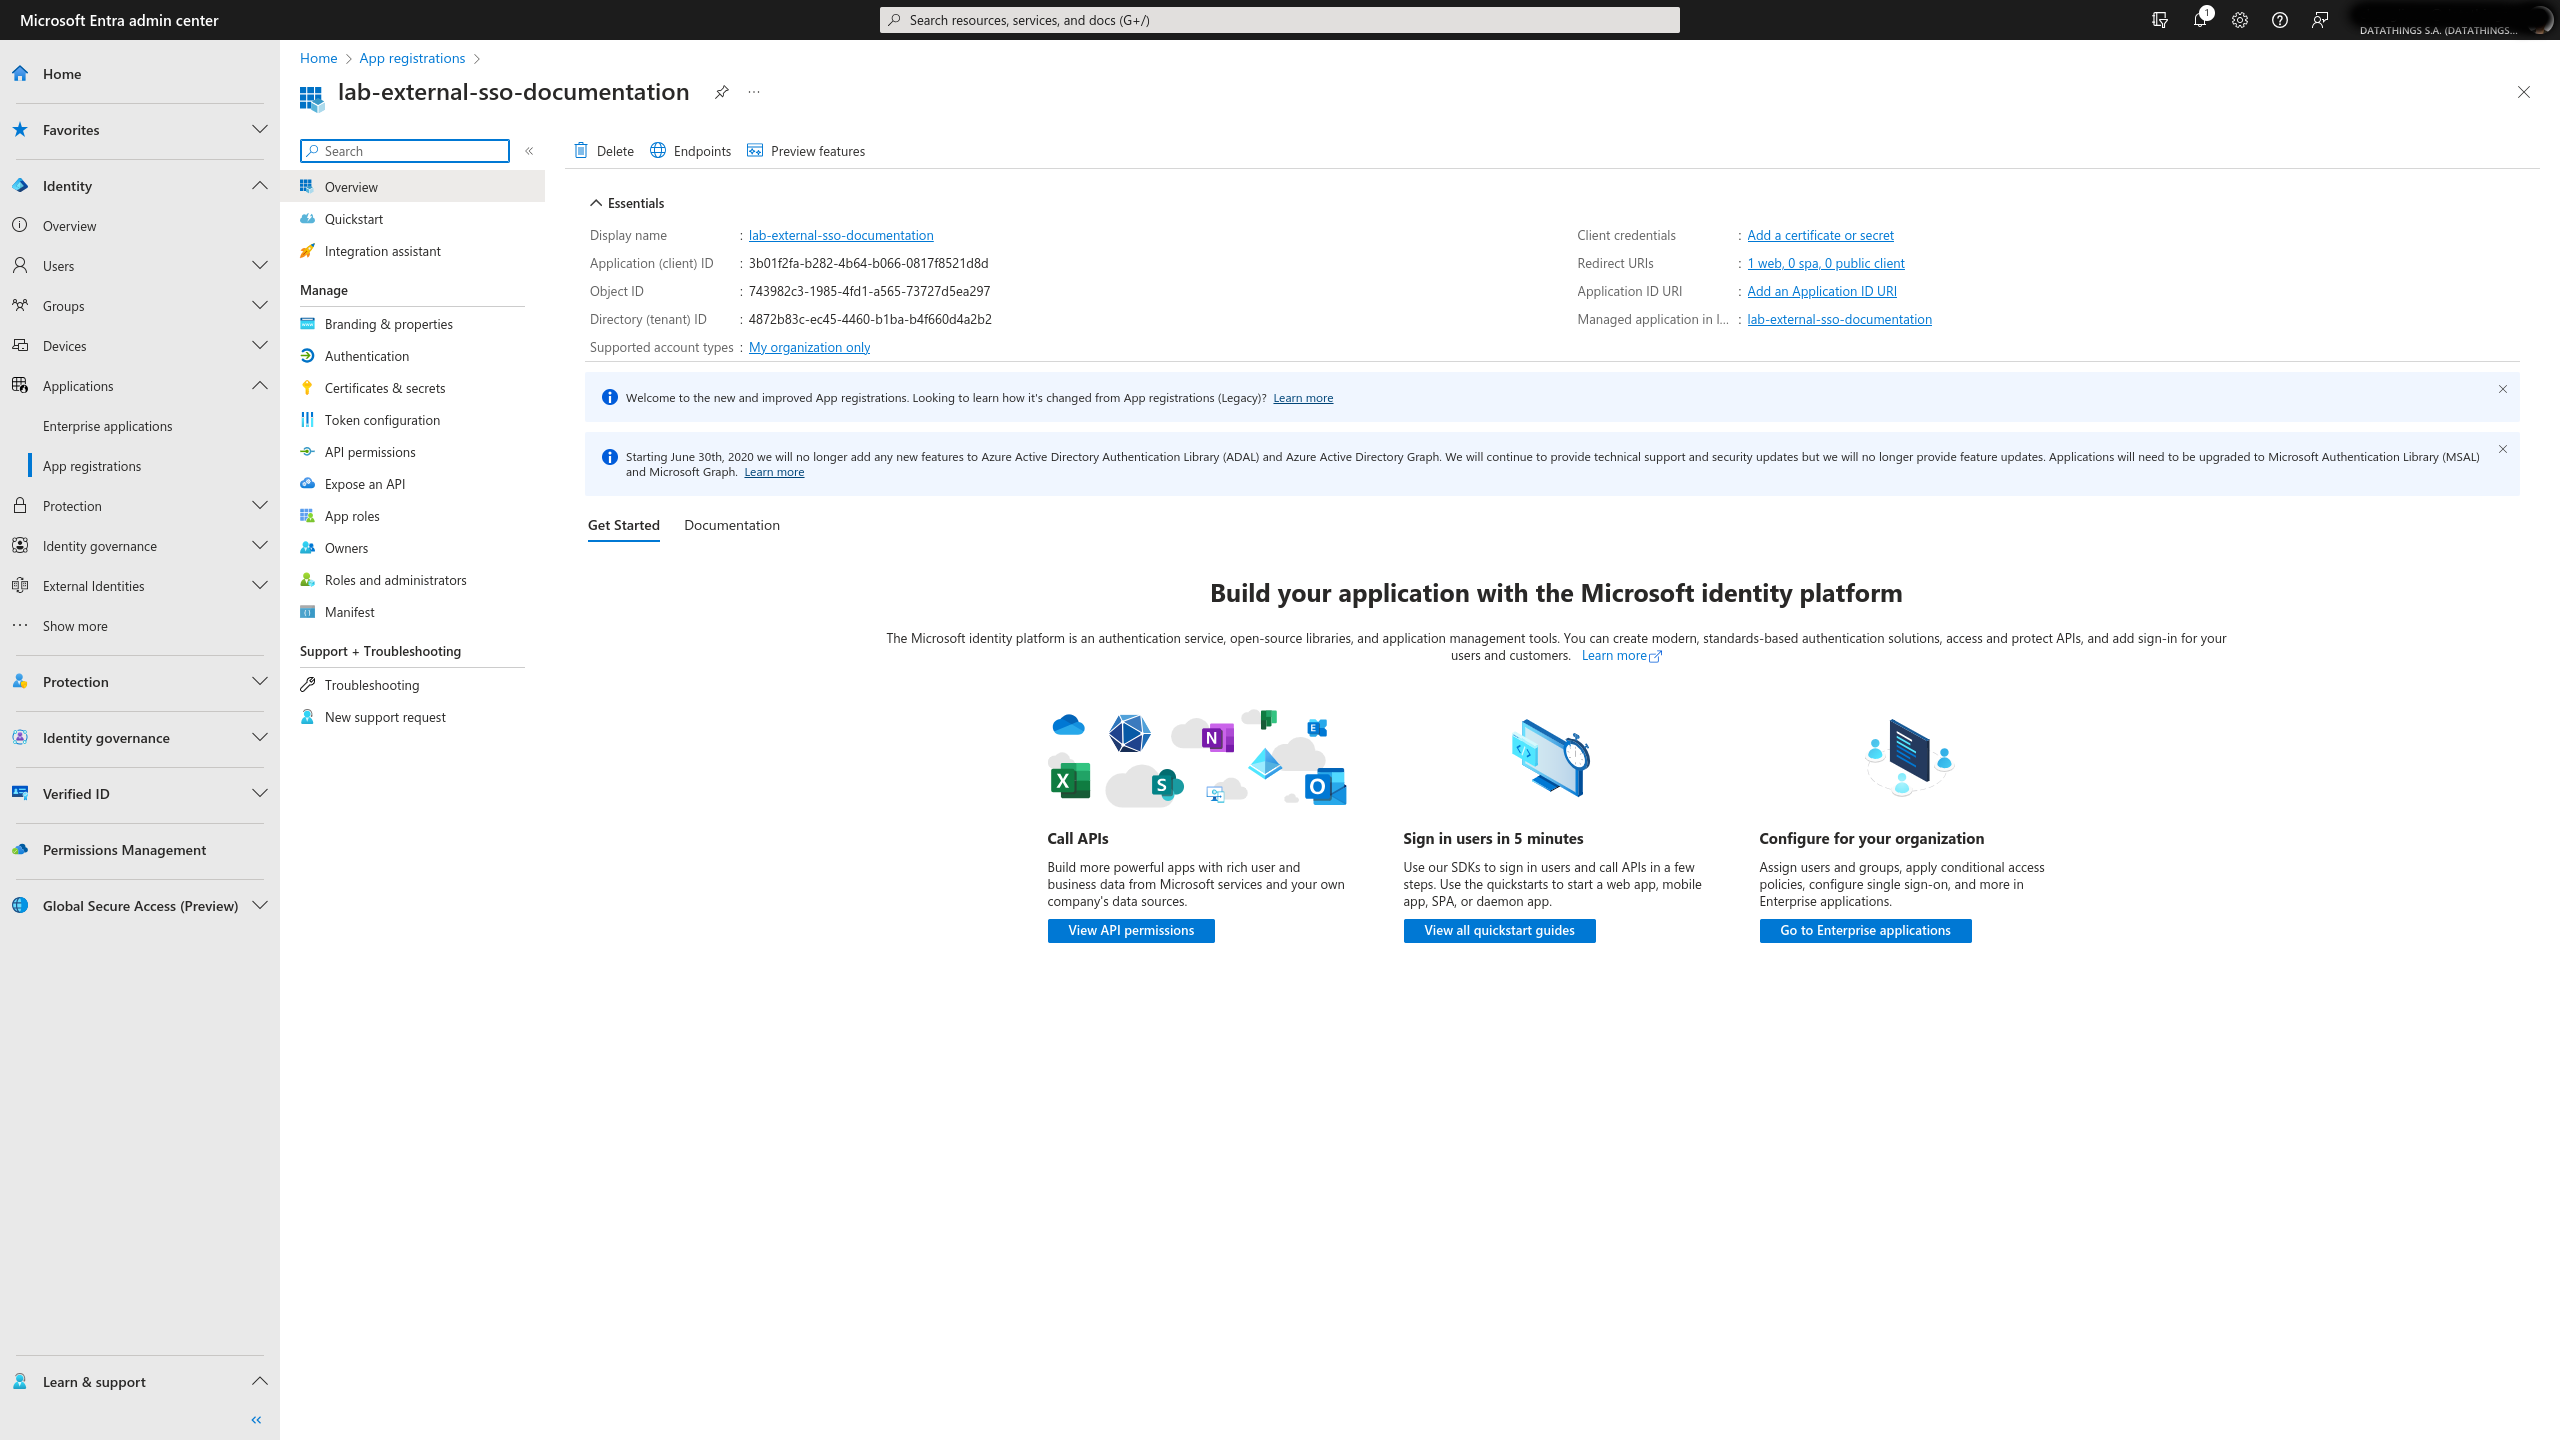
Once you submit your registration request, you should see this page below that shows you the information you need to configure your GreyCat deployment.
Authentication configuration
Regarding the basic configurations, assuming you followed all the previous steps precisely, you only have to check one last option to complete the settings. In your work zone, navigate toManage -> Authentication. Within the session of implicit grant and hybrid flows, check the ID tokens option. This token is essential for GreyCat’s SSO functionality based on the OpenID Connect protocol.
Token configuration
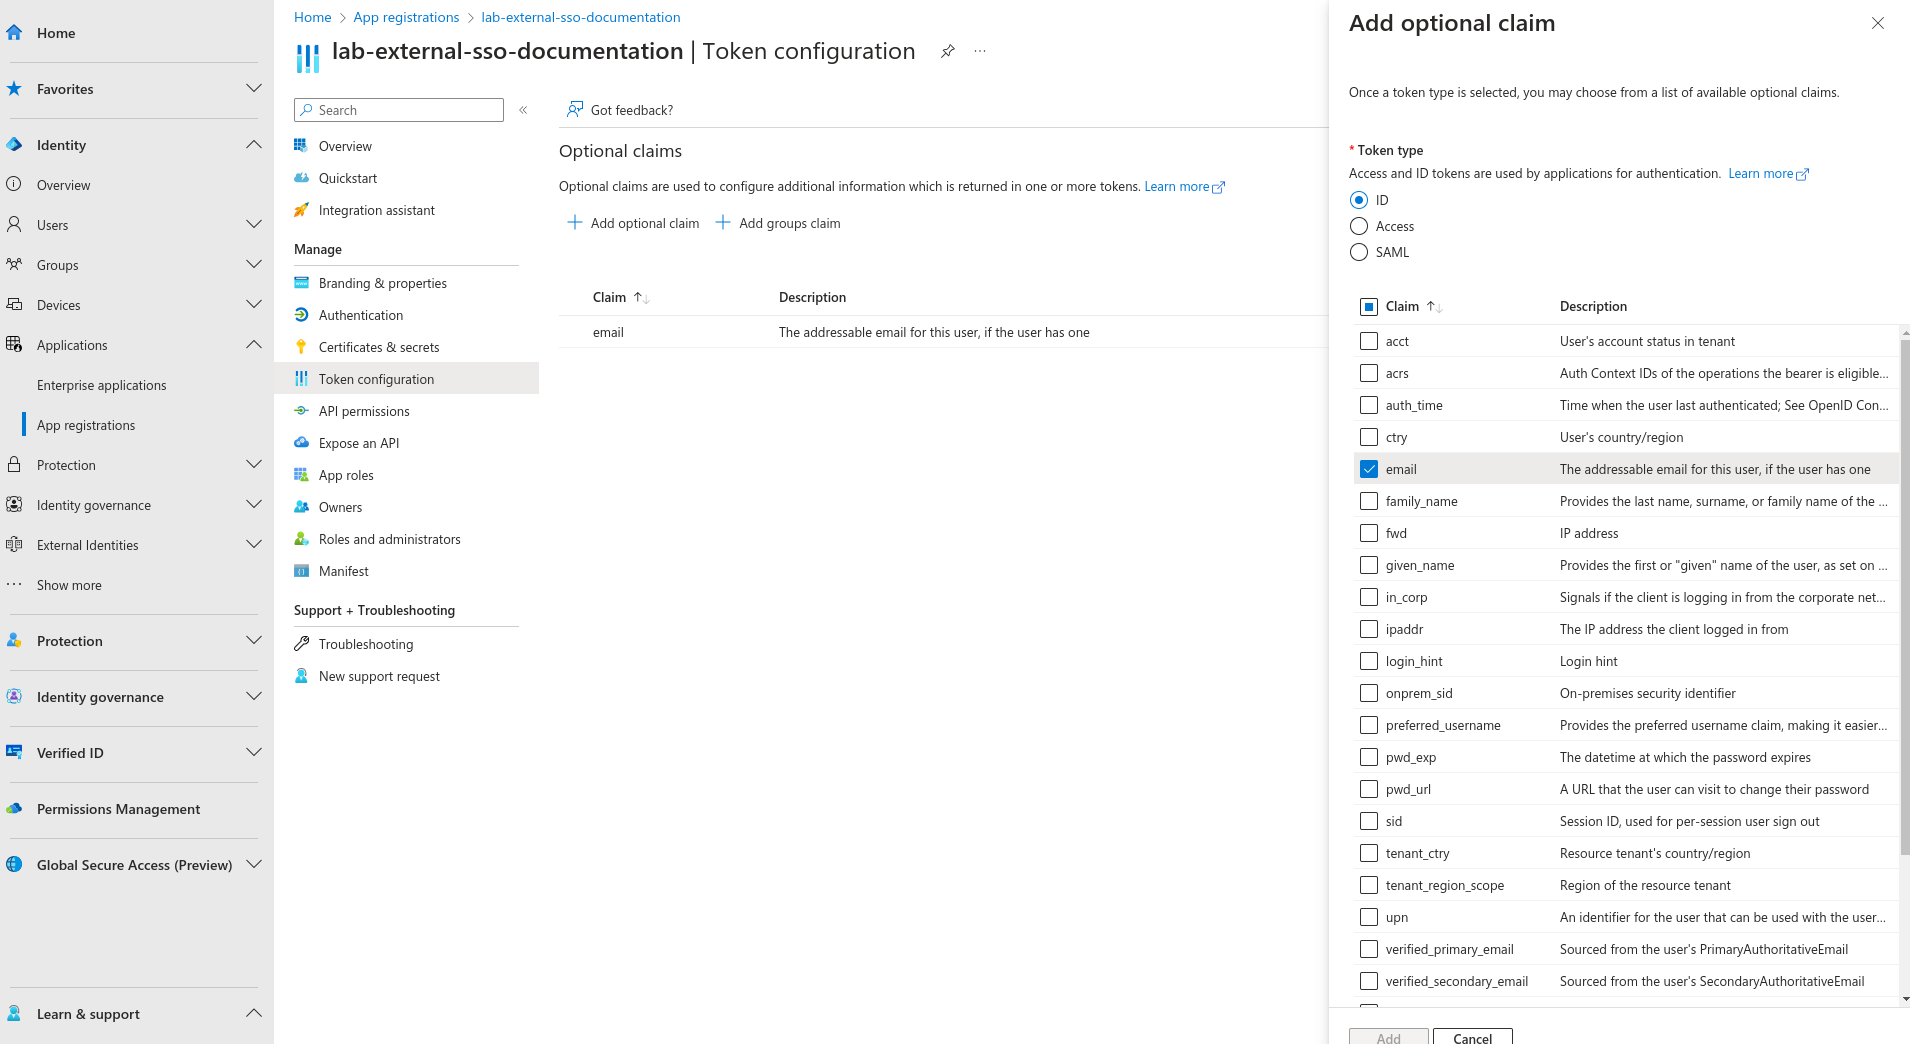
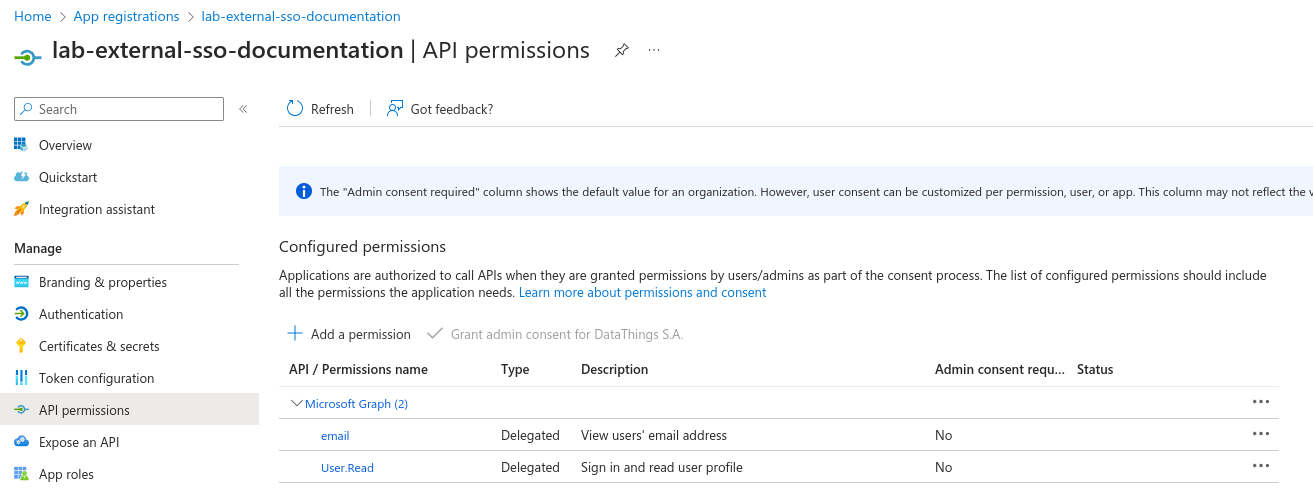
When using a third-party SSO service for authentication, GreyCat manages its own user sessions on the server-side. To enable this, it requires additional information in the claims of the ID Token issued by the SSO service provider. To make this work, it needs extra information in the claims of the ID Token issued by the SSO service provider. Essentially, you have to include either preferred_username or email in the claims of the token. In the case of Azure Entra application, you can include both. We recommend you to always include at least email since this information is always present for a Microsoft account. To configure this, navigate to Manage -> Token configuration. Click on the Add optional claim button in the top left corner of the work zone. When adding email into the claim, Azure might remind you to grant additional permissions because Microsoft Graph manages users’ personal information. Each piece of information needs explicit exposure to your Entra application for visibility.
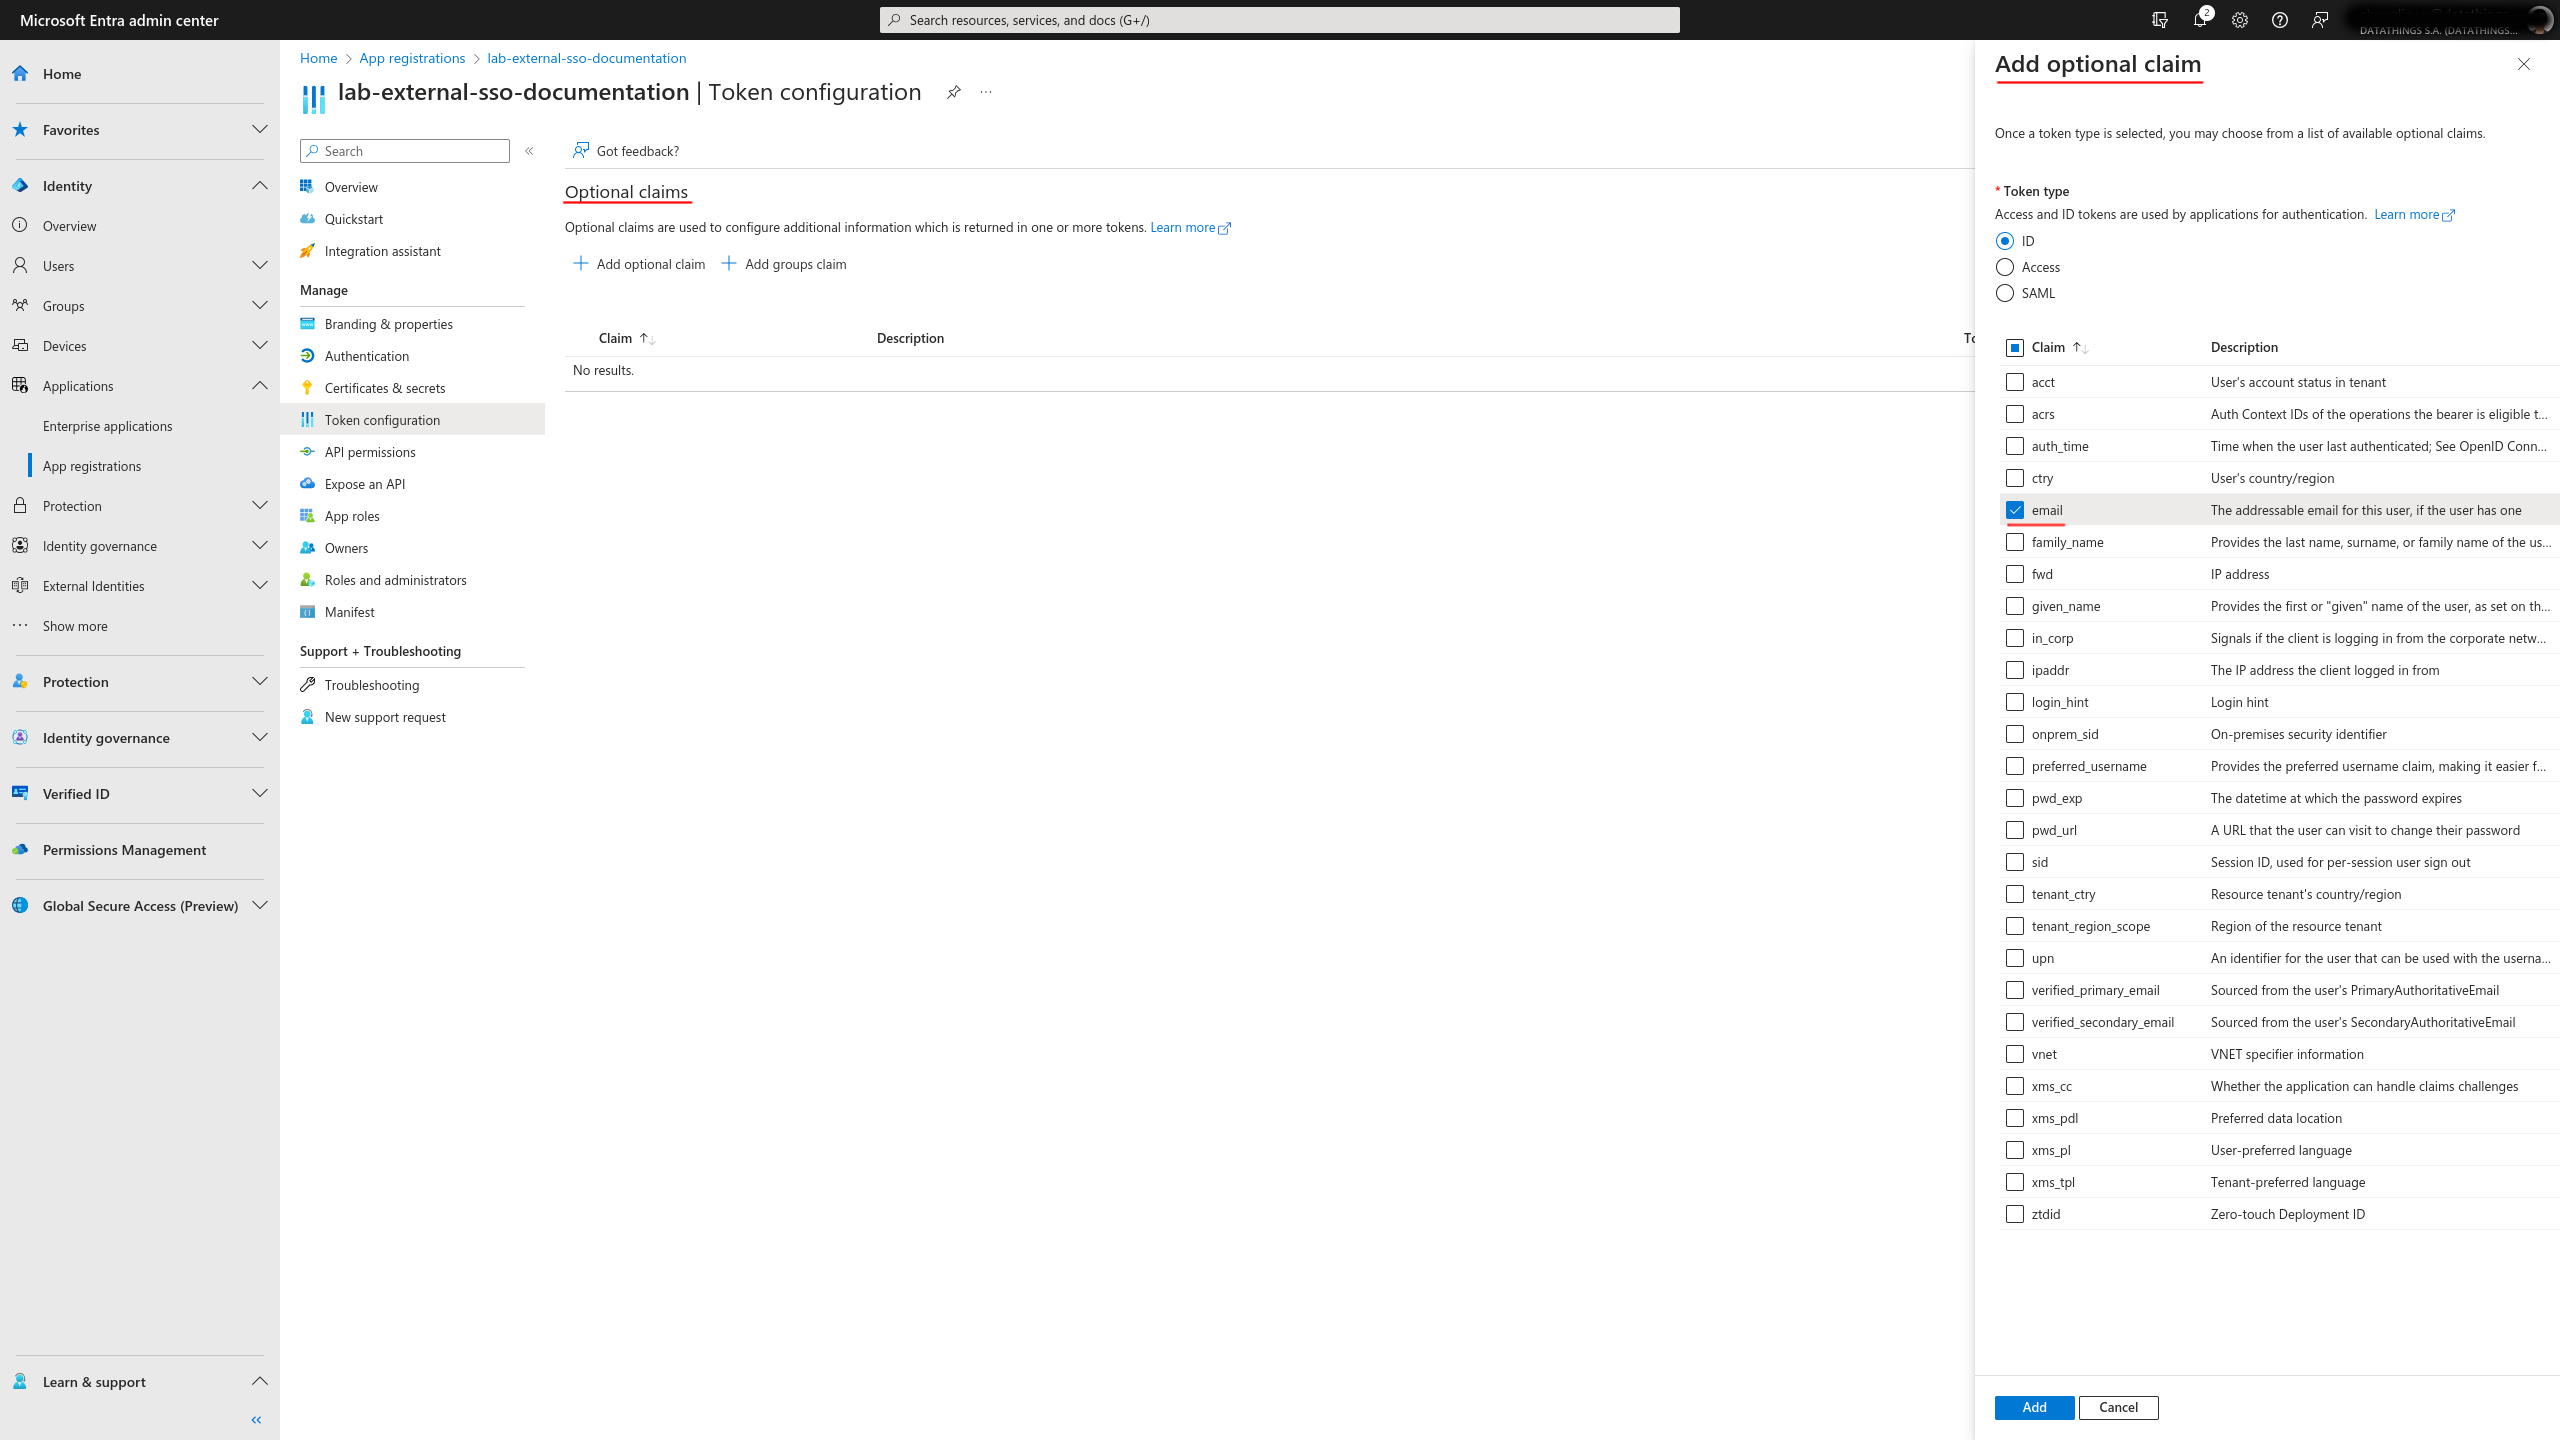
If you wanna check the permissions granted to your Entra application, you can navigate to Manage -> API permissions.
Role-related configuration
This section is essential to grant the access to GreyCat through SSO service. If none compatible role is assigned to the user of if the role is not mentioned in the ID Token, you will get an error code of 403 Forbidden.
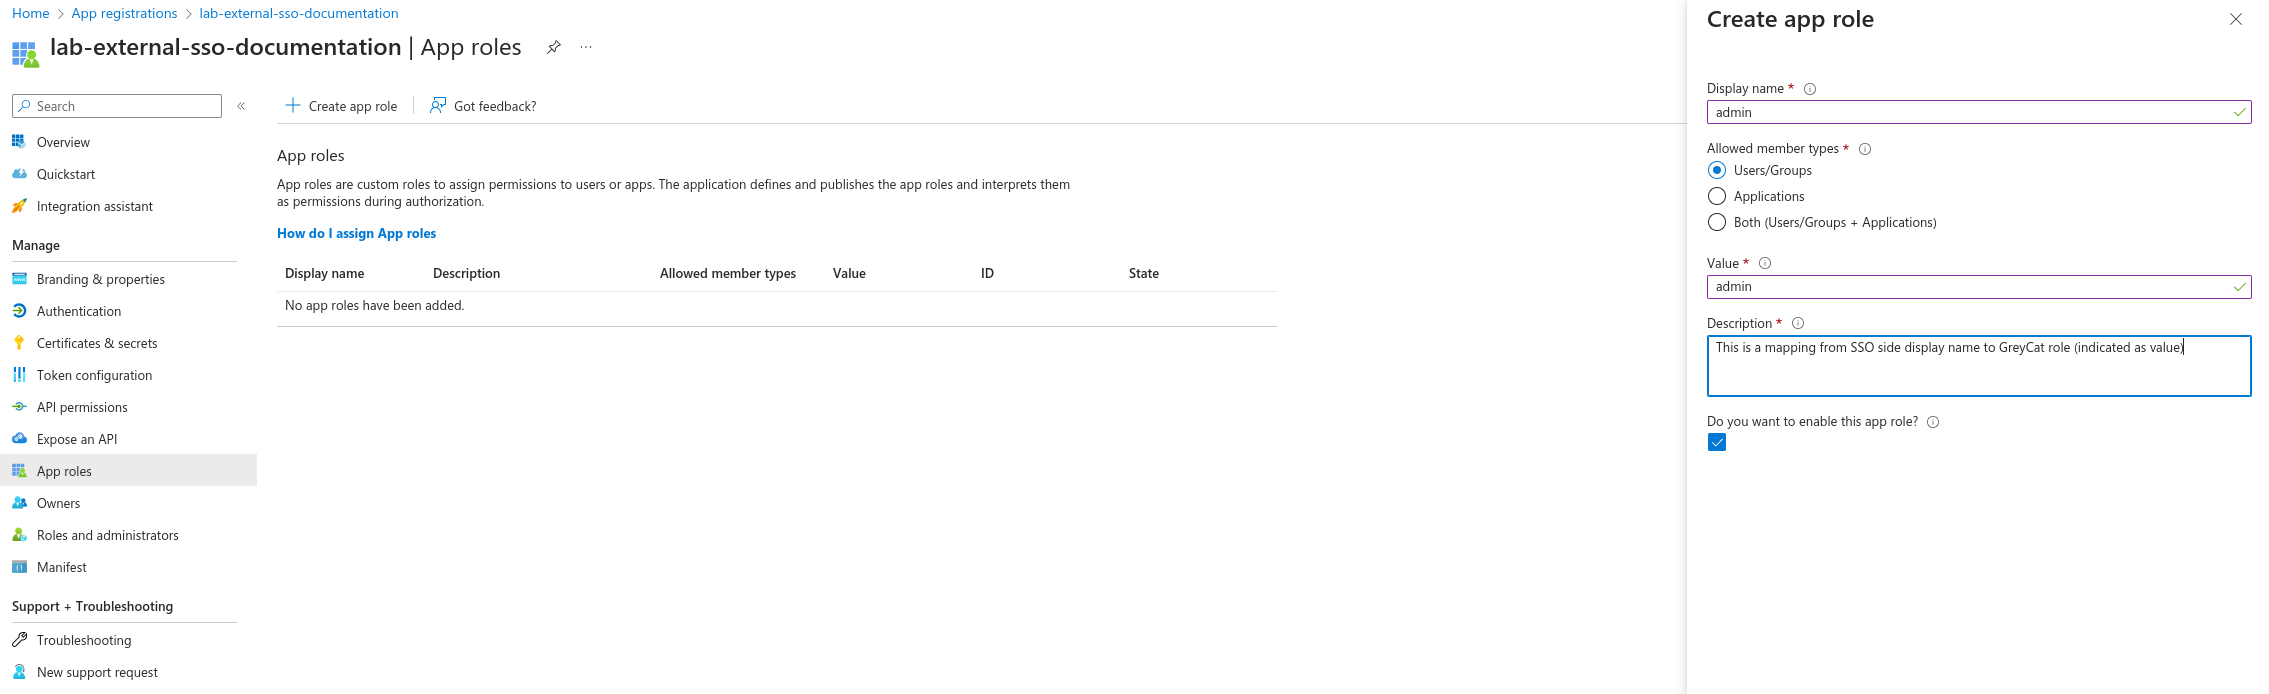
Define roles
Since GreyCat relies on Role-Based Access Control (RBAC) for security, you’ll need to define server-side roles within GreyCat and associate permissions with them. While this definition happens within GreyCat, you should also define and assign Entra App roles to Microsoft users in Azure Entra. This ensures user linkage to corresponding GreyCat roles. Essentially, each Entra role value should match a GreyCat role name for proper mapping. For example, by default, GreyCat generates a set of roles in *[GreyCat_Project_Root]/gcdata/security/user_policy.json* including admin. To map this GreyCat role to an Entra App role, create an Entra App role with the value ‘admin’. To do this, navigate to Manage -> APP roles and click on the button of Create app role on the top left of work zone.
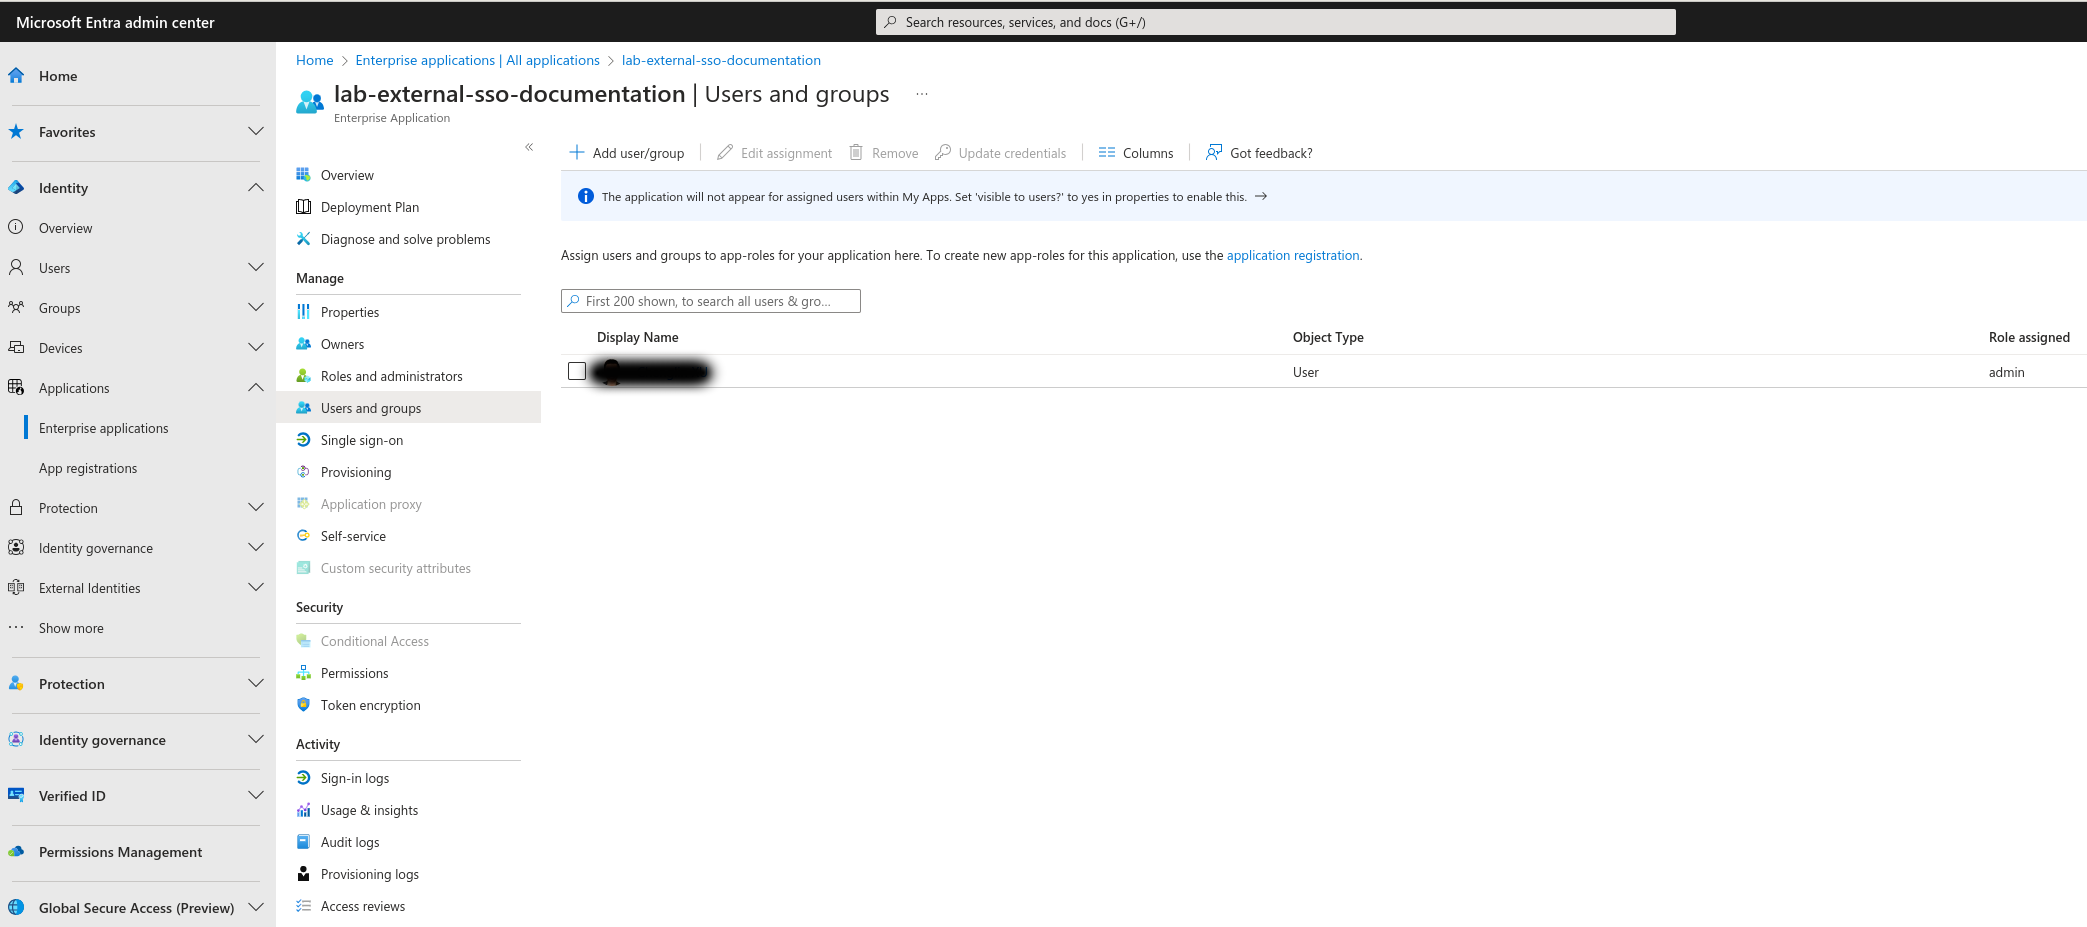
Assign roles
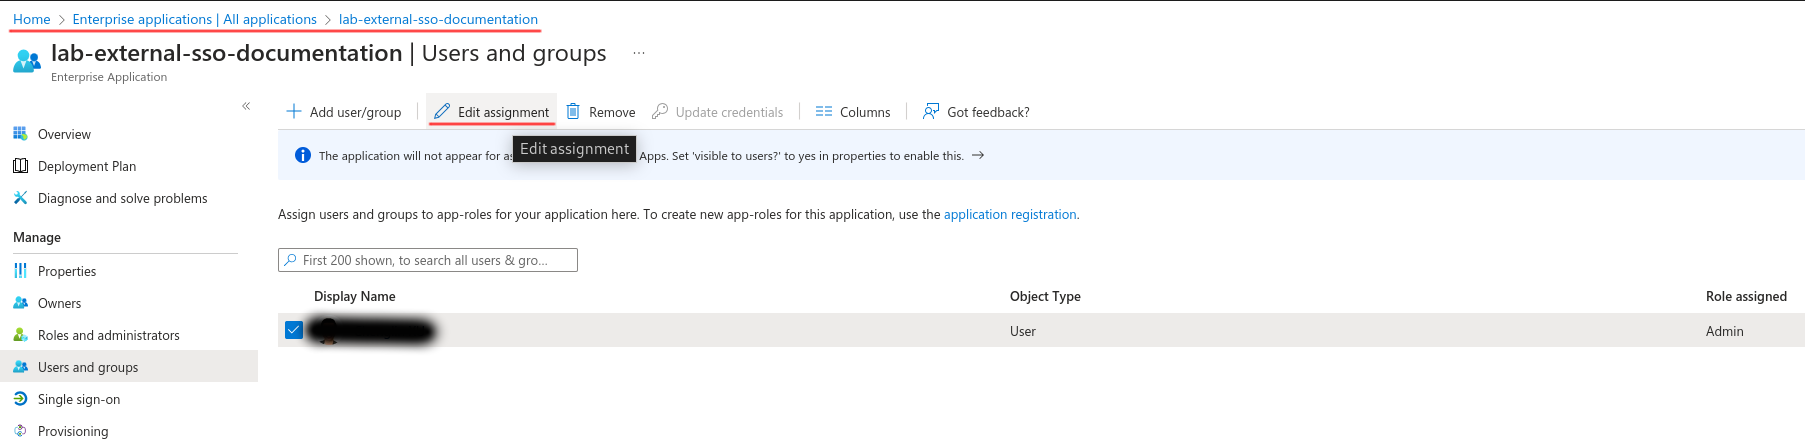
Once you have defined App roles which are automatically mapped to the GreyCat roles by value, you can assign these roles to the users of specific users. To do this, you have to access the setting from the most left side menu by navigating to Applications -> Enterprise applications -> YOUR_ENTRA_APPLICATION. Then, using the left navigation panel of your application, navigate to Manage -> Users and groups. Use the Add user/group button to add users and assign roles directly. You can also edit existing user assignments with the Edit assignment button. Remember, only one unique role can be assigned to each GreyCat user.
GreyCat configuration
Find the values
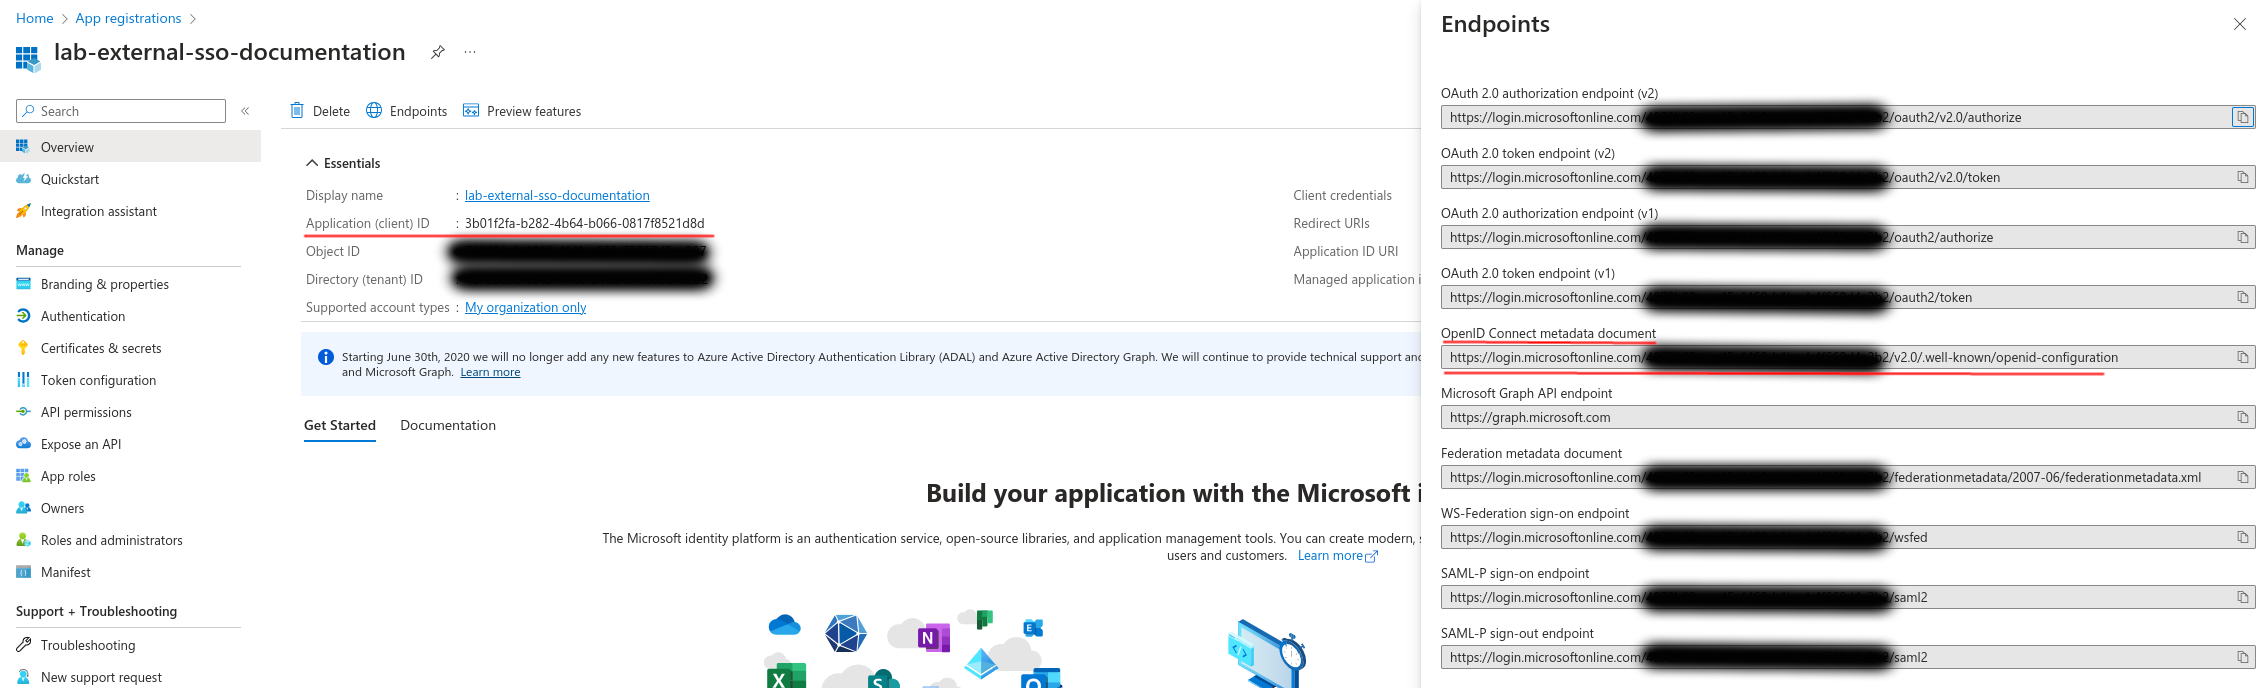
To configure GreyCat to use your newly created MS Azure Entra application, you need two pieces of information, which can be provided either through command-line arguments or a .env file at your GreyCat application’s root.
- The first piece of information is the Application ID (Client ID), which you can find directly in the top left corner of your Entra application’s dashboard. Its value is referenced by the GreyCat environment variable
GREYCAT_OID_CLIENT_ID. - The second piece of information is the URL that allows GreyCat to discover the SSO service configuration. This value is named
GREYCAT_OID_CONFIG_URLas a GreyCat environment variable. We can click on theEndpointbutton and find it namedOpenID Connect metadata documenton the right.
Use the values for configuration
To check how to pass the configurations using command line arguments, you can always run greycat serve -h.
To pass the values by environment variables using a .env file, create the file named exactly ".env" at the root directory of your GreyCat project and set the two values that we just found:
GREYCAT_OID_CLIENT_ID={$YOUR_APPLICATION_ID (Client ID)}
GREYCAT_OID_CONFIG_URL=https://login.microsoftonline.com/{$YOUR_TENANT_ID}/v2.0/.well-known/openid-configuration
Using Google
Create a project
We suppose that you already have a Google Cloud account and you have completed all the basic account configurations. Before using Google’s OAuth 2.0 authentication system as SSO service, you must set up a project in the Google API and services console. As illustrated in the screenshot, on the top right, we can click on the CREATE PROJECT button.

Once you click the button, you will see the page that allows you to name your project and attach it to an organization. You can name the project as you want, keep in mind that the project cannot be renamed afterwards. Regarding the organization, you do not have to provide one; in this demo, we would leave it as it is.

Create a credential
Create the OAuth consent screen
Once we have our project created, we will navigate to the Credentials panel using the left-side menu. Then, we click on the Create credentials button and select OAuth client ID in the drop-down menu.
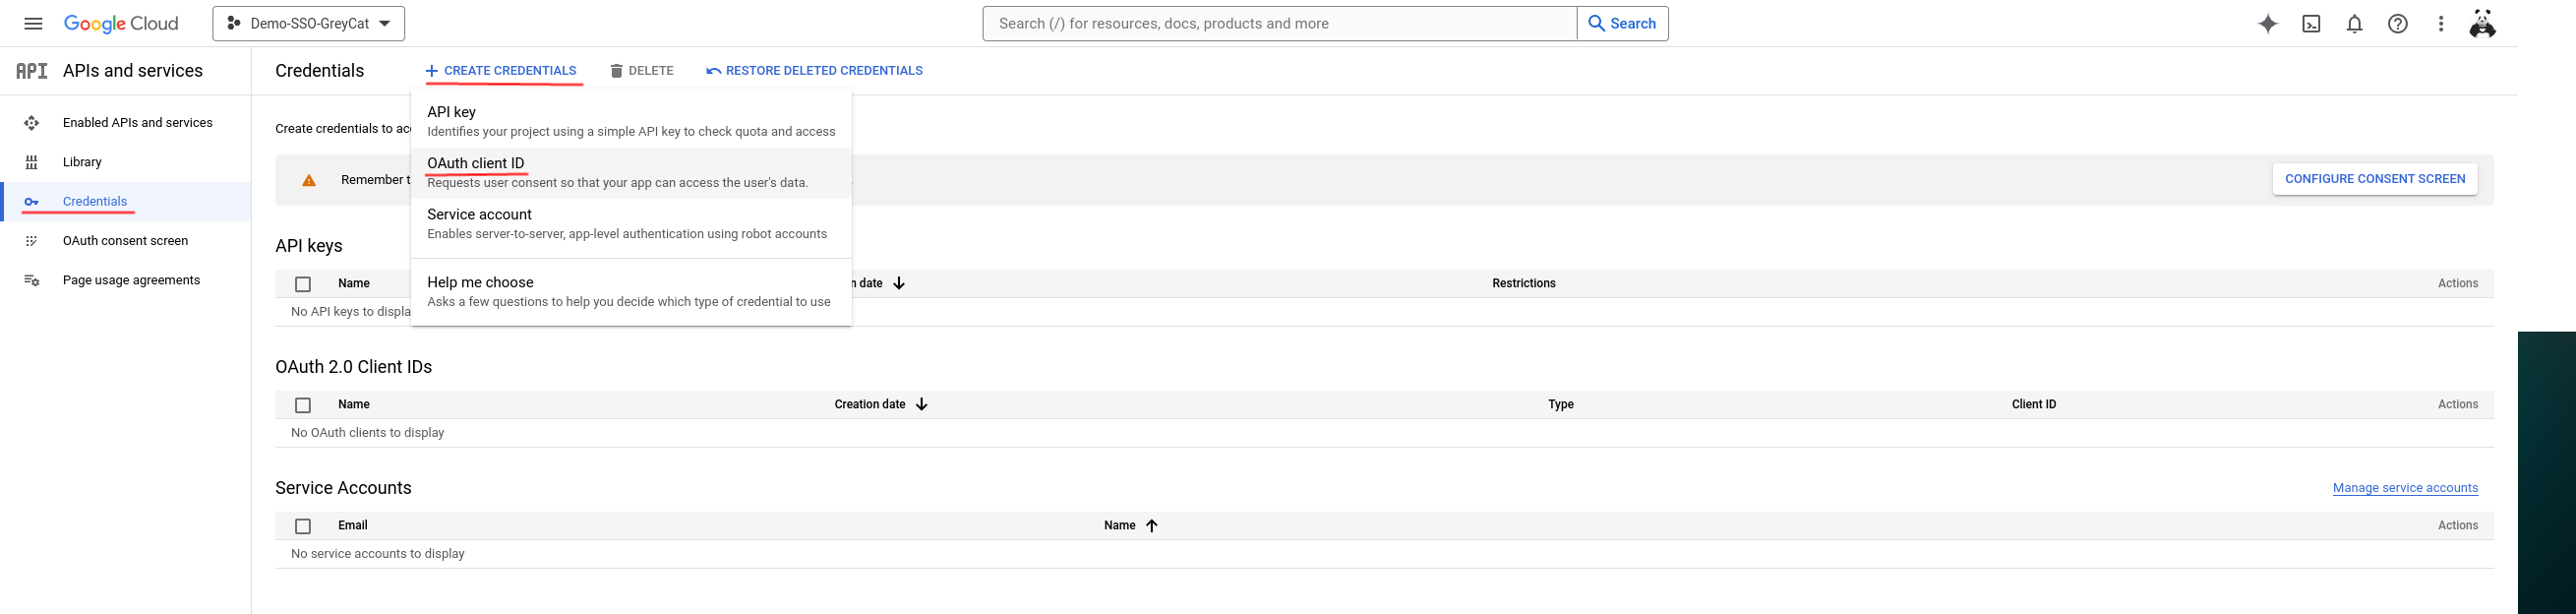
If you followed the exact instructions, you will find out that it doesn’t work. But please do not curse yet; it is an expected failure. It wants us to configure the consent screen. To do so, we need to click on the Configure consent screen on the right side.

Once you click the button, you will be redirected to the OAuth consent page configuration. The configuration process needs us to specify our target users, it could be either internal users of the organization that we previously defined or external users, which means any Google Account holder. Since we didn’t attach this application to any organization, we will select external and click on Create.

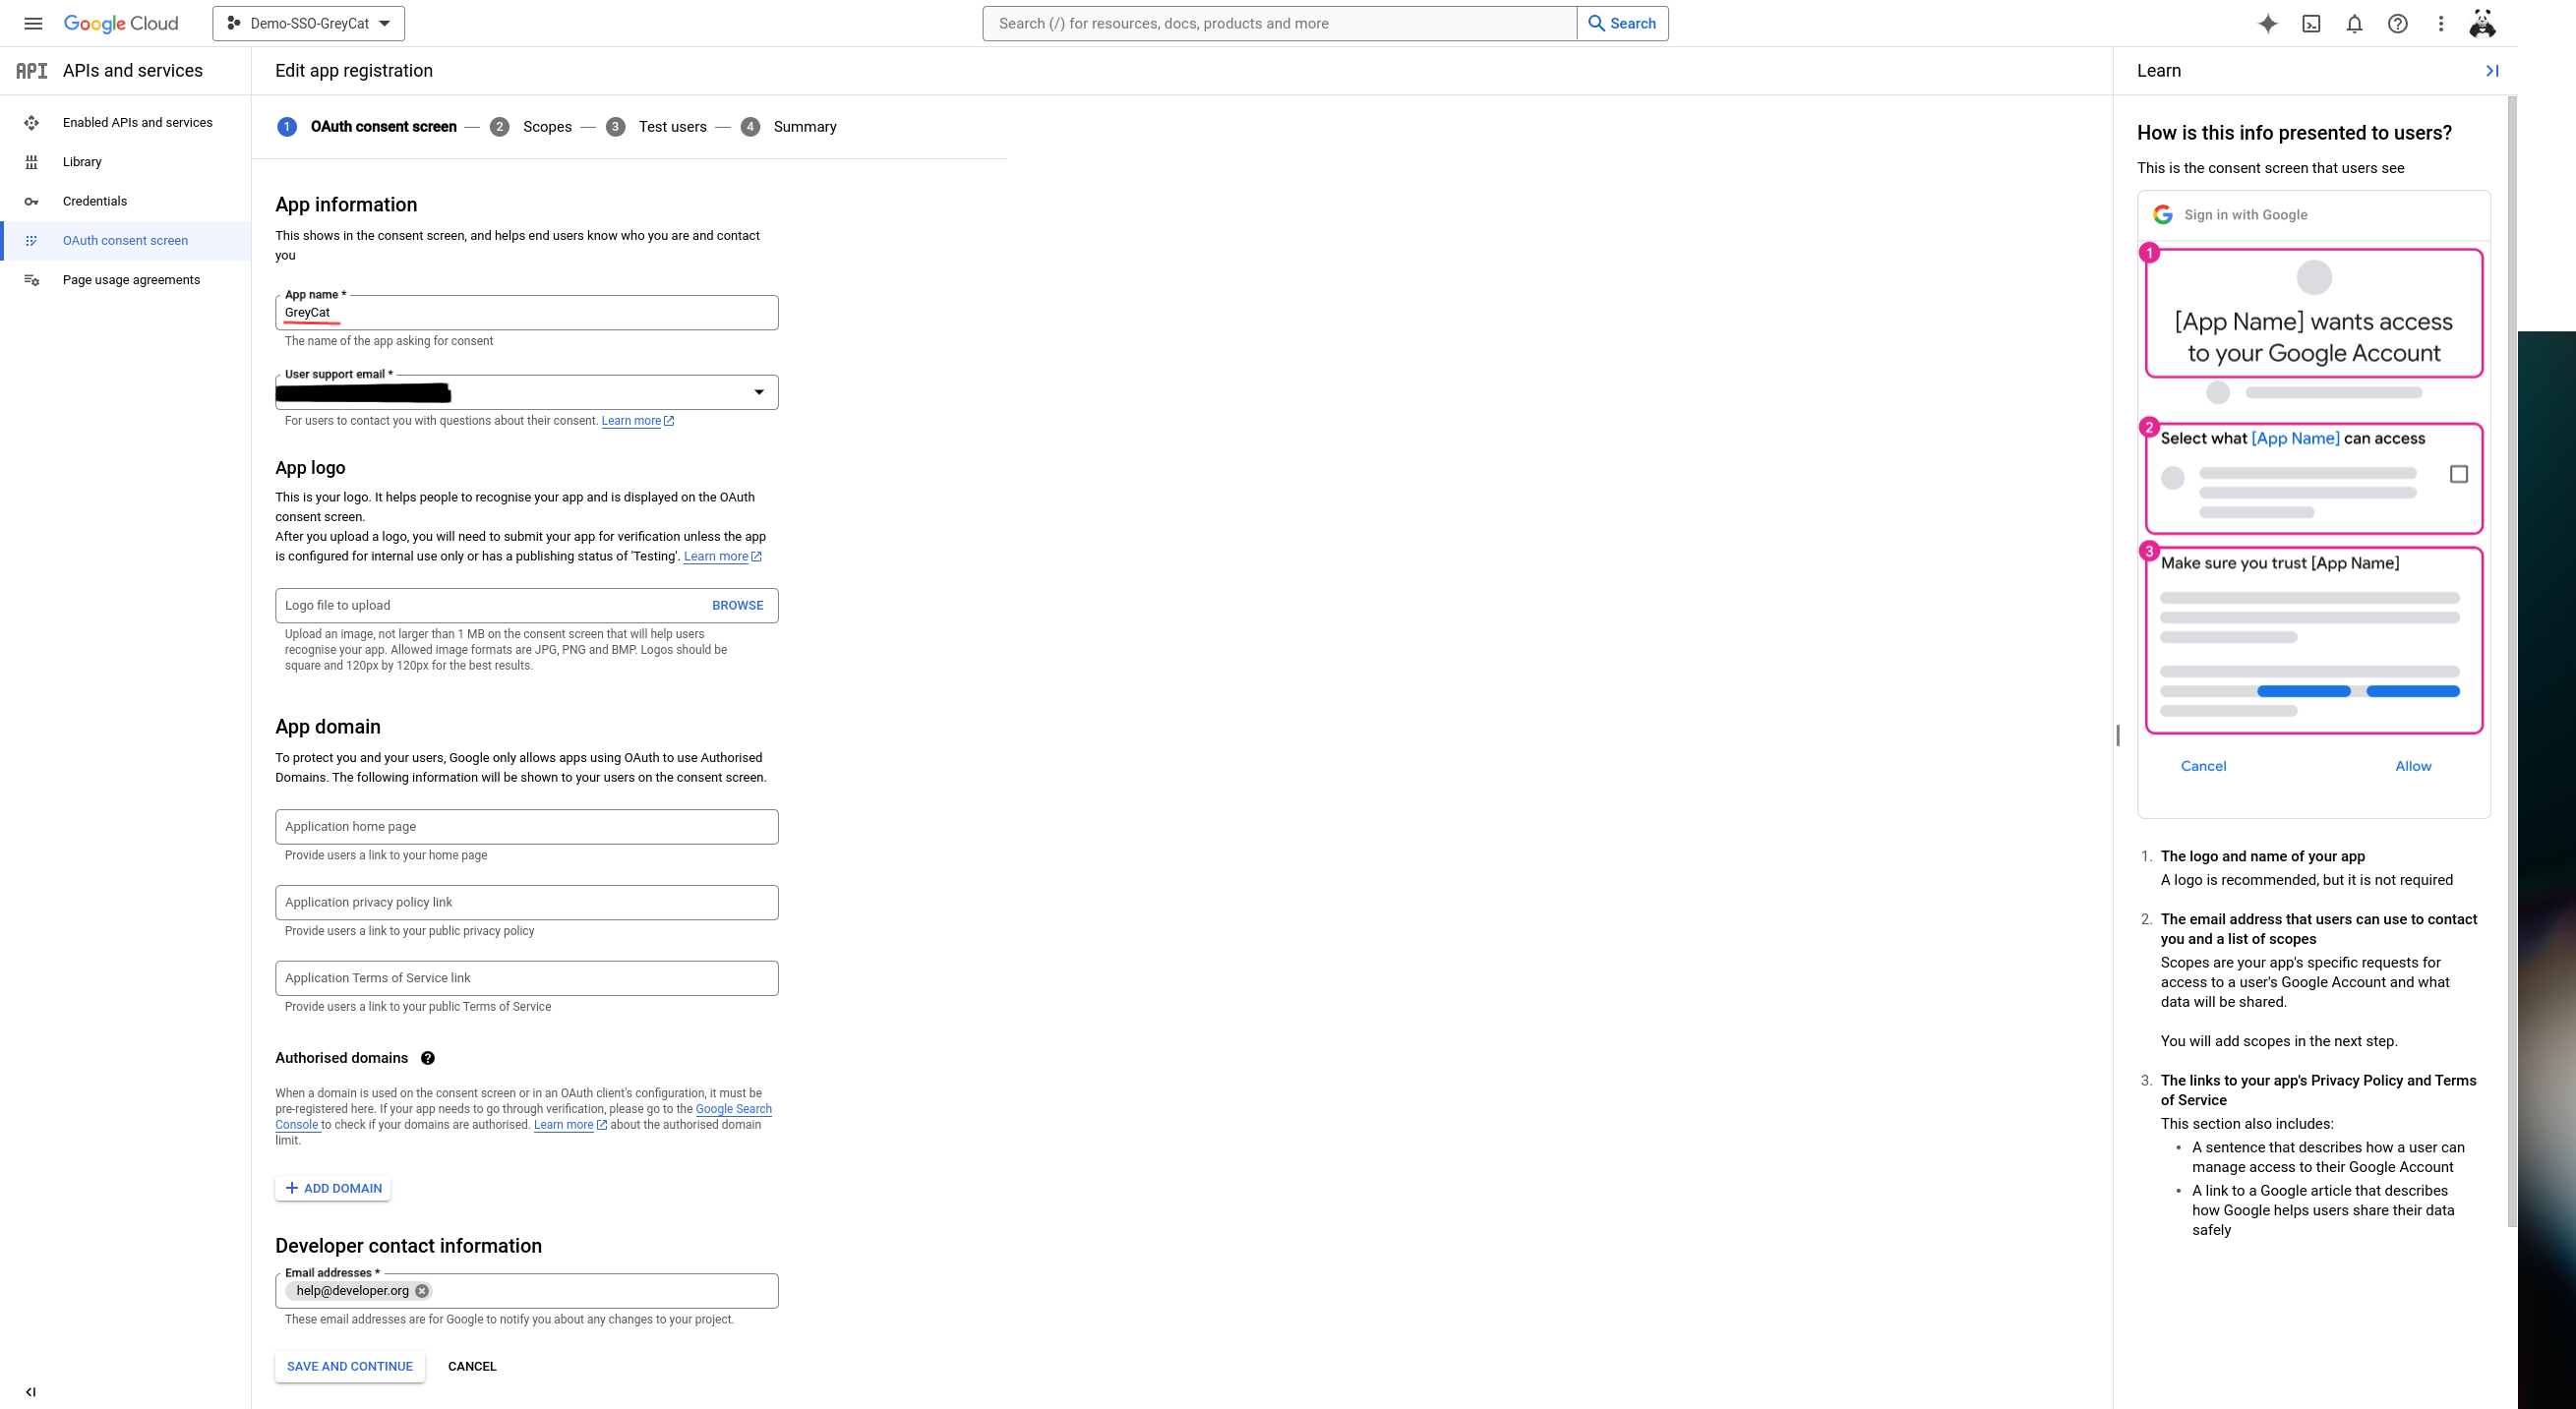
Now, we are going to customize the content to be displayed on the consent page. For this step, you can fill the blanks as you want. Make sure that you meet the minimal demand. Click Save and continue when you are ready.
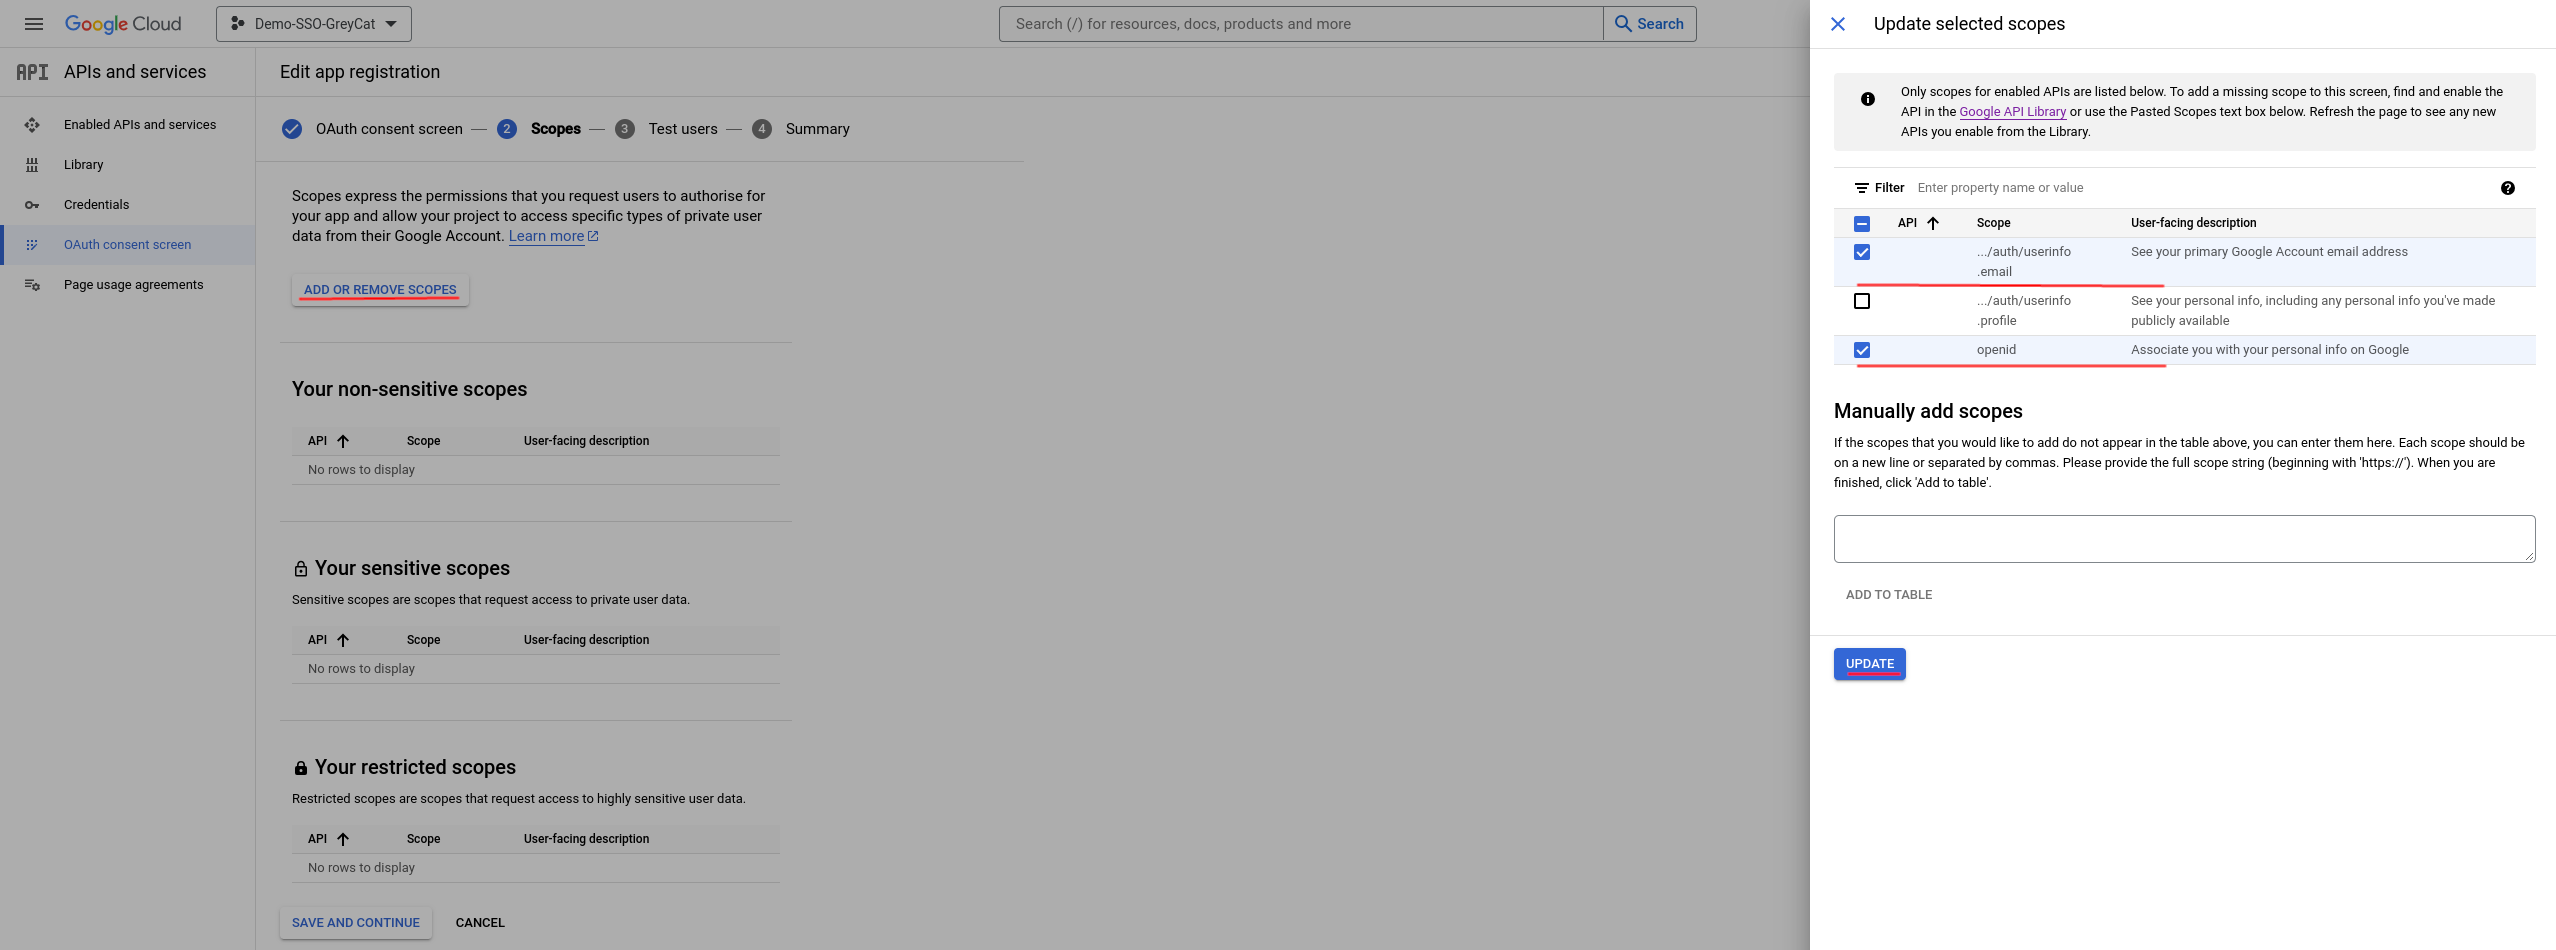
This following step is essential and important for the SSO service to work with GreyCat. Here, we are going to define the scopes to be included in the SSO response. As explained earlier in this documentation, GreyCat adopts the Implicit flow of OIDC protocol which needs the ID_Token during the authentication. Also, GreyCat relies on the user’s email to distinguish users; make sure this scope is also included in the responses of the SSO service. To add these two scopes, click on Add or remove scopes. Then, on the right side of your screen, in the popped-out panel, check at least .../auth/userinfo.email and openid, then click update.
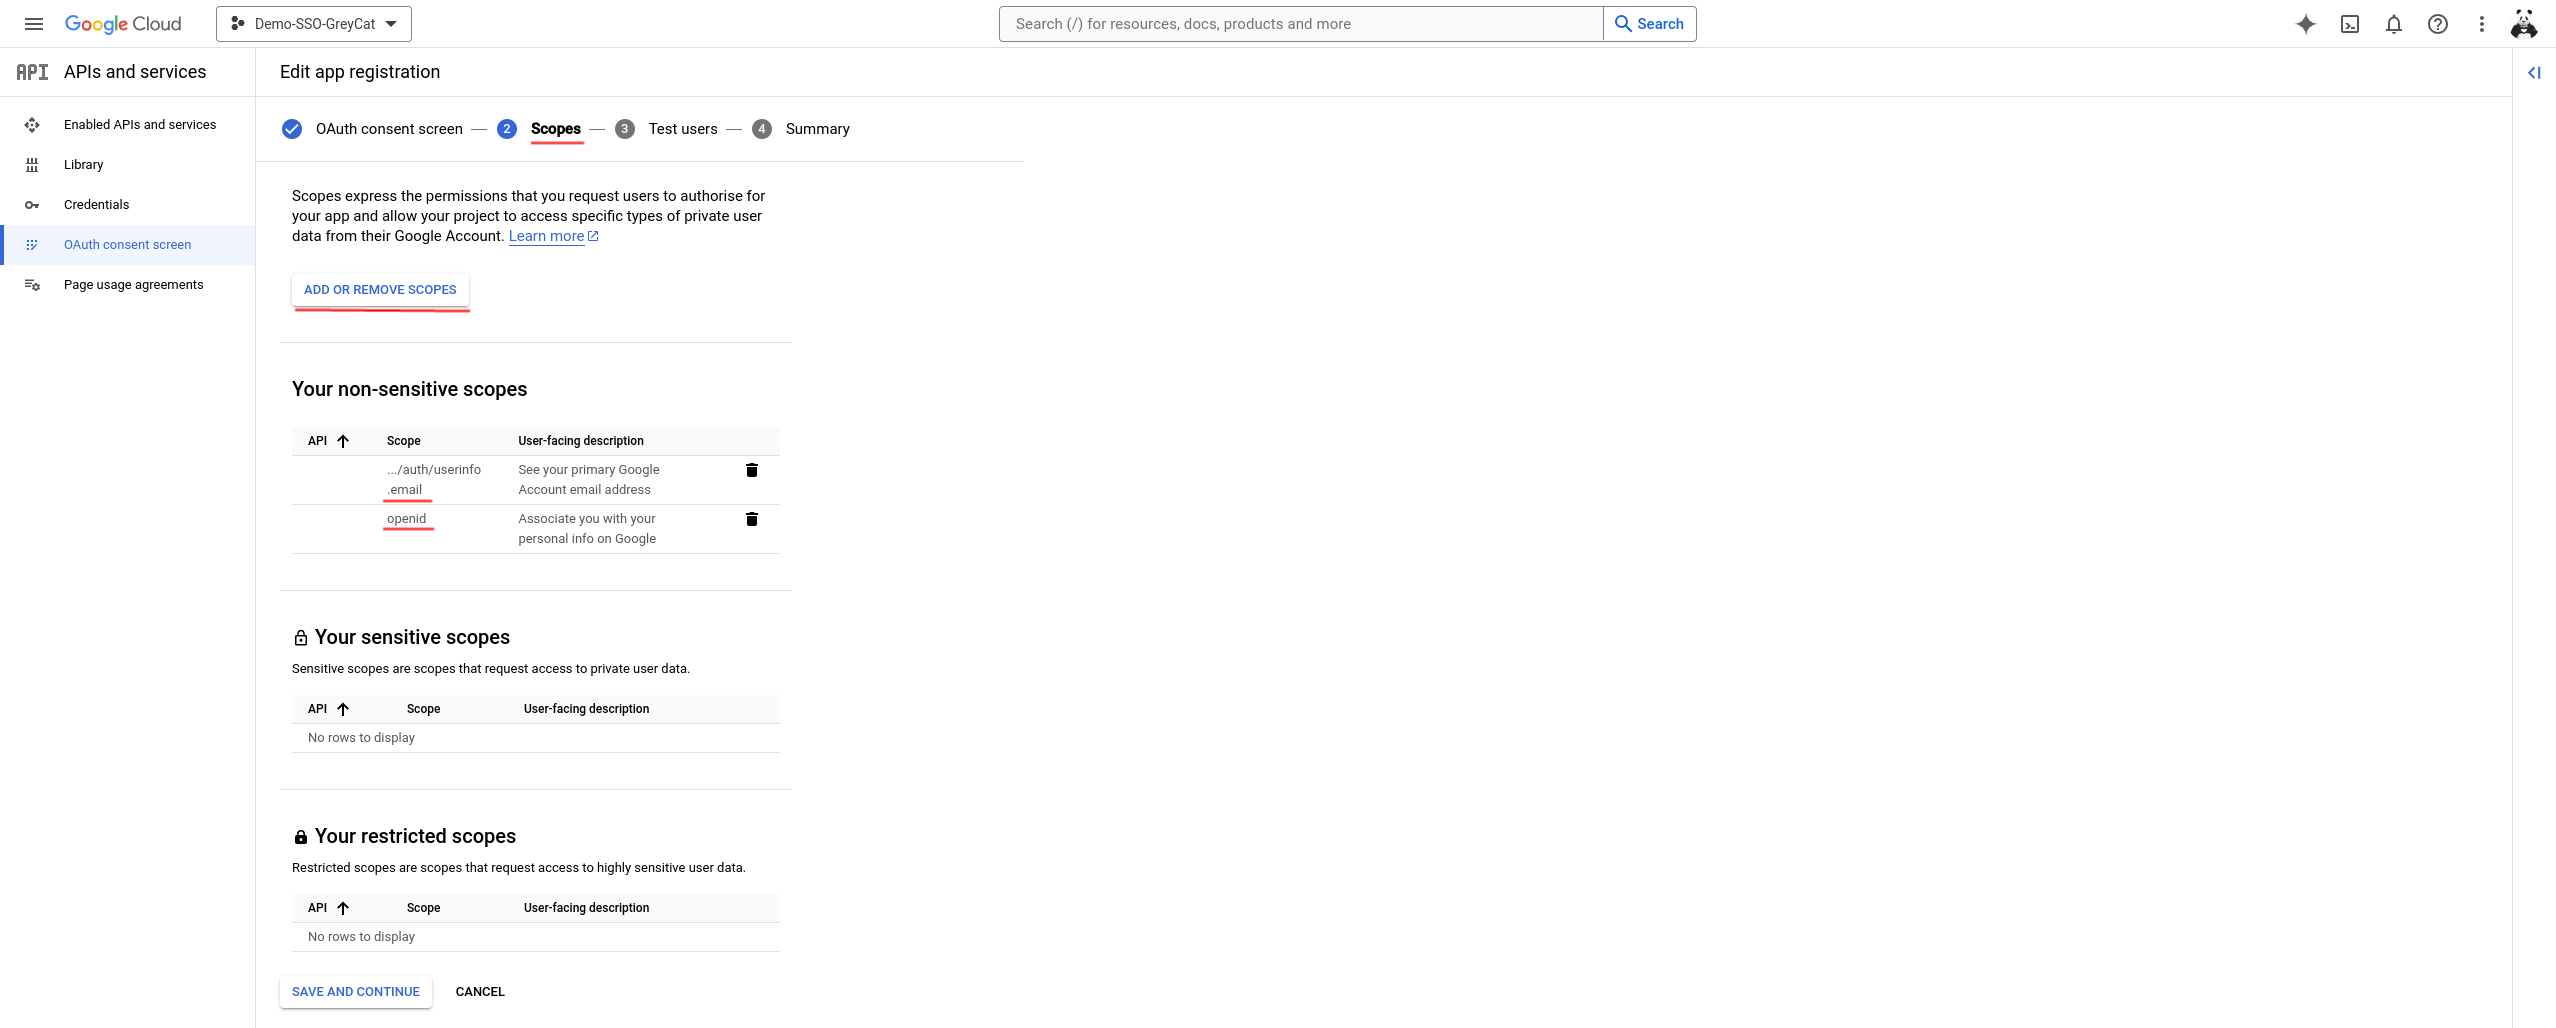
Afterwards, you should see a result similar to this:
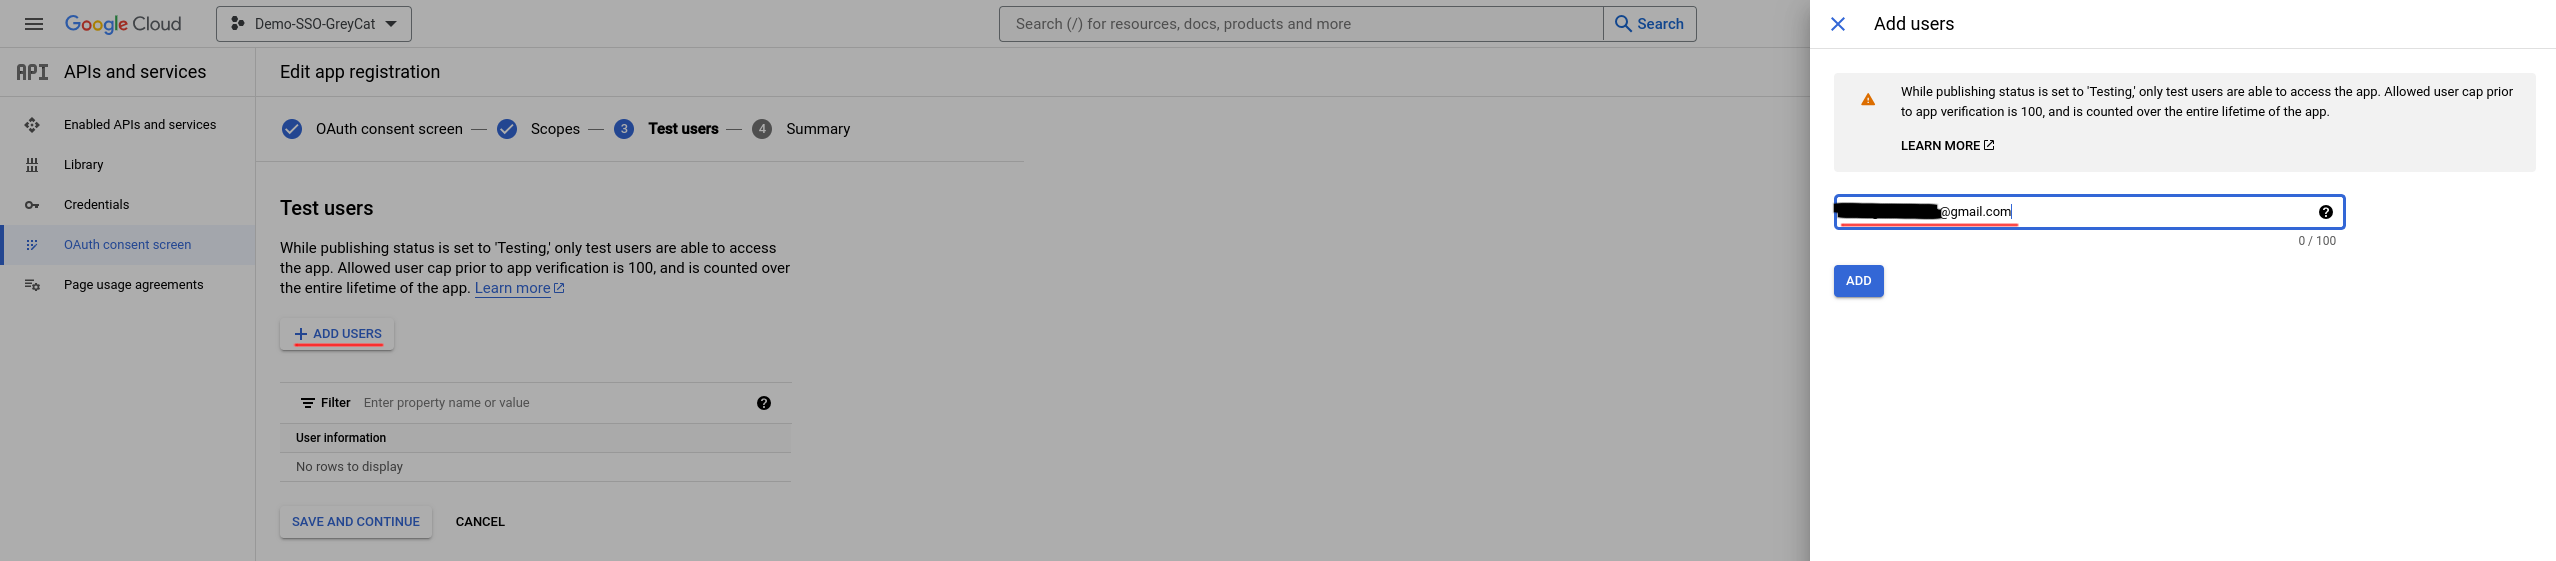
This next step allows us to add Test users. Basically, you can add from zero to one hundred users, but for test purposes, you might want to add at least yourself as a test user. To do so, click Add users, and again, type your Gmail address in the popped-out panel then click Add.
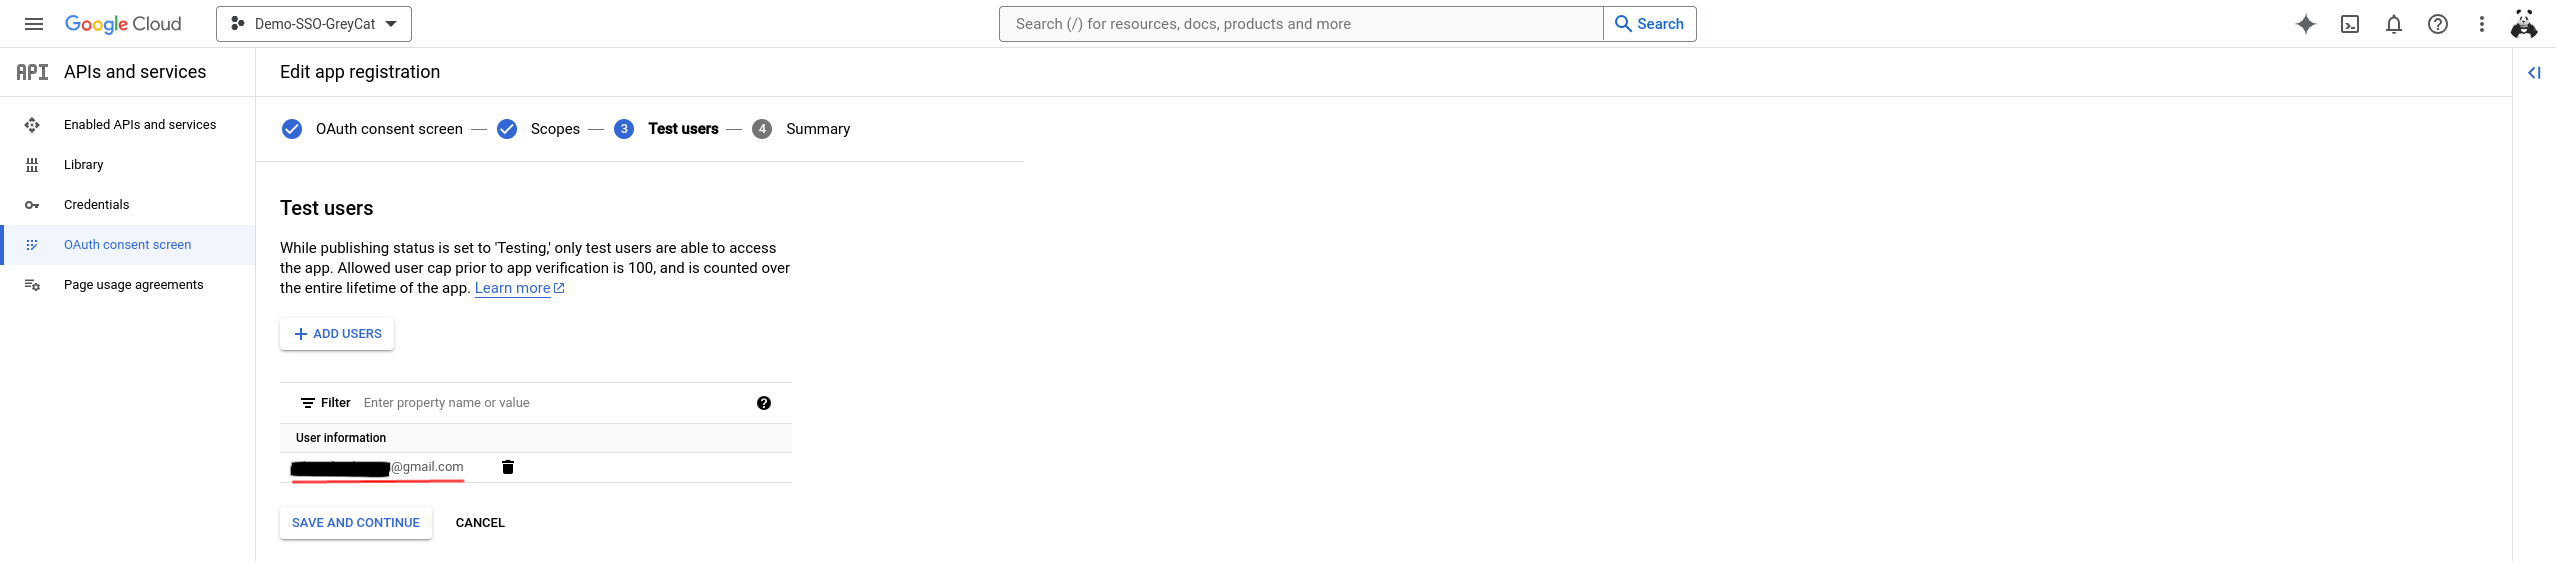
As demonstrated in the following image, all users will be displayed in the list once they are added. To keep all your modifications and move on, click on Save and continue.
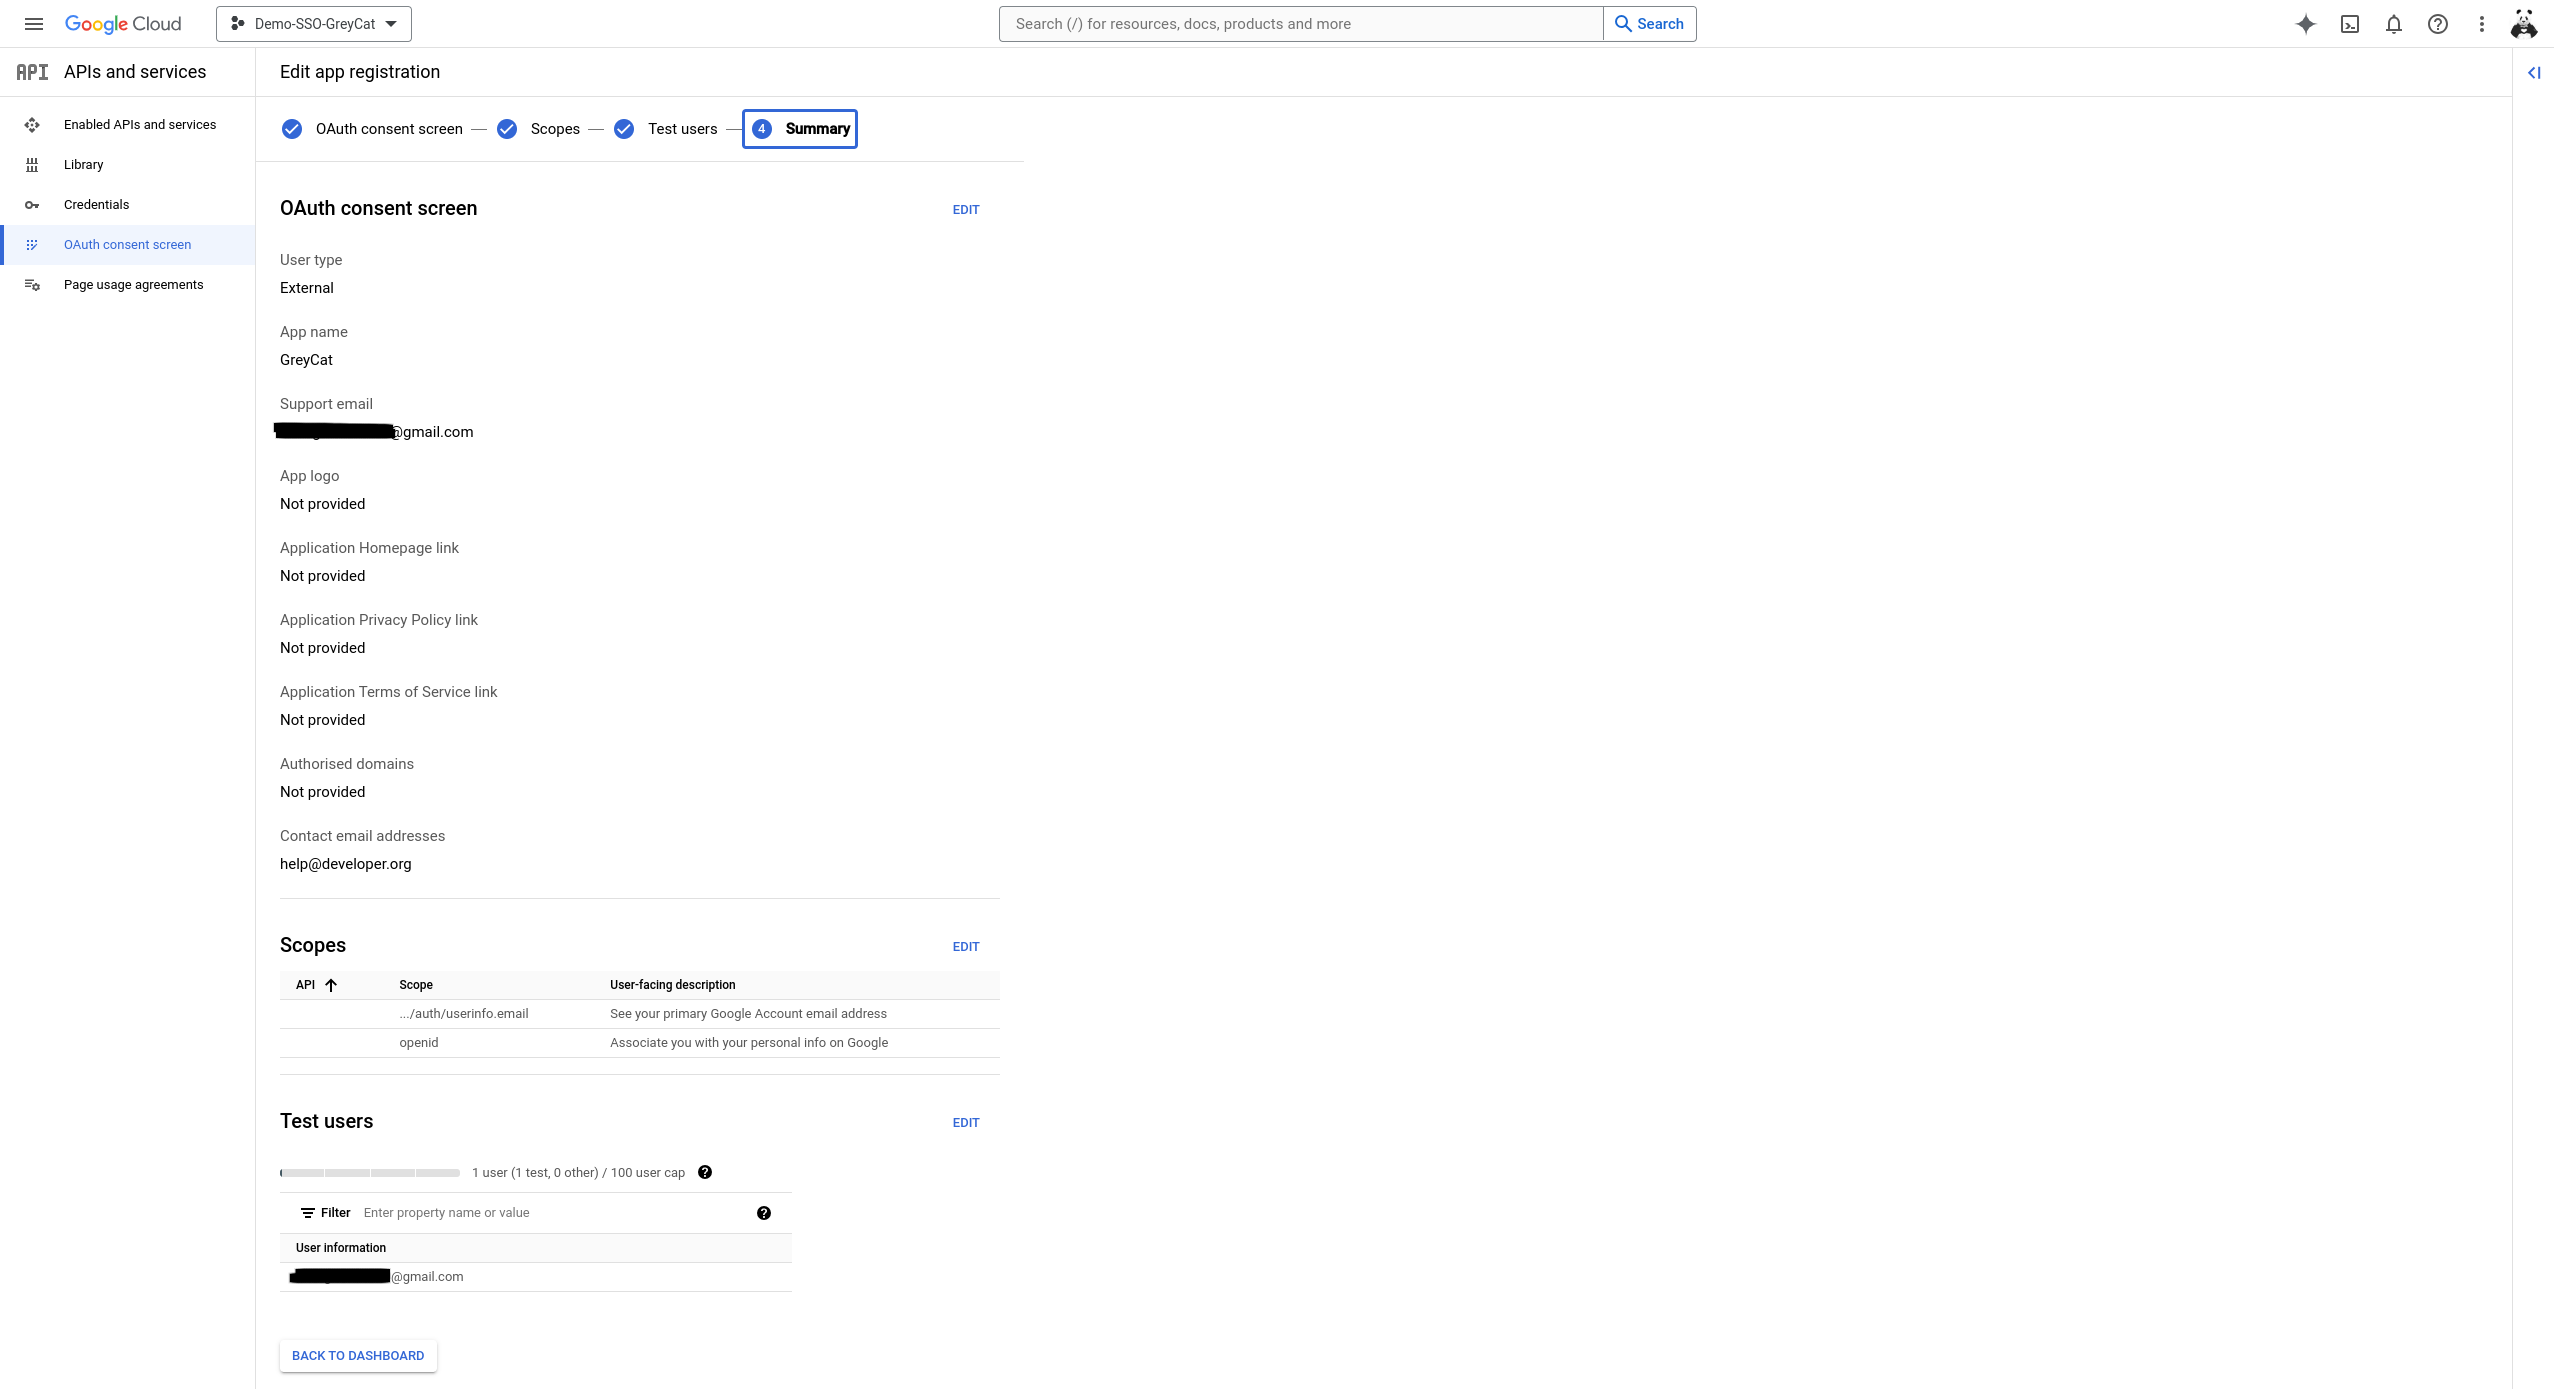
Now you should see the summary page similar to what’s illustrated in this image below. If everything’s fine, click on Back to dashboard and the configuration for the consent page is completed.
Create credentials
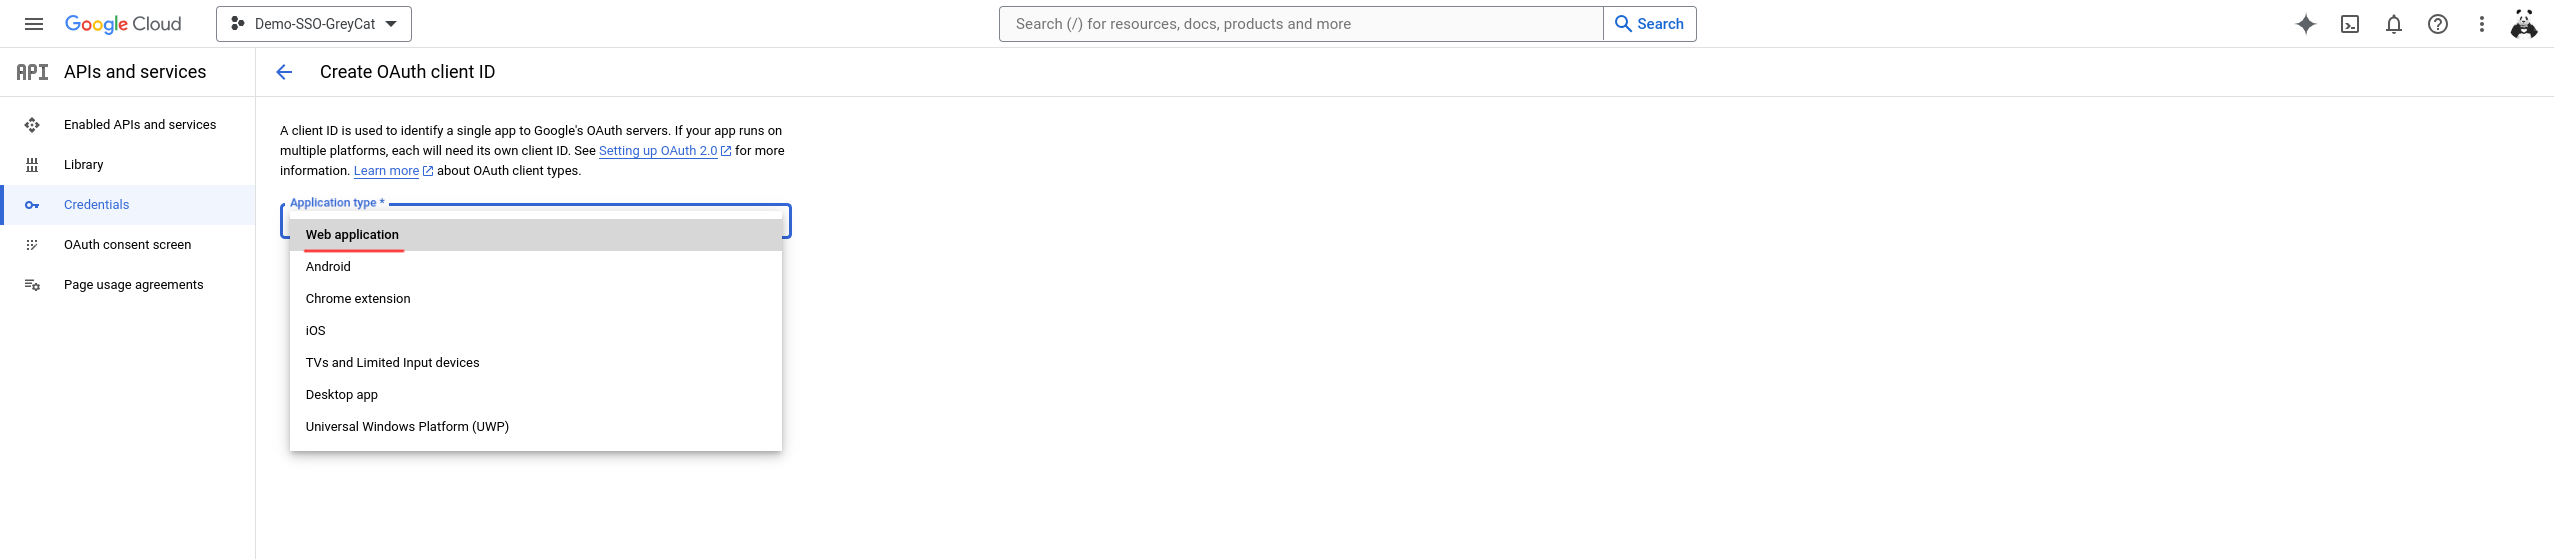
Having the consent page well configured, again, we will navigate to the Credentials panel using the left-side menu. Then, we click on the Create credentials button and select OAuth client ID in the drop-down menu to eventually create the credentials.

Now we need to select the type of application that uses this Google OAuth service. In the case of GreyCat, we need to select Web application.
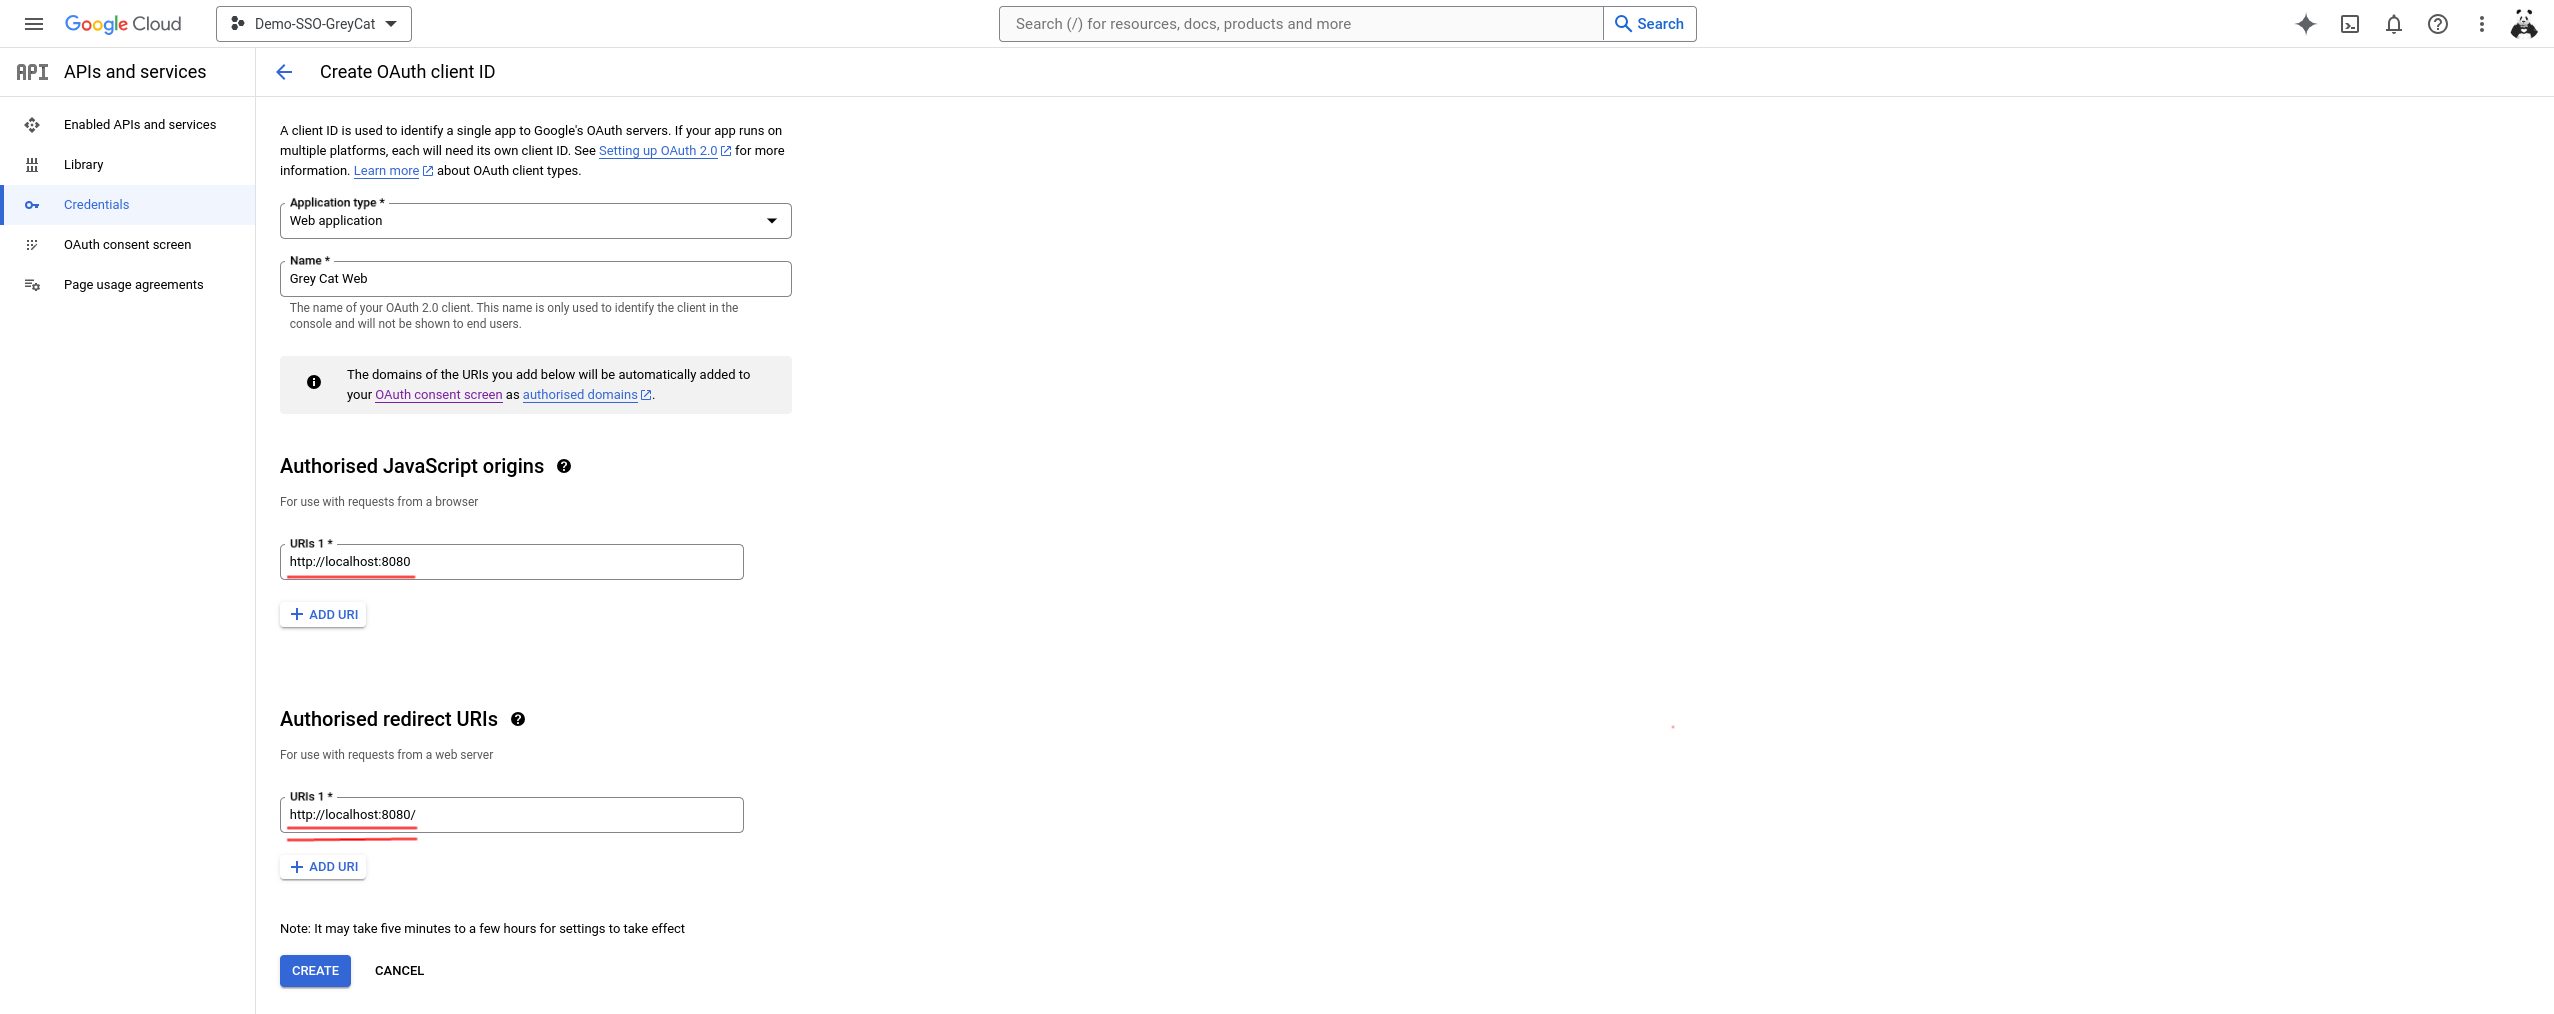
Then, in this following step, you will define more information related to this OAuth service. Of course, you can name the application as you want, make sure the other fields are carefully filled before you click the Create button:
- Application type: Web application
- Authorized JavaScript origins: GreyCat’s host address (By default, http://localhost:8080)
- Authorized redirect URIs: Make sure you have the ‘/’ character appended to GreyCat’s host address, otherwise, you will get a
mismatch_uri_redirectduring authentication. (By default, http://localhost:8080/)
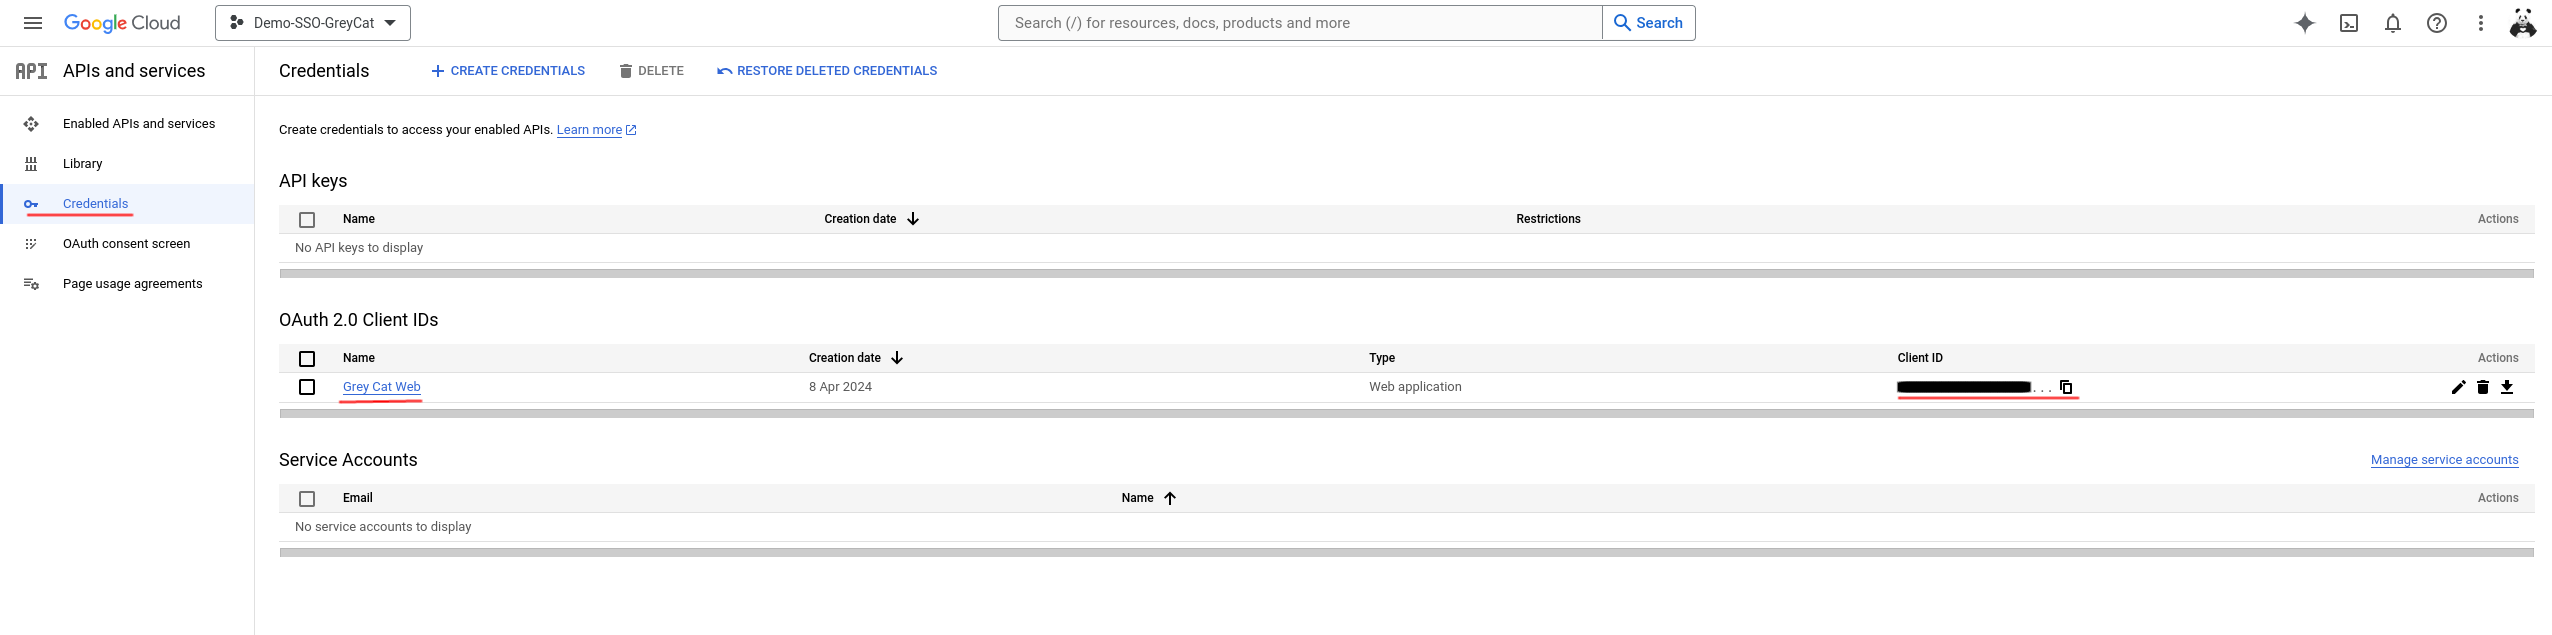
Now, you should have your OAuth service ready to be used. In the popped-out panel, you can see the key information related to your OAuth service. Copy and save the Client ID in a notebook since we will use it immediately.

GreyCat configurations
To check how to pass the configurations using command-line arguments, you can always run greycat serve -h.
To pass the values by environment variables using a .env file, create the file named exactly ".env" at the root directory of your GreyCat project and set the two values as shown below:
GREYCAT_OID_CLIENT_ID=Google_OAuth_Client_ID
GREYCAT_OID_CONFIG_URL=https://accounts.google.com/.well-known/openid-configuration
The value of Google_OAuth_Client_ID is the one that we asked you to save in a notebook earlier. If ever you lost it, go back to Google API and services console, navigate to the Credentials panel using the left side menu. Try to find the OAuth application that you created and copy its Client ID.
Once you created and saved the .env file, you are ready to use the Google SSO service in your GreyCat application. Launch GreyCat by running greycat serve from the root directory of your GreyCat application, then open your browser and go to the host address of your GreyCat application. By default, the address is http://localhost:8080. If everything goes well, you will see a page like this image below.
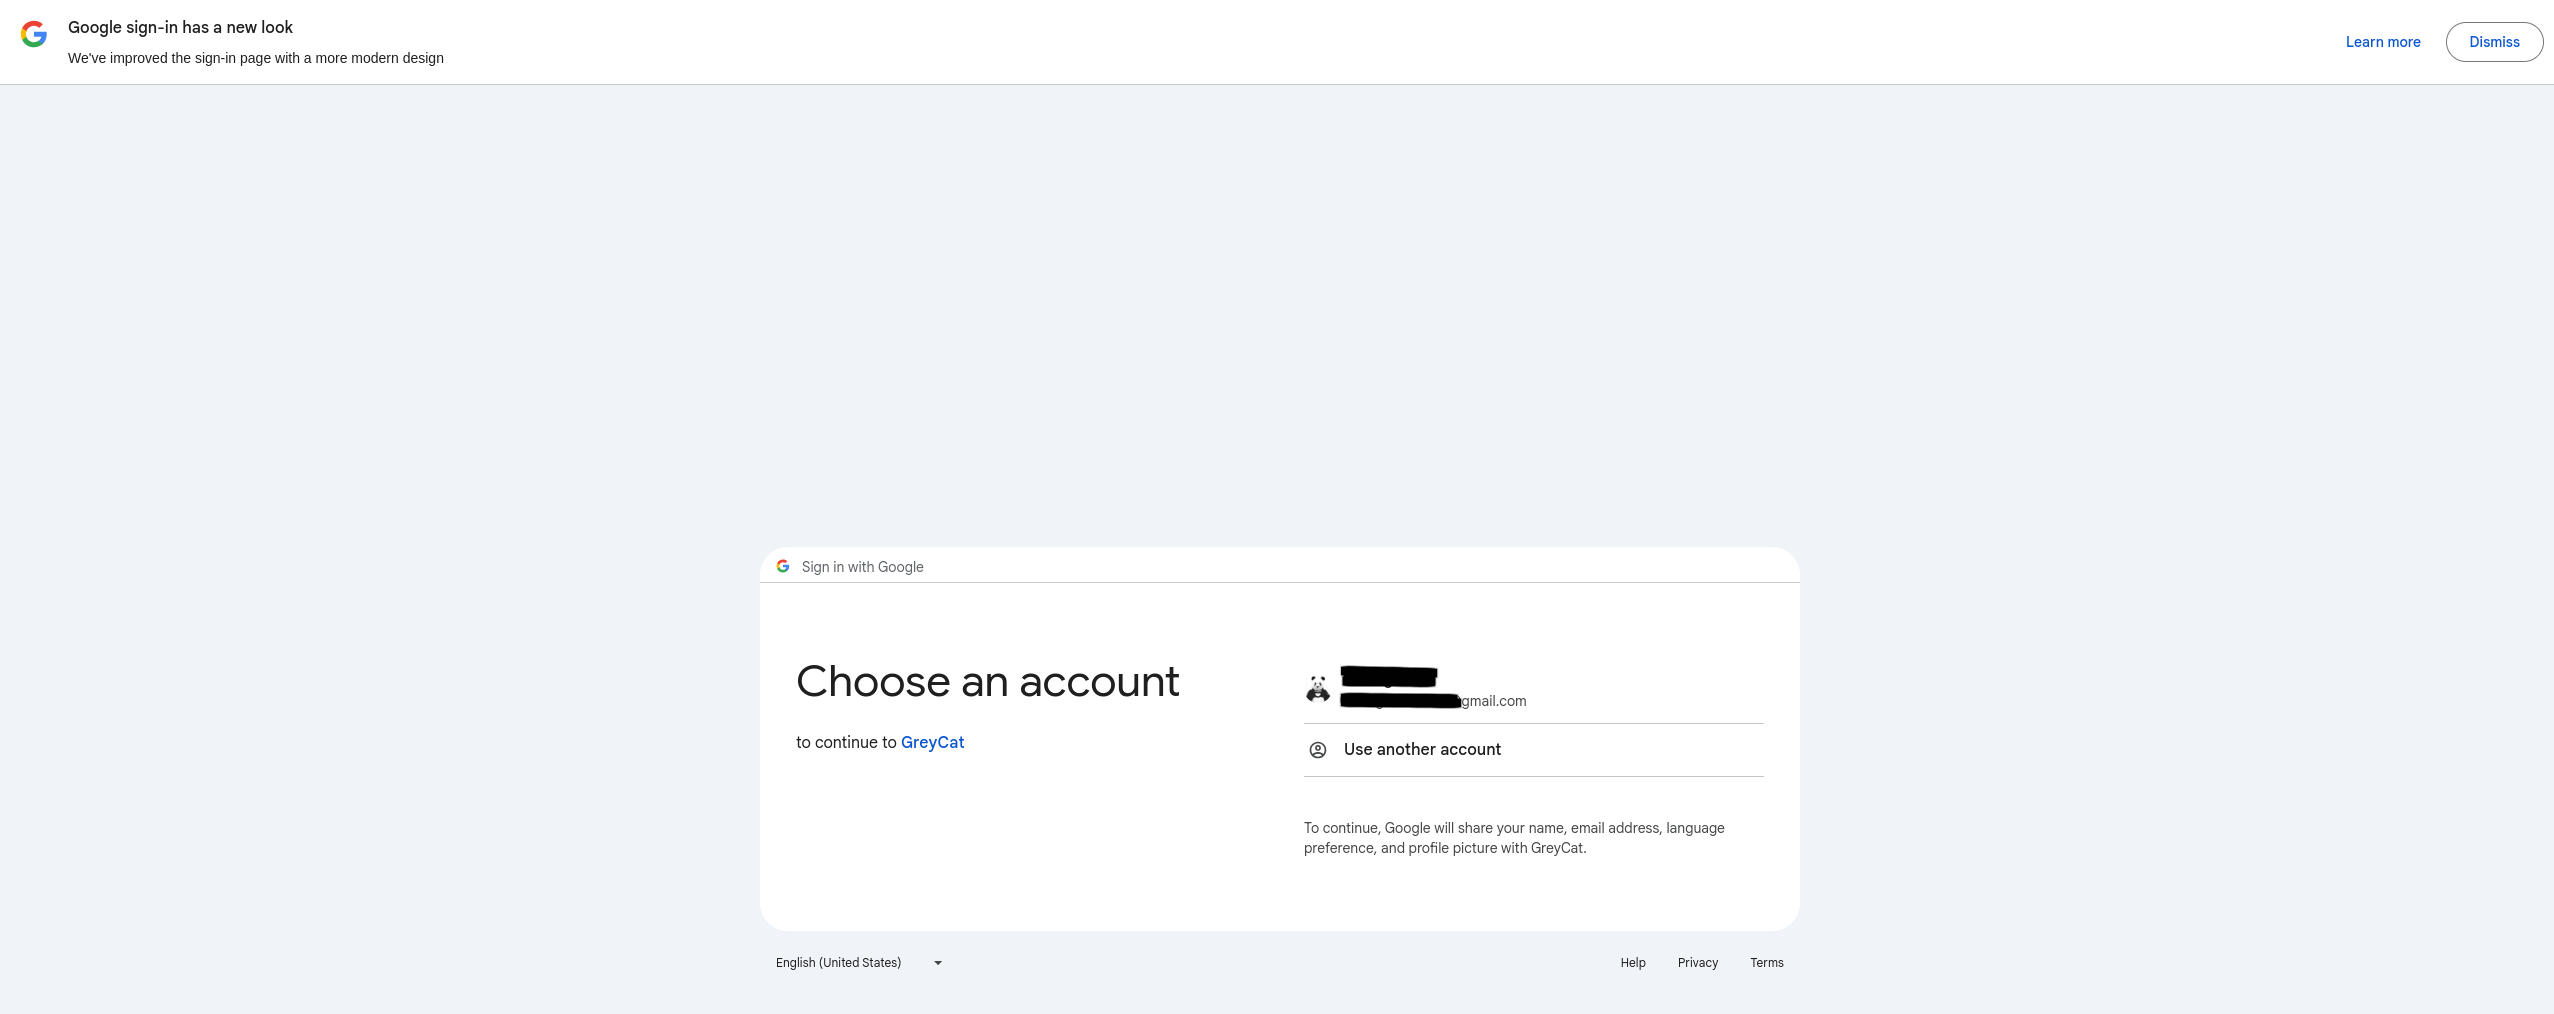
If you saw such a screen, basically, your configuration “works”. But still, you will find out your application falls into an infinite authentication loop which is “normal”. Check the FAQs session to fix it.